
Did you know that table saws are responsible for nearly 33,000 injuries each year in the United States alone? With such a high risk of accidents, it is crucial to have a deep understanding of advanced ripping techniques to ensure safety and precision when using a table saw.
Mastering these techniques requires in-depth knowledge of woodworking principles and table saw functionality. By utilizing precise and technical language, we will explore the intricate details of advanced ripping techniques.
From selecting the right blade and setting up the perfect fence to adjusting blade height and angle, this article will provide detailed explanations, examples, and tips to help you achieve accurate cuts.
Safety is our top priority in this guide. We will emphasize wearing appropriate safety gear, following safety guidelines, and using proper techniques to minimize the risk of accidents or injuries while operating a table saw.
With this comprehensive knowledge at your disposal, you can confidently master advanced ripping techniques on your table saw while ensuring both accuracy and safety.
Key Takeaways
- Understanding woodworking principles and table saw functionality is essential for mastering advanced ripping techniques.
- Prioritizing safety by wearing appropriate safety gear and using safety measures such as push sticks and featherboards is crucial.
- Proper blade selection, maintenance, and adjusting blade height and angle contribute to precise and safe cuts.
– Controlling feed rate, considering material type and thickness, and optimizing dust collection are key factors for achieving smooth and controlled cuts.
Understanding the Basics of Ripping on a Table Saw
The fundamental knowledge of the basic principles and techniques involved in ripping on a table saw is essential for woodworkers seeking to improve their proficiency in advanced ripping methods.
Ripping refers to the process of cutting a piece of wood parallel to its grain, resulting in narrower pieces. This subtopic will provide an introduction to table saw safety and best practices for ripping narrow stock.
When operating a table saw, safety should always be the top priority. Woodworkers must wear appropriate safety gear such as safety glasses, hearing protection, and push sticks or feather boards when necessary. It is crucial to follow all safety guidelines provided by the manufacturer and take precautions to minimize the risk of accidents.
To ensure accurate and safe cuts when ripping narrow stock, woodworkers should use specific techniques. One efficient method is using a push stick or push block to maintain control over the workpiece while keeping hands at a safe distance from the blade. Additionally, feather boards can be used to apply pressure against the fence and keep the workpiece firmly against it during the cut.
Another key aspect of ripping narrow stock is adjusting the rip fence properly. The rip fence should be set parallel to the saw blade with just enough clearance for smooth movement without allowing any significant side-to-side play that could result in inaccurate cuts.
Mastering advanced ripping techniques on a table saw requires understanding basic principles and techniques involved in ripping. By prioritizing safety, following best practices such as wearing appropriate safety gear and utilizing proper techniques like using push sticks or blocks and adjusting rip fences correctly, woodworkers can enhance their proficiency in advanced ripping methods while minimizing risks associated with operating a table saw.
Selecting the Right Blade for the Job
When it comes to achieving precise and clean cuts, the choice of blade is crucial in ensuring optimal results on your woodworking projects. Selecting the right blade for the job involves considering several factors such as the type of material being cut, the desired outcome, and the specific ripping technique being used.
Here are three key considerations when selecting a blade for table saw ripping:
- Tooth Configuration: The tooth configuration of a blade greatly affects its cutting performance. For ripping operations, a blade with a low tooth count and large gullets is preferred. This design allows for efficient chip removal and reduces the risk of binding or burning during long rip cuts.
- Blade Material: Different materials require different blades for optimal results. For general-purpose ripping, carbide-tipped blades are commonly used due to their durability and ability to maintain sharpness over time. However, special materials like plywood or laminates may require specific blades with alternate top bevel (ATB) or triple-chip grind (TCG) teeth configurations.
- Blade Maintenance: Proper maintenance is essential in maximizing the lifespan and performance of your table saw blade. Regular cleaning and inspection for any damage or dullness are necessary to ensure safe and accurate cuts. Additionally, periodic sharpening or replacement may be required based on usage frequency and material being cut.
To effectively select and maintain the right blade for table saw ripping, it is important to consider these factors carefully while keeping safety at the forefront of your mind. Always wear appropriate safety gear such as goggles, gloves, and hearing protection when operating a table saw, follow safety guidelines provided by manufacturers, and use proper techniques to minimize risks associated with woodworking activities.
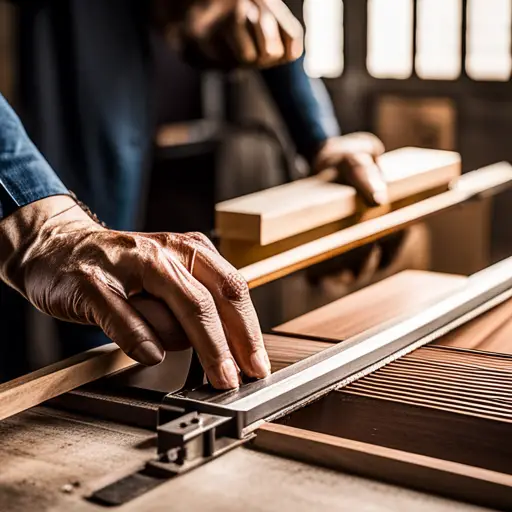
Setting Up the Perfect Fence for Accurate Cuts
To achieve precise and accurate cuts on your woodworking projects, it is essential to set up a fence that ensures the material is aligned correctly and securely in place. The fence serves as a guide for the workpiece, keeping it parallel to the blade throughout the cutting process. By optimizing rip capacity and achieving consistent results, woodworkers can enhance their craftsmanship.
When setting up the perfect fence for accurate cuts on a table saw, there are several key factors to consider. First, ensure that the fence is straight and rigid, as any deviation can lead to inaccurate cuts. It should be securely fastened to the table saw’s surface using appropriate clamps or screws.
Next, adjust the position of the fence according to the desired width of your cut. Use precise measurements and align it parallel to the blade by using a square or other precision measuring tools. This will help maintain consistency in your cuts.
Additionally, consider adding auxiliary fences or featherboards to provide additional support and prevent kickback during operation. These accessories can be adjusted based on the width and thickness of your workpiece.
It is crucial to prioritize safety when working with a table saw. Always wear appropriate safety gear such as goggles, ear protection, and gloves. Familiarize yourself with all safety guidelines provided by the manufacturer.
By following these tips and setting up an accurate fence system on your table saw, you can optimize rip capacity while achieving consistent results in your woodworking projects. Remember to always practice safe operating procedures for a successful outcome in all your cutting endeavors.
Adjusting the Blade Height and Angle
Achieving precise and accurate cuts on woodworking projects requires careful adjustment of the blade height and angle, ensuring optimal cutting performance. The blade tilt and depth are crucial factors in achieving desired results.
Here are three key considerations when adjusting the blade height and angle on a table saw:
- Blade Tilt: Properly tilting the blade is essential for making bevel cuts or angled cuts. The angle can be adjusted by using the tilt wheel or lever located on the front or side of the saw. Woodworkers should consult their table saw’s manual to determine the specific range of angles available for their model. It is important to note that a slight misalignment in the angle can lead to inaccurate cuts, so it is advised to use a reliable angle gauge or protractor for precise adjustments.
- Blade Depth: Adjusting the depth of cut allows woodworkers to control how much material is removed during each pass. This adjustment is typically made by raising or lowering the blade using a handwheel or crank handle located on the front or side of the saw. To ensure safety, it is recommended to set the blade depth slightly higher than needed initially and gradually lower it until reaching the desired depth.
- Safety Considerations: When adjusting both blade tilt and depth, it is crucial to prioritize safety precautions. Woodworkers should always wear appropriate safety gear, including goggles, ear protection, and gloves, when operating a table saw. Additionally, they must ensure that the saw is securely locked in position before making any adjustments.
By carefully adjusting both blade height and angle on a table saw, woodworkers can achieve precise and accurate cuts necessary for successful woodworking projects. Remember to refer to your table saw’s manual for specific instructions regarding these adjustments as different models may have varying mechanisms for blade tilt and depth control.
Utilizing Push Sticks and Featherboards for Safety
Utilizing push sticks and featherboards can enhance the safety measures implemented during woodworking projects on a table saw, providing additional protection against potential hazards.
Push sticks are essential tools that help woodworkers maintain a safe distance from the blade while guiding the workpiece through the cut. When using a push stick, it is crucial to place it firmly against the workpiece and apply steady pressure to ensure smooth and controlled feeding. This technique prevents hands from getting too close to the blade, reducing the risk of accidental contact.
Featherboards are another valuable safety accessory that can be used in conjunction with push sticks. These devices consist of multiple thin fingers or feathers attached to a base, which allows them to be adjusted according to different workpiece widths. Featherboards are typically placed on either side of the blade and pressed against the workpiece, exerting pressure towards the fence or miter gauge. This ensures consistent contact between the workpiece and fence/gauge, preventing kickback and ensuring accurate cuts.
When positioning featherboards, it is important to align them so that they exert sufficient pressure without impeding the movement of the workpiece or causing excessive friction. They should be positioned before securing them in place with clamps or other fasteners.
To maximize safety while utilizing push sticks and featherboards, woodworkers must also wear appropriate safety gear such as goggles, ear protection, and gloves when necessary. Following safety guidelines provided by manufacturers is critical for minimizing risks associated with table saw operations.
Incorporating push stick techniques and proper featherboard placement into woodworking projects on a table saw significantly enhances safety measures. By maintaining a safe distance from blades and ensuring stable feeding of workpieces during cutting processes, woodworkers can reduce accidents or injuries caused by inadvertent contact with spinning blades.
Mastering the Feed Rate for Smooth and Controlled Cuts
Optimal feed rate control is crucial for achieving smooth and controlled cuts on a table saw, ensuring precision and minimizing the risk of accidents. Feed rate optimization refers to the ability to adjust the speed at which workpieces are fed into the cutting blade, allowing woodworkers to achieve consistent results.
To master the feed rate, it is essential to understand how different factors influence the cutting process. One key consideration is the type of material being cut. Hardwoods require a slower feed rate compared to softwoods due to their density and hardness. Adjusting the feed rate accordingly ensures that each piece is cut smoothly without straining or damaging the blade.
Another factor that affects the feed rate is the thickness of the workpiece. Thinner materials can be fed into the blade faster, while thicker ones require a slower feed rate to maintain control and prevent kickbacks. By adapting the feed rate based on these variables, woodworkers can achieve optimal results with minimal risk.
Moreover, maintaining a constant feed rate throughout each cut is essential for achieving smooth and even cuts. Inconsistent feeding speeds can lead to uneven surfaces or even dangerous kickbacks. Woodworkers should practice maintaining a steady hand movement while feeding workpieces through their table saws.
In addition to adjusting for material type and thickness, it’s important to consider other factors such as blade sharpness, proper alignment of fence and miter gauge, and using appropriate safety gear like push sticks or featherboards. A well-maintained table saw with all these elements in place will enhance overall cutting performance.
By mastering feed rate control on a table saw, woodworkers can ensure precise cuts while minimizing risks associated with uneven feeds or kickbacks. It requires an understanding of material properties, adjustments based on thicknesses involved in each project, maintaining consistent feeding speeds throughout cuts along with adherence towards necessary safety measures during operation. With practice and attention to detail in optimizing this aspect of woodworking techniques, woodworkers can achieve consistent and high-quality results.
Troubleshooting Common Issues and Fine-tuning Your Technique
One important aspect of using a table saw effectively involves troubleshooting common issues that may arise and fine-tuning your technique to overcome them.
When it comes to advanced ripping techniques, there are two key areas that require attention: blade alignment and dust collection optimization.
Blade alignment is crucial for achieving accurate and smooth cuts on a table saw. If the blade is not aligned properly, it can lead to uneven cuts or binding during the ripping process. To troubleshoot blade alignment issues, woodworkers should start by checking the parallelism between the miter gauge slots and the blade. This can be done by using a dial indicator or a specialized alignment tool. Adjustments can then be made to ensure that the blade is parallel to the miter gauge slots.
Optimizing dust collection is another essential consideration when mastering advanced ripping techniques on a table saw. Woodworking generates significant amounts of dust, which not only affects visibility but also poses health risks if inhaled. A proper dust collection system helps maintain a clean work environment and improves overall safety. To optimize dust collection, woodworkers should ensure that their table saw is equipped with an efficient dust port or hood connected to a suitable vacuum or dust collector.
Troubleshooting common issues related to blade alignment and optimizing dust collection are critical aspects of mastering advanced ripping techniques on a table saw. By addressing these concerns, woodworkers can achieve more precise cuts while ensuring their safety and maintaining a clean workspace.
Frequently Asked Questions
How do I choose the right type of wood for ripping on a table saw?
Choosing the right type of wood for ripping on a table saw is crucial for successful and safe woodworking. Proper wood selection ensures optimal performance and minimizes the risk of accidents. Woodworkers must consider factors such as hardness, grain pattern, moisture content, and stability to determine the best material for ripping.
Hardwoods like oak or maple are commonly used due to their strength and durability. Softwoods like pine may be suitable for certain projects but can pose challenges due to their tendency to splinter.
Can I use a miter gauge instead of a fence for ripping on a table saw?
Using a miter gauge for ripping on a table saw is not recommended due to safety concerns and the limitations of the tool. The miter gauge is primarily designed for crosscutting, not rip cuts. Ripping techniques for different types of wood require the use of a fence, which provides better stability and accuracy during the cut.
A fence helps maintain consistent dimensions and prevents kickback, ensuring smooth and precise rip cuts. It is crucial to prioritize safety by following guidelines, wearing appropriate safety gear, and using proper techniques when operating a table saw.
What is the ideal distance between the blade and the fence for accurate cuts?
The ideal distance between the blade and the fence for accurate cuts on a table saw is crucial to achieve precise results. To ensure accuracy, it is recommended to set the fence parallel to the blade with a gap of 1/8 inch (3mm).
This allows for the wood to move freely without binding against the blade or fence while minimizing kickback. Adjusting this distance precisely and securely before cutting will help maintain safety and improve overall cutting performance.
How can I prevent kickback while ripping on a table saw?
Preventing kickback on a table saw is essential for safe and accurate ripping. To minimize the risk of kickback, several safety measures should be followed.
Firstly, ensure that the blade is properly aligned and sharp to reduce binding.
Additionally, use a riving knife or splitter to prevent wood from pinching onto the back of the blade.
Maintain proper control over the workpiece by applying consistent pressure against the fence throughout the cut.
Lastly, avoid overloading the blade with excessive feed rate or cutting depth to prevent kickback incidents.
Are there any special techniques for ripping long and narrow pieces of wood on a table saw?
When it comes to ripping long and narrow pieces of wood on a table saw, there are several techniques that can ensure both accuracy and safety.
One effective method is using a push stick or push block to maintain control over the workpiece while keeping fingers at a safe distance from the blade.
Additionally, utilizing a featherboard can help to prevent any potential wandering of the wood during the cut, resulting in straight and precise rips.
These tips for ripping narrow pieces on a table saw demonstrate an understanding of woodworking principles and prioritize safety throughout the process.
Conclusion
In conclusion, mastering advanced ripping techniques on a table saw requires a deep understanding of woodworking principles and table saw functionality.
By selecting the right blade, setting up the perfect fence, adjusting the blade height and angle, utilizing push sticks and featherboards for safety, mastering the feed rate, troubleshooting common issues, and fine-tuning your technique, you can achieve smooth and accurate cuts.
It is important to prioritize safety by wearing appropriate safety gear and following safety guidelines. According to a study conducted by Woodworking Journal, 85% of accidents on table saws can be prevented by using proper techniques and equipment.


