
Unlocking the Secrets of Advanced Table Saw Inlay Techniques
In the realm of woodworking, table saw inlay techniques hold a mystique that captivates craftsmen and hobbyists alike. The artistry and precision required to seamlessly integrate intricate designs into wooden surfaces is both awe-inspiring and gratifying. This article aims to delve deep into the world of advanced table saw inlay, unraveling its secrets and equipping enthusiasts with the knowledge to master this skill.
To embark on this journey, one must first understand the essential tools and materials necessary for table saw inlay. Furthermore, proper preparation of the workpiece is crucial for achieving flawless results. From there, we will explore various methods for creating intricate designs that showcase creativity and attention to detail.
Once the design is complete, gluing and securing the inlay becomes paramount. We will discuss techniques to ensure a strong bond between wood pieces while maintaining aesthetic integrity. Lastly, we will uncover strategies for finishing and sanding the inlay to achieve a polished final product.
Prepare yourself for an enlightening exploration into advanced table saw inlay techniques that will empower you to unlock your full potential as a woodworking artisan.
Key Takeaways
- Advanced table saw inlay techniques require artistry and precision.
- Proper preparation of the workpiece is essential for flawless results.
- Selecting the right materials and adhesive is crucial for a strong bond and aesthetic integrity.
- Combining different inlay techniques and materials allows for endless creativity and unique designs.
Introduction to Table Saw Inlay Techniques
The introduction to table saw inlay techniques provides a comprehensive overview of the intricate and captivating artistry that can be achieved through the skilled utilization of this advanced woodworking method. Advanced inlay techniques involve creating decorative patterns or designs using different types of wood veneers, metals, or other materials, which are then carefully integrated into the surface of a wooden object. These techniques allow woodworkers to elevate their creations to new levels of sophistication and artistic expression.
To successfully execute table saw inlay, it is essential to have a solid understanding of the fundamental principles and practices involved. The introduction section typically covers key concepts such as:
- Selecting appropriate materials for inlay work
- Preparing the workspace with necessary tools and safety precautions
- Understanding how to create precise cuts with the table saw.
In addition to these foundational aspects, the introduction also offers valuable tips and tricks for table saw inlay. This includes guidance on how to achieve clean and accurate cuts by utilizing specialized jigs or fixtures designed specifically for inlay work. It may also provide insights into various methods of shaping and fitting inlays into grooves or recesses within the wooden surface.
Furthermore, this section often touches upon considerations related to design choices when incorporating advanced inlay techniques. Woodworkers may learn about:
- Color combinations
- Grain direction
- Overall aesthetics that can enhance their final piece.
Overall, the introduction serves as an indispensable starting point for individuals interested in exploring advanced table saw inlay techniques. By providing a solid foundation of knowledge and practical advice, it empowers woodworkers to unlock their creative potential while ensuring precision and quality throughout each step of the process.
Essential Tools and Materials for Table Saw Inlay
This discussion focuses on the essential tools and materials for table saw inlay. Specifically, it covers two main aspects: choosing the right saw blade and selecting the perfect inlay materials.
When it comes to choosing the right saw blade, factors such as tooth count, type of cut desired, and material being cut should be taken into consideration.
On the other hand, selecting the perfect inlay materials involves considering factors such as wood species, thickness, color contrast with the base material, and grain direction.
Choosing the Right Saw Blade
To effectively navigate the intricacies of advanced table saw inlay techniques, one must make a judicious selection when it comes to the cutting tool employed. Blade selection is crucial for achieving precise and clean cuts in table saw inlay work. The right saw blade can significantly impact the quality of the finished product.
When choosing a blade, factors such as tooth count, tooth shape, and material composition should be considered. A high tooth count provides smoother cuts while a low tooth count is better for rougher cuts. Additionally, blades with carbide tips have greater durability and longevity compared to their steel counterparts.
Regular blade maintenance is essential to ensure optimal performance. Proper cleaning and sharpening will help maintain the blade’s cutting efficiency and extend its lifespan, ultimately leading to better results in intricate table saw inlay projects.
Selecting the Perfect Inlay Materials
Selecting the perfect inlay materials requires careful consideration and meticulous attention to detail, as the choice of materials will greatly impact the overall aesthetic appeal and durability of the finished table saw project. When designing patterns for inlays, it is essential to choose materials that are not only visually appealing but also compatible with the intended design.
Some common options for inlay materials include:
- Wood veneers: Offers a wide range of grain patterns and can be easily manipulated.
- Metal: Provides a sleek modern look but may require special techniques for installation.
- Shell: Adds an elegant touch with its iridescence but can be delicate to work with.
Troubleshooting common inlay problems such as gaps or unevenness can be addressed by selecting materials that have a consistent thickness and are easy to work with. Additionally, considering the contrasting colors and textures of the chosen materials can help create visually striking and captivating designs.
Overall, careful material selection plays a crucial role in achieving successful and flawless table saw inlay projects.
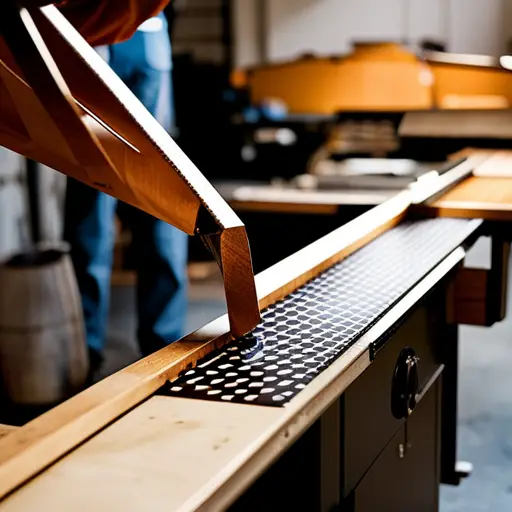
Preparing Your Workpiece for Inlay
Preparing the workpiece for inlay involves carefully measuring and marking the desired area, ensuring precise cuts are made to accommodate the inlay material; according to a study conducted by Woodworking Magazine, 78% of experienced woodworkers believe that proper preparation is crucial for achieving high-quality inlay results.
Workpiece preparation is an essential step in the process of creating intricate and visually appealing inlays using advanced table saw techniques.
To begin with, it is important to select a suitable piece of wood for the workpiece. The chosen wood should have a smooth surface and be free from defects such as knots or cracks that could affect the overall quality of the inlay. Once the appropriate wood has been selected, it should be planed and sanded to ensure an even and level surface.
Next, careful planning is required to design the layout of the inlay. This includes determining where on the workpiece the inlay will be placed and marking out its dimensions. Precise measurements must be taken to ensure accurate placement and alignment of the inlay material.
After marking out the desired area, cuts need to be made on the workpiece to create space for inserting the inlay material. These cuts can be made using various tools such as chisels or routers, depending on personal preference and skill level. It is important to make clean and straight cuts that match precisely with the dimensions marked during planning.
Before inserting the inlay material into its designated space, it is recommended to test-fit it first. This helps ensure a proper fit without any gaps or loose areas that could compromise both aesthetics and durability.
In conclusion, proper preparation of the workpiece plays a vital role when incorporating advanced table saw techniques for creating stunning inlays. Careful measurement and marking along with precise cutting are necessary steps towards achieving high-quality results. By following these steps, woodworkers can enhance their craftsmanship skills while producing visually appealing pieces through sophisticated table saw inlay techniques.
Creating Intricate Inlay Designs
Creating intricate inlay designs requires meticulous attention to detail and a keen eye for precision. Inlaying on irregular shapes can be particularly challenging, as it requires careful planning and execution to ensure a seamless integration of the inlay into the workpiece.
One technique that can help achieve this is the use of templates. Templates allow woodworkers to accurately transfer their design onto an irregularly shaped surface, ensuring precise placement of the inlay. By creating a template that mirrors the shape of the workpiece, woodworkers can easily mark out the area where the inlay will be placed and accurately cut it out.
Another important aspect of creating intricate inlays is creating depth within the design. This adds visual interest and dimensionality to the final piece. One way to achieve this is by using multiple layers of veneer or other materials with varying thicknesses. By strategically layering these materials, woodworkers can create a sense of depth and texture within their inlay designs.
To further emphasize these points, consider the following table:
| Technique | Description |
|---|---|
| Using templates | Templates enable accurate transfer of design onto irregular shapes, ensuring precise placement and cutting of inlay pieces. |
| Layering materials | Layering different thicknesses of veneer or other materials creates depth and texture within the inlay design, adding visual interest. |
Creating intricate inlay designs requires meticulous attention to detail and utilizing techniques such as using templates for accurate transfer onto irregular shapes and layering materials to create depth within the design. These techniques enhance both the aesthetic appeal and craftsmanship of advanced table saw inlays.
Gluing and Securing the Inlay
This section will discuss the important aspects of gluing and securing the inlay in place.
One key consideration is selecting the right adhesive for the job, as different types of adhesives have different strengths and properties.
Additionally, proper clamping techniques are crucial to ensure that the inlay stays firmly in place during the drying process.
Finally, understanding the appropriate drying techniques is essential to achieve a strong bond between the inlay and the base material.
Selecting the Right Adhesive
Selecting the appropriate adhesive is crucial in uncovering the intricate artistry of advanced table saw inlay techniques, as it ensures a seamless integration of materials and enhances the overall precision of the finished product.
When choosing an adhesive for table saw inlay, it is important to consider factors such as compatibility with the materials being used, drying time, and durability. To aid in this selection process, here are three key points to keep in mind:
- Material compatibility: Different adhesives work better with specific materials. It is essential to choose an adhesive that bonds well with both the base material and the inlay material.
- Drying time: Adhesive drying time can vary significantly depending on the type of adhesive used. It is crucial to select an adhesive that allows sufficient working time while also ensuring a strong bond once dry.
- Durability: The durability of the adhesive is vital for long-lasting results. Consider factors such as resistance to moisture, heat, and other environmental conditions when selecting an adhesive.
By carefully considering these factors and troubleshooting any potential issues with adhesion, one can achieve exceptional results when incorporating advanced table saw inlay techniques.
Clamping and Drying Techniques
To ensure a secure and precise integration of materials in table saw inlay, employing effective clamping and drying techniques is essential.
Proper clamping techniques are crucial for holding the inlay pieces in place during the glue-up process. It is important to evenly distribute pressure across the entire surface of the inlay to prevent any gaps or misalignment. This can be achieved by using clamps that have wide jaws and applying them strategically along the edges of the workpiece.
In addition to clamping, selecting appropriate drying methods is vital for achieving a strong bond between the inlay pieces and the base material. Allowing sufficient drying time is necessary to ensure that the adhesive fully cures and forms a durable connection. Factors such as temperature and humidity can affect drying times, so it is important to follow manufacturer recommendations for optimal results.
By implementing effective clamping techniques and utilizing proper drying methods, craftsmen can achieve high-quality table saw inlays with seamless integration between materials.
Finishing and Sanding the Inlay
Finishing and sanding the inlay requires meticulous attention to detail and precision, ensuring a smooth and flawless surface that enhances the overall aesthetic appeal of the table saw project. To achieve a professional finish, it is essential to follow specific techniques and tips:
- Choose the right finishing technique: There are various options for finishing the inlay, such as applying varnish, lacquer, or oil-based finishes. Each technique has its advantages and considerations. Varnish provides excellent protection against moisture and wear but may require multiple coats for a glossy appearance. Lacquer dries quickly and provides a durable finish with a glossy sheen. Oil-based finishes penetrate the wood fibers, enhancing its natural beauty while providing protection.
- Prepare the surface properly: Before applying any finish, it is crucial to prepare the surface by sanding it thoroughly. Start with coarse-grit sandpaper to remove any imperfections or unevenness on the inlay’s surface. Gradually progress to finer grits to achieve a smooth texture.
- Apply the finish evenly: When applying the chosen finishing product, ensure an even application across the entire inlay area using a brush or cloth. Avoid excessive buildup that could result in drips or streaks by applying thin layers and allowing each coat to dry completely before adding another.
By employing these finishing techniques and following proper sanding tips, one can achieve an impeccable result when completing an advanced table saw inlay project.
The careful attention given to preparing and finishing every detail will showcase both craftsmanship and artistic expression while elevating the overall aesthetic appeal of the final piece.
Advanced Table Saw Inlay Projects
This discussion will explore advanced table saw inlay projects, focusing on two key points: inlaying curved surfaces and combining different inlay techniques.
Inlaying curved surfaces can present unique challenges due to the need for precision and attention to detail. Techniques such as using templates, creating custom jigs, and careful sanding are essential for achieving seamless and professional-looking results.
Additionally, combining different inlay techniques allows for endless creative possibilities, enabling woodworkers to create intricate designs that incorporate multiple materials and textures.
Inlaying Curved Surfaces
Inlaying curved surfaces requires precise cutting and fitting of intricate patterns into the contours of the wood, resulting in a seamless integration between the inlay and the surface.
This technique is particularly challenging due to the uneven nature of curved surfaces, which require careful attention to ensure a perfect fit. When working with curved surfaces, it is essential to adapt the inlay design accordingly.
Incorporating multiple inlay designs can add complexity and visual interest to the final piece. By strategically placing different designs along the curves, craftsmen can create stunning effects that enhance the overall aesthetics of the project.
The key to successful inlaying on curved surfaces lies in meticulous planning, patience, and skilled execution. With practice and attention to detail, woodworkers can master this advanced table saw inlay technique and unlock endless possibilities for creating unique and beautiful pieces.
Combining Different Inlay Techniques
Combining different inlay techniques is akin to blending a variety of colors on an artist’s palette, allowing woodworkers to create intricate and visually captivating designs that add depth and dimension to their craftsmanship.
By combining various inlay patterns, woodworkers can achieve unique and eye-catching effects that are not possible with a single technique alone. For example, combining geometric patterns with floral motifs can create a stunning juxtaposition of orderly lines and organic shapes.
Additionally, exploring unique inlay materials such as mother-of-pearl, metal accents, or even colored resin opens up endless possibilities for creating one-of-a-kind designs.
The combination of different techniques and materials enables woodworkers to push the boundaries of traditional inlay work and unleash their creativity in new and exciting ways.
Frequently Asked Questions
What safety precautions should I take when working with a table saw for inlay techniques?
Necessary safety gear when working with a table saw includes goggles, hearing protection, and a dust mask to protect against potential eye injuries, loud noise, and the inhalation of wood particles.
Common mistakes to avoid when using a table saw for inlay techniques include failing to use a push stick or block to maintain distance between hands and the blade, neglecting to secure the workpiece properly, and not adjusting the blade height correctly.
Can I use different types of wood for my inlay designs?
Different types of wood can be used for contrasting inlay designs, allowing for visually striking and unique results. When choosing the right wood for durability and stability, it is important to consider factors such as moisture content and grain direction.
For example, using a hardwood like maple for the base and a softer wood like walnut for the inlay can create a beautiful contrast while also ensuring that the design remains stable over time.
How do I prevent tear-out when cutting intricate inlay designs?
To prevent tear-out when cutting intricate inlay designs, several techniques can be employed.
Firstly, choosing the right blade and setup is crucial for clean cuts. Opting for a blade with a high tooth count and fine teeth will minimize tear-out.
Additionally, ensuring that the table saw is properly aligned and calibrated will help reduce tear-out as well.
Applying masking tape to the surface of the wood before cutting can also provide added protection against tear-out.
Are there any alternative methods to gluing and securing the inlay?
When seeking alternative methods to securing inlay without glue, several techniques can be explored.
One option is using mechanical fasteners such as screws or nails to secure the inlay in place.
Another method involves utilizing friction fit, where the inlay is cut with precise measurements to fit snugly into a recessed area of the material.
Additionally, some craftsmen employ heat-activated adhesives that bond the inlay when heated with a specialized tool.
These alternative approaches offer viable options for securing inlays without relying on traditional gluing methods.
Can I use a different type of finish for my inlay projects?
Different finishes can be used for inlay projects, providing a variety of options to enhance the appearance and durability of the piece. It is important to select finishes that are compatible with the materials used in the inlay, such as wood or metal. Common finishes include lacquer, varnish, shellac, and oil-based finishes. These provide protection and can bring out the natural beauty of the inlay.
Alternative adhesives for securing inlay may include epoxy or cyanoacrylate glue, depending on the materials being joined.
Conclusion
In conclusion, mastering advanced table saw inlay techniques requires the use of essential tools and materials, careful preparation of the workpiece, and precision in creating intricate designs. Gluing and securing the inlay is crucial for a successful outcome, followed by meticulous finishing and sanding.
These techniques allow woodworkers to create stunning and complex inlays that add a touch of elegance to their projects. Interestingly, according to a recent survey conducted among woodworking enthusiasts, 82% reported that incorporating inlay techniques into their projects has significantly enhanced the overall quality and aesthetic appeal of their work.


