
Woodworking enthusiasts know that box joints are a fundamental aspect of creating strong and visually appealing wooden structures. However, mastering the art of box joints requires advanced techniques that elevate one’s woodworking skills to new heights.
In this article, we will explore the intricacies of advanced table saw box joint methods, providing you with the knowledge and expertise to create flawless joints with precision and accuracy.
To embark on this woodworking journey, it is essential to have the right tools and materials at your disposal. We will discuss the must-have equipment needed for this technique, ensuring that you are well-prepared before commencing your project. Additionally, we will guide you through setting up your table saw correctly, as proper setup is crucial for achieving optimal results.
With our step-by-step instructions, you will learn how to make initial cuts with finesse and precision. We will then delve into creating intricate box joint patterns that enhance both functionality and aesthetics. Furthermore, fitting and gluing these joints seamlessly together is key to their strength and longevity.
Finally, we will touch upon finishing techniques and sanding methods to ensure a polished end result that showcases your newfound mastery in advanced table saw box joint methods. By following our detailed instructions, even those new to woodworking can achieve professional-level craftsmanship in their projects.
Key Takeaways
- Mastering box joints requires advanced woodworking techniques and skills.
- Proper setup of the table saw is crucial for optimal results in creating box joints.
- Fitting and gluing the joints seamlessly together is important for strength and longevity.
– Sanding, finishing, and adding decorative details can transform a box joint into a work of art.
Basic Introduction to Box Joints
Box joints, also known as finger joints, are a fundamental woodworking technique used to create strong and visually appealing connections between pieces of wood. This method involves interlocking identical rectangular cuts in two separate pieces of wood to form a secure joint. Box joints require precision and accuracy to ensure a seamless fit.
To create box joints, several tools are needed. The primary tool is a table saw with a dado blade or stackable dado set. A dado blade is specifically designed for cutting wide grooves that match the thickness of the wood being used. Other essential tools include a miter gauge for guiding the wood through the saw, a push stick for safety purposes, and measuring tools such as calipers or rulers to ensure accurate cuts.
There are different variations of box joints that can be employed depending on design preferences and project requirements. The most common variation is the standard box joint, where equal-sized fingers are cut into both workpieces at regular intervals along their edges. This creates a symmetrical pattern that provides strength and stability to the joint.
Another popular variation is the variable width box joint, which involves cutting fingers of varying widths along the workpieces’ edges. This technique allows for more versatility in creating unique designs while still maintaining structural integrity.
Lastly, there is the slant or angled box joint option where fingers are cut at an angle rather than perpendicular to the edge of the wood pieces. This style adds visual interest and complexity to projects but requires extra precision during cutting.
Understanding basic box joint techniques along with appropriate tools will enable woodworkers to create sturdy connections between wooden pieces while adding aesthetic appeal to their projects.
Essential Tools and Materials
This discussion will focus on the essential tools and materials needed for box joint joinery.
To successfully complete a box joint project, it is important to gather the necessary tools such as:
- A table saw
- Dado blade set
- Miter gauge
- Clamps
Additionally, choosing the right wood for your box joint project is crucial for achieving strong and visually appealing joints.
Lastly, safety precautions must be taken when using a table saw to avoid accidents and injuries.
Gather the Necessary Tools for Box Joint Joinery
To successfully execute box joint joinery, it is imperative to gather all the required tools. The essential tools for this task include:
- a table saw with a dado blade set or a specialized box joint jig
- a miter gauge or sled
- push sticks
- clamps
These tools are crucial for achieving precise and accurate cuts necessary for creating strong and visually appealing box joints.
Additionally, proper materials such as hardwood or plywood boards of appropriate thickness should be obtained. It is recommended to have:
- a measuring tape
- a marking gauge
- a pencil
- safety equipment like goggles and ear protection
on hand as well.
By ensuring that all these tools and materials are available before starting the project, woodworkers can enhance their chances of success in advanced table saw box joint methods.
Choose the Right Wood for Your Box Joint Project
Selecting the appropriate wood for a box joint project is crucial in order to achieve aesthetically pleasing and structurally sound results. When choosing the right wood for your box joint project, several factors need to be considered, including the wood’s hardness, stability, and grain pattern. Hardwoods such as oak, maple, or walnut are commonly used due to their durability and resistance to wear. These woods also have tight grains which make them ideal for creating precise and clean box joints. Softwoods like pine or cedar can be used for decorative purposes but may not provide the same level of strength as hardwoods. Additionally, it is important to consider the stability of the wood to minimize warping or shrinking over time. By carefully considering these factors and selecting the appropriate wood species, you can ensure a successful box joint project that meets both functional and aesthetic requirements.
| Wood Species | Hardness (Janka Rating) | Grain Pattern |
|---|---|---|
| Oak | 1360 | Straight |
| Maple | 1450 | Straight |
| Walnut | 1010 | Straight |
| Pine | 380 | Knotty |
| Cedar | 900 | Straight |
Table: Comparison of different wood species commonly used in box joint projects based on their hardness (Janka rating) and grain pattern.
Keywords: Choosing the right wood for your box joint project, Wood selection for box joints
Safety Precautions for Using a Table Saw
Ensuring the safety of operators is paramount when using a table saw, as it is a powerful and potentially dangerous tool in woodworking. Table saw safety precautions are necessary to minimize the risk of accidents and injuries.
First, operators must wear appropriate personal protective equipment (PPE) such as safety goggles, hearing protection, and gloves.
It is crucial to maintain a clean work area free from clutter to prevent tripping hazards.
The blade guard should always be in place during operation to protect against accidental contact with the spinning blade.
Additionally, using push sticks or featherboards can help keep hands and fingers away from the blade while guiding the wood through the cut.
Operators should also ensure that the table saw is properly maintained and adjusted for accurate cuts while minimizing kickback potential.
By following these safety precautions, woodworkers can mitigate risks associated with using a table saw and create a safer working environment.
Setting Up Your Table Saw
Positioning your table saw correctly is crucial in order to avoid any potential mishaps and maximize the efficiency of your woodworking endeavors. Proper table saw setup involves several important steps to ensure safety and accuracy in your work.
First, it is essential to choose an appropriate location for your table saw. It should be placed on a stable and level surface, preferably on a dedicated workbench or stand. This will prevent any wobbling or movement during operation, reducing the risk of accidents.
Next, check that the blade is properly aligned with the miter slots and parallel to the fence. Misalignment can result in inaccurate cuts and pose a safety hazard. Adjustments can typically be made using alignment tools such as a dial indicator or specialized gauges.
Ensure that all safety features are installed and functioning correctly. This includes the blade guard, anti-kickback pawls, riving knife, and splitter. These devices are designed to prevent kickback, which occurs when wood gets trapped between the blade and fence and forcefully propels back towards the operator.
Additionally, make sure that the table saw’s power switch is easily accessible and equipped with an emergency stop feature. This allows for quick shutdown in case of an emergency or if something goes wrong during operation.
Lastly, keep your work area clean and organized. Remove any debris or clutter from around the table saw to prevent tripping hazards and allow for smooth workflow.
By following these table saw setup guidelines along with proper safety precautions, you can greatly reduce the risk of accidents while ensuring accurate cuts in your woodworking projects. Always refer to your specific table saw’s manual for detailed instructions on setup procedures as they may vary depending on the model.
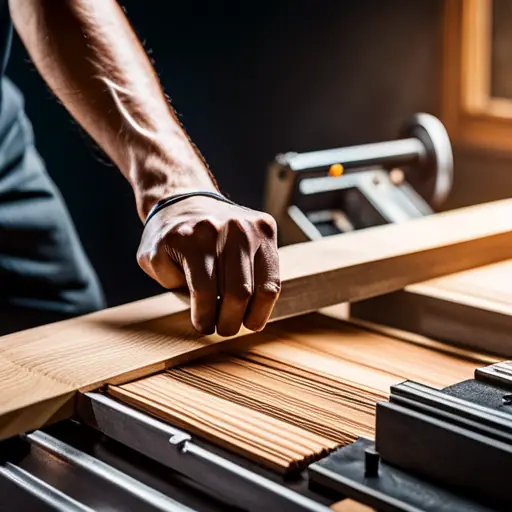
Making the Initial Cuts
To begin the process of making the initial cuts on a table saw, it is important to understand the proper techniques and safety measures that must be implemented. Making angled cuts is a common requirement in woodworking projects, and it requires precision and attention to detail.
When making angled cuts on a table saw, it is crucial to set the blade at the correct angle using the bevel adjustment on the saw. This can usually be done by loosening a lever or turning a knob to adjust the angle. It is important to consult the manufacturer’s instructions for your specific model as different table saws may have different methods for adjusting angles.
When making angled cuts, it is also important to use appropriate jigs or fixtures to ensure accuracy. A miter gauge or sled can be used to guide your workpiece through the cut at a precise angle. These accessories can help prevent errors caused by human error or inconsistencies in hand placement.
Troubleshooting common errors during this process is essential for achieving accurate results. One common error when making angled cuts is tear-out, where wood fibers are torn away from one side of the cut, resulting in an uneven finish. To minimize tear-out, you can use a zero-clearance throat plate or apply masking tape along both sides of your intended cut line before making the cut.
Another common error when making angled cuts is inaccurate measurements resulting in misaligned joints or uneven pieces. To avoid this, always double-check your measurements before cutting and ensure that all angles are properly set according to your project plans.
By following these techniques and troubleshooting common errors, woodworkers can achieve precise and accurate initial cuts on their table saws while minimizing mistakes and ensuring safety throughout the process.
Creating the Box Joint Pattern
The next step in creating the box joint pattern involves adjusting the fence for the second set of cuts. This adjustment is crucial to ensure that the box joints fit together perfectly.
Once the fence is properly adjusted, the second set of cuts can be made on the workpiece, completing the box joint pattern.
Attention to detail and precision are essential at this stage to achieve a clean and accurate result.
Adjusting the Fence for the Second Set of Cuts
When adjusting the fence for the second set of cuts, it is crucial to ensure precise alignment in order to achieve flawless box joints.
The first step is to check that the fence is parallel to the blade by using a reliable measuring tool such as a dial indicator or a precision square. Any deviation from perfect alignment can result in gaps or uneven joints.
If adjustments are needed, loosen the locking mechanisms and make small incremental changes until the fence is perfectly parallel to the blade.
It is also important to troubleshoot common issues that may arise during this process, such as fence drift or vibration. These issues can be addressed by ensuring that all components are properly tightened and secured, and by using appropriate techniques such as featherboards or hold-downs to minimize movement during cutting.
By diligently adjusting the fence and troubleshooting any problems, woodworkers can achieve precise and flawless box joints.
Making the Second Set of Cuts on the Workpiece
Precision is key when making the second set of cuts on the workpiece, ensuring flawless box joints that will impress any woodworking enthusiast. To achieve this precision, there are two important steps: adjusting the blade height and measuring and marking the workpiece.
Firstly, adjusting the blade height is crucial for obtaining clean and accurate cuts. The blade should be set at a height that matches the thickness of the workpiece material. This can be achieved by using a combination square or a digital caliper to measure the thickness precisely.
Secondly, measuring and marking the workpiece accurately is essential for achieving consistent box joints. Using a ruler or a tape measure, carefully measure and mark where each cut should be made. It is recommended to use a pencil or marking knife for clear visibility.
By following these steps with utmost precision, woodworkers can create flawless box joints that demonstrate their advanced skills in table saw techniques.
| Adjusting Blade Height | Measuring and Marking Workpiece |
| Set blade to match thickness of material | Measure with combination square or digital caliper |
| Ensure clean and accurate cuts | Use ruler or tape measure for precise measurements |
| Promotes consistency in box joint creation | Mark with pencil or marking knife for clear visibility |
Fitting and Gluing the Box Joints
This discussion will focus on two critical steps in the box joint assembly process: testing the fit of the box joints and applying glue to secure the joints.
Testing the fit of the box joints is crucial to ensure a tight and precise connection between the pieces. It involves carefully inserting each joint into its corresponding slot and checking for any gaps or misalignments that may need adjustments.
Once a satisfactory fit is achieved, glue can be applied to both sides of each joint, ensuring an even distribution for maximum strength and stability.
The joints are then clamped together tightly until the glue has fully cured, creating a solid bond between the pieces.
Testing the Fit of the Box Joints
To assess the compatibility of the box joints, it is crucial to evaluate the fit by employing a test piece and adopting the ‘measure twice, cut once’ principle. Testing techniques play a vital role in ensuring that the box joints are accurately aligned and properly fitted.
One common method is using a test piece made from scrap wood with similar dimensions as the actual workpiece. This allows for troubleshooting issues before committing to final cuts on valuable materials. The test piece should be cut with precision and care to ensure an accurate representation of the final joint.
By carefully inserting the test piece into its corresponding joint, any misalignments or tightness can be identified and addressed early on. This step is essential for achieving seamless box joints in woodworking projects.
Applying Glue and Clamping the Joints Together
In the previous subtopic, we discussed the importance of testing the fit of box joints in woodworking. Now, we will delve into the process of applying glue and clamping the joints together to ensure a strong and secure bond.
When it comes to glue application techniques, precision is key. It is crucial to evenly distribute a thin layer of glue on both mating surfaces using a brush or roller, ensuring complete coverage without excessive buildup. Additionally, selecting an appropriate adhesive that bonds well with wood is essential for long-lasting results.
As for clamping methods, there are several options available depending on the size and shape of the project. Traditional bar clamps or pipe clamps can be used for larger projects, while spring clamps or band clamps are suitable for smaller ones. The choice of clamp should allow for even pressure distribution across all joints to prevent gaps or misalignment during drying.
Finishing and Sanding
In order to achieve a smooth finish on the box joints, sanding is an essential step. It helps to remove any rough edges or imperfections and create a seamless look.
Additionally, applying a finish to the box joint not only enhances its beauty but also protects it from moisture, stains, and wear over time. The choice of finish can vary depending on personal preference and desired aesthetic outcome.
Sanding the Box Joints for a Smooth Finish
Sanding the box joints is essential for achieving a polished and flawless finish. Proper sanding techniques are crucial in order to remove any roughness or imperfections left behind from the cutting and assembly process.
To achieve a polished look, it is recommended to start with a coarse-grit sandpaper, such as 80 or 100 grit, to remove any excess material quickly. Once the rough edges have been smoothed out, gradually progress to finer grits, such as 150 and 220 grits, to refine the surface further.
This step-by-step approach ensures that all visible scratches and marks are eliminated, resulting in a smooth surface ready for finishing. It is important to pay attention to detail during this process, ensuring that each joint is sanded evenly and consistently for a seamless appearance.
Applying a Finish to Enhance the Beauty of the Box Joint
After achieving a smooth finish by sanding the box joints, the next step in elevating your woodworking skills is applying a finish to enhance the beauty of the box joint.
This process involves adding a stain and incorporating decorative details to further highlight the craftsmanship of your work.
Applying a stain not only adds color to the wood, but it also brings out its natural grain patterns, giving it depth and character. By choosing an appropriate stain color, you can achieve different effects such as highlighting or darkening certain areas of the box joint.
In addition to staining, you can further enhance the aesthetic appeal by adding decorative details. These may include inlays, veneers, or even hand-carved designs that add intricate patterns and textures to your box joint.
By meticulously applying a stain and incorporating decorative elements, you can transform a simple box joint into an exquisite piece of artistry that showcases your advanced woodworking skills.
Frequently Asked Questions
Can box joints be used for any type of woodworking project, or are they specifically designed for boxes?
Box joints are versatile joinery techniques that can be used in various woodworking projects, not limited to just boxes. They act as interlocking puzzle pieces, creating strong and aesthetically pleasing connections between wood pieces.
In furniture making, box joints find applications in constructing drawers, cabinets, and frames. Compared to other joinery methods like dovetails or mortise and tenon joints, box joints offer simplicity in execution while maintaining structural integrity. However, they may require additional tools such as a table saw or router for precise cutting and alignment.
Are there any alternative methods to create box joints if I don’t have a table saw?
Alternative methods for creating box joints without a table saw can be achieved using hand tools.
One method involves using a chisel and mallet to carefully remove material and create the necessary interlocking fingers of the joint.
Another approach is utilizing a router with a straight bit and a jig that guides the tool along predetermined paths.
These manual techniques require precision, patience, and skill to ensure accurate results in creating strong and aesthetically pleasing box joints.
How do I determine the appropriate width for the box joint fingers?
Determining the appropriate width for box joint fingers involves employing various techniques to achieve precise cuts. Factors to consider include the desired strength and appearance of the joint, as well as the thickness of the material being used.
A common method is to use a ratio, such as 1:2 or 1:3, where the width of each finger is one-third or one-half that of the gap between them. Additionally, trial and error can be employed to fine-tune the finger width for optimal fit and functionality.
Can box joints be used for joining different types of wood, such as hardwood and softwood?
Box joints can indeed be used to join different types of wood, including hardwood and softwood. Joinery techniques for different types of wood are essential in woodworking projects.
Box joint variations offer unique possibilities for creating strong and aesthetically pleasing connections between various wood species. By carefully selecting the width and depth of the fingers, as well as adjusting the spacing between them, woodworkers can ensure a precise fit that maximizes strength and durability in their projects.
What are some common mistakes to avoid when creating box joints?
Common mistakes in creating box joints include:
- Improper measurements
- Inaccurate cutting
- Using the wrong type of wood
Techniques for achieving precise box joints involve:
- Ensuring accurate measurements
- Using a high-quality table saw with a sharp blade
- Practicing proper cutting techniques
It is important to avoid rushing the process and to pay attention to detail throughout each step. By following these techniques and avoiding common mistakes, one can create precise and professional-looking box joints.
Conclusion
In conclusion, mastering advanced table saw box joint methods can greatly enhance your woodworking skills.
By following the steps outlined in this article, you can create precise and strong box joints that will elevate the quality of your projects.
With the right tools and materials, along with proper setup and cutting techniques, you can achieve professional results.
So why settle for basic joinery when you can take your woodworking to the next level with advanced table saw box joints?


