
Woodworking is an art form that requires precision, skill, and a keen eye for detail. Like a sculptor shaping their masterpiece, the woodworker manipulates raw material to create functional and aesthetically pleasing pieces. To truly elevate your woodworking skills and add a touch of finesse to your creations, mastering taper cuts on a table saw is essential.
Taper cuts are like the brushstrokes of woodworking, allowing you to shape and contour wood with accuracy and control. With this technique, you can create elegant furniture legs, tapered edges on tabletops, or even intricate designs on cabinet doors. However, achieving perfect taper cuts requires not only knowledge but also proper setup and execution.
In this article, we will delve into the world of taper cuts on a table saw. We will explore the step-by-step process of making taper cuts, provide tips for achieving flawless results, discuss creative applications of this technique in woodworking projects, troubleshoot common issues that may arise during the process, and offer guidance on how to practice and refine your taper cutting skills.
By understanding and mastering taper cuts on a table saw, you will unlock endless possibilities in your woodworking journey. Let’s embark together on this exciting exploration of precision craftsmanship!
Key Takeaways
- Taper cuts can be used to shape and contour wood with precision and control.
- Proper setup and execution, including securing the workpiece and using a tapering jig, are essential for achieving perfect taper cuts.
- Choosing the right blade for taper cuts, considering factors such as tooth count and blade material, is important for achieving precise and clean cuts.
- Maintaining control and stability during taper cuts, through proper body positioning, weight distribution, and smooth movements, is crucial for accuracy.
Understanding Taper Cuts on a Table Saw
The process of understanding taper cuts on a table saw involves acquiring knowledge and skills to effectively manipulate the angle and position of the workpiece in order to achieve precise and accurate results.
When making taper cuts on a table saw, there are common mistakes that should be avoided. One such mistake is failing to properly secure the workpiece, which can lead to inaccurate cuts or even accidents. It is crucial to use clamps or other appropriate methods to ensure that the workpiece remains stable during the cutting process.
Another common mistake is relying solely on the fence for guiding the workpiece. While the fence is an important tool for maintaining a straight cut, it may not be suitable for creating tapered cuts. Therefore, it is essential to explore alternative methods for achieving taper cuts in woodworking. One option is using a tapering jig, which allows for precise angle adjustments and ensures consistent results.
Additionally, it is important to consider safety precautions when working with a table saw. Wearing protective gear such as goggles and gloves can help prevent injuries from flying debris or accidental contact with the blade. It is also advisable to maintain a clean workspace by removing any obstructions or clutter that could interfere with the cutting process.
Understanding taper cuts on a table saw requires knowledge of proper techniques and precautions. By avoiding common mistakes and exploring alternative methods like using a tapering jig, woodworkers can elevate their skills and achieve accurate and precise taper cuts in their projects.
Setting Up Your Table Saw for Taper Cuts
This discussion will focus on two key points for setting up your table saw for taper cuts: adjusting the blade angle and using a tapering jig for precision.
Adjusting the blade angle is crucial in achieving the desired taper, as it determines the slope of the cut. A slight adjustment can make a significant difference in the final outcome of the taper cut.
Additionally, using a tapering jig ensures precise and consistent cuts by providing support and guiding the workpiece at a specific angle throughout the cutting process.
Adjusting the Blade Angle
Adjusting the blade angle on a table saw allows for precise and controlled taper cuts, enhancing woodworking skills by enabling the craftsman to achieve desired angles and shapes.
Blade angle adjustment is a crucial step in setting up a table saw for taper cuts. By tilting the blade, woodworkers can create tapered edges or make bevel cuts with precision.
There are various techniques used to adjust the blade angle on a table saw, depending on the specific model being used. Some table saws have a dedicated tilt mechanism that allows for easy adjustments, while others require manual adjustments using tools such as wrenches or hex keys.
It is essential to follow manufacturer guidelines when adjusting the blade angle to ensure safety and accuracy in achieving desired taper cuts.
Properly adjusting the blade angle on a table saw is an important skill that all woodworkers should master to elevate their woodworking abilities and produce high-quality pieces.
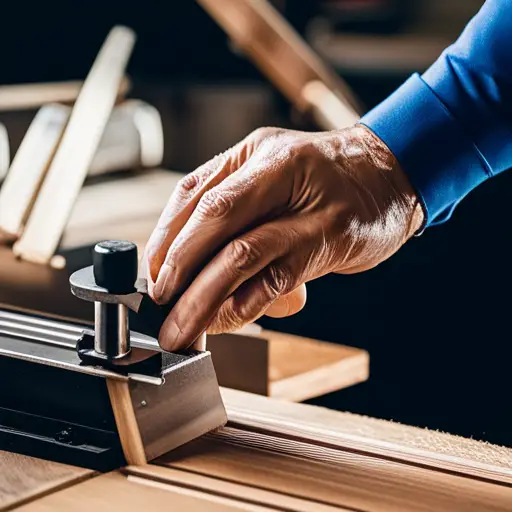
Using a Tapering Jig for Precision
Utilizing a tapering jig on a table saw enhances precision in achieving desired angles and shapes for woodworking projects. A tapering jig is a valuable tool that allows woodworkers to make accurate tapered cuts, which are essential in creating various advanced woodworking techniques. One of the main advantages of using a tapering jig is its ability to provide consistent results, ensuring that each cut is identical and precise.
A tapering jig typically consists of a fence and a guide rail, which work together to secure the workpiece and control its movement during cutting. The fence ensures that the workpiece remains perpendicular to the blade, while the guide rail enables controlled and smooth movement along the table saw’s surface.
To further enhance precision, woodworkers can utilize an adjustable stop block integrated into some tapering jigs. This feature allows for repetitive cuts at specific angles or lengths, eliminating the need for manual measurements with each cut.
Overall, incorporating a tapering jig into woodworking practices elevates precision and opens up possibilities for advanced techniques in shaping woodwork projects with utmost accuracy.
Step-by-Step Guide to Making Taper Cuts
To master the art of taper cuts on a table saw, one must carefully follow a step-by-step guide that outlines the precise techniques required to achieve accurate and professional results. When it comes to making taper cuts, using a tapering jig is essential for ensuring precision and consistency in your work.
The first step in making taper cuts is setting up the tapering jig. Start by adjusting the angle of the jig according to the desired degree of taper. This can be done by loosening the angle adjustment knob and sliding the fence until you reach the desired angle measurement on the scale. Once set, tighten the knob to secure the fence in place.
Next, position your workpiece against the fence of the jig, making sure it is securely held in place. Use clamps or other appropriate methods to ensure stability throughout the cutting process.
Before proceeding with cutting, it’s crucial to double-check that everything is properly aligned and secured. Ensure that both ends of your workpiece are supported and that there is enough clearance for smooth movement along with the table saw’s surface.
With all preparations complete, it’s time to begin making your tapered cut. Turn on the table saw and gently feed your workpiece into the blade at a steady pace, keeping firm control throughout. It’s important to maintain an even pressure against both sides of your workpiece while guiding it through for consistent results.
By following this step-by-step guide and utilizing a well-adjusted tapering jig, you can achieve accurate and professional-looking taper cuts on a table saw every time. Practice these techniques with caution and patience to elevate your woodworking skills effectively.
Tips for Achieving Perfect Taper Cuts
This paragraph will discuss key points for achieving perfect taper cuts, including choosing the right blade, maintaining control, and stability.
When it comes to choosing the right blade for taper cuts, it is important to consider factors such as tooth count, rake angle, and kerf width. These features can greatly impact the quality of the cut and ensure a smooth and accurate taper.
Additionally, maintaining control and stability while making taper cuts is crucial for achieving precise results. This can be achieved by using a push block or featherboard to guide the workpiece through the cut and prevent any unwanted movement or kickback.
Choosing the Right Blade
Selecting the appropriate blade for a table saw is crucial in order to achieve precise and clean taper cuts in woodworking. Blade selection plays a significant role in determining the quality of the finished product as well as the safety of the operator.
When choosing a blade for taper cuts, there are several factors to consider:
- Tooth count: Blades with a higher tooth count produce smoother cuts, while blades with fewer teeth remove material more quickly.
- Blade material: Carbide-tipped blades are known for their durability and ability to stay sharp for longer periods.
- Kerf width: A narrow kerf width reduces waste and provides greater accuracy.
- Blade diameter: Smaller blades are suitable for delicate projects, while larger blades can handle thicker materials.
- Safety precautions: It is essential to select a blade that matches the power and speed capabilities of your table saw, ensuring safe operation.
By carefully considering these factors, woodworkers can choose the right blade that guarantees optimal results while prioritizing safety.
Maintaining Control and Stability
To further enhance your woodworking skills, it is crucial to maintain control and stability while executing taper cuts on a table saw. This ensures precision and accuracy in your work.
Maintaining balance during the cutting process is essential to prevent any mishaps or accidents that may compromise the quality of the final product. One way to achieve this is by using proper body positioning and foot placement.
Distributing your weight evenly and maintaining a firm grip on the workpiece will help you stay in control throughout the cut. Additionally, improving your technique can significantly contribute to maintaining stability.
Practicing smooth and consistent movements, along with applying appropriate pressure on the workpiece, will result in cleaner cuts with minimal tear-out or rough edges. By implementing these strategies, you can elevate your woodworking skills and produce impeccable taper cuts consistently.
Creative Applications of Taper Cuts in Woodworking
This discussion will explore the creative applications of taper cuts in woodworking. Specifically, it will focus on two main areas: adding flair to furniture design and creating unique joinery techniques.
Taper cuts can be used to add visual interest and elegance to furniture pieces. One way to achieve this is by incorporating tapered legs, which can give a piece a more modern and sleek look. Tapered edges can also be used to create a sense of lightness and movement in a design.
In addition to enhancing the aesthetics of furniture, taper cuts can also be utilized to create intricate and innovative joinery methods. By carefully tapering the edges of two pieces of wood that are meant to be joined together, a stronger and more visually appealing connection can be achieved. This can be particularly useful when working with delicate or thin pieces of wood that may be prone to splitting or breaking.
Overall, taper cuts offer a versatile and creative way to enhance the structural integrity and aesthetic appeal of woodworking projects. Whether it’s adding flair to furniture design or creating unique joinery techniques, taper cuts can be a valuable tool in the woodworker’s arsenal.
Adding Flair to Furniture Design
Adding flair to furniture design involves incorporating unique and eye-catching elements that enhance the overall aesthetic appeal, captivating viewers with intricate details and visually striking features. In woodworking, adding flair can be achieved through various techniques and design choices. Here are three ways to enhance furniture design:
- Ornate carvings: Intricate carvings on wood surfaces can add a touch of elegance and sophistication to furniture pieces. These detailed designs showcase the skill of the craftsman while creating a visually appealing focal point.
- Decorative inlays: Incorporating decorative inlays such as mother-of-pearl, brass, or exotic woods can elevate the visual impact of furniture. These inlays can be used to create patterns or motifs that complement the overall design and add depth.
- Unique finishes: Experimenting with different types of finishes like distressing, antiquing, or using metallic paints can give furniture a distinctive look. These finishes not only protect the wood but also add character and personality.
By incorporating these elements into furniture design, woodworkers can create pieces that stand out and leave a lasting impression on viewers.
Creating Unique Joinery Techniques
One potential concern that may arise when considering creating unique joinery techniques in furniture design is the perceived complexity and level of skill required to execute them effectively. However, by understanding the principles behind these techniques and practicing their execution, woodworkers can elevate their craftsmanship and add design elements that set their work apart.
Unique joinery techniques involve utilizing unconventional methods to connect different pieces of wood together, resulting in visually striking and structurally sound joints. These techniques often require precise measurements, specialized tools, and a deep understanding of wood properties.
By incorporating unique joinery techniques into their furniture designs, woodworkers can create pieces that showcase both technical expertise and artistic flair. This combination not only enhances the aesthetic appeal but also ensures the longevity and durability of the finished product.
Troubleshooting Common Issues with Taper Cuts
To overcome challenges encountered when making taper cuts on a table saw, it is crucial to identify and address common issues that may arise during the process. Taper cuts can be tricky, but by understanding and implementing effective troubleshooting techniques, woodworkers can achieve precise and accurate results.
Here are three common issues that may occur when making taper cuts on a table saw:
- Uneven Tapers: One of the most common mistakes in taper cutting is ending up with uneven or inconsistent tapers. This can happen due to misalignment of the fence, improper blade angle settings, or inaccurate measurement markings. To troubleshoot this issue, ensure that the fence is parallel to the blade and securely locked in place. Double-check the blade angle using a protractor or specialized gauge for accuracy. Additionally, carefully measure and mark both ends of the workpiece to ensure symmetrical tapers.
- Tearout: Another problem woodworkers face when making taper cuts is tearout along the cut edges. Tearout occurs when fibers of wood splinter or tear away instead of cleanly cutting through. This issue can be minimized by using a sharp blade with a high tooth count designed specifically for smooth cuts. Adjusting the feed rate can also help reduce tearout – slower feeding often produces better results.
- Safety Concerns: Working with power tools like table saws always carries inherent safety risks if not used correctly. When troubleshooting taper cut issues, it is important to prioritize safety measures such as wearing appropriate personal protective equipment (PPE), keeping fingers clear from moving parts, and maintaining proper control over the workpiece throughout each cut.
By addressing these common mistakes and utilizing effective troubleshooting techniques, woodworkers can enhance their skills in making taper cuts on table saws while achieving precise and professional results in their woodworking projects.
Practice and Refine Your Taper Cutting Skills
Practicing taper cutting techniques on a table saw is akin to honing the skills of a sculptor, refining precision and finesse in manipulating wood into desired shapes. It is an essential skill for any woodworking enthusiast or professional seeking to elevate their craftsmanship. To refine technique and master precision in taper cuts, several key considerations must be taken into account.
Firstly, it is crucial to ensure that the table saw is properly set up and calibrated. The blade should be aligned parallel to the miter gauge slots, and the fence should be positioned at the correct angle for the desired taper. Any misalignment can result in inaccurate cuts and compromise the overall quality of the finished workpiece.
Secondly, it is advisable to begin practicing with scrap pieces of wood before moving on to more valuable materials. This allows for experimentation and adjustment without fear of wasting expensive lumber. By starting with simpler projects such as straight tapers or shallow angles, woodworkers can gradually build confidence and skill before attempting more complex designs.
Furthermore, paying close attention to body positioning and movement during taper cutting is essential. Proper posture ensures stability and control throughout the process, minimizing errors caused by shaking or shifting hands. Additionally, maintaining a steady feed rate helps achieve consistent results while avoiding kickback or other safety hazards.
Lastly, continuous practice and repetition are crucial for mastering taper cutting skills. Woodworkers should strive for consistency in their technique by repeating cuts until they achieve desired results consistently. As with any craft, improvement comes with time, patience, and dedication.
Practicing on a table saw allows woodworkers to refine their taper cutting technique while mastering precision in manipulating wood into desired shapes. Through proper setup of equipment, starting with simpler projects before progressing to more complex ones using scrap materials first provides ample opportunity for learning from mistakes without fear of wasting valuable resources.
Attention to body positioning during cuts ensures stability throughout each task undertaken while maintaining a steady feed rate promotes consistent outcomes. Ultimately, continuous practice and repetition are key to achieving mastery in taper cutting skills.
Frequently Asked Questions
What safety precautions should I take when making taper cuts on a table saw?
When making taper cuts on a table saw, it is crucial to adhere to safety precautions.
First, ensure that the saw’s blade is properly aligned and secured.
Always wear appropriate personal protective equipment such as safety glasses and gloves.
Maintain a safe distance from the blade to avoid accidents.
Additionally, alternative methods for making taper cuts without a jig include using a tapering guide or creating a custom sled for the table saw.
Can I make taper cuts on a table saw without a tapering jig?
Alternative methods exist for making taper cuts on a table saw without a tapering jig.
One common approach is using a straight edge guide or a miter gauge with an angled fence. By carefully aligning the workpiece and adjusting the angle of the fence, precise taper cuts can be achieved.
However, caution must be exercised to avoid common mistakes such as inaccurate measurements, unstable workpieces, or improper blade alignment, which may compromise safety and result in subpar results.
What type of wood is best for making taper cuts?
The choice of wood for making taper cuts depends on the desired outcome and the project at hand. Generally, hardwoods such as oak, maple, and walnut are preferred due to their density and stability. These woods allow for clean and precise cuts while minimizing tear-out.
Techniques for achieving smooth taper cuts include:
- Using a sharp blade
- Adjusting the table saw fence accurately
- Maintaining a steady feed rate during the cutting process.
How can I prevent tear-out when making taper cuts?
In the realm of woodworking, preventing tear-out during taper cuts on a table saw can be likened to navigating treacherous terrain. However, there are several best techniques that can be employed to ensure smooth and flawless results.
To prevent tear-out, it is essential to use a sharp blade with a high tooth count and make shallow passes while cutting. Additionally, using a zero-clearance insert and applying masking tape on the wood surface can further minimize tear-out risks.
Can I make taper cuts on a table saw with a dado blade?
Taper cuts on a table saw using a dado blade possess certain limitations. The dado blade, designed for cutting grooves, lacks the necessary precision and control required for taper cuts. Alternative tools such as a bandsaw or jointer are better suited for this task due to their ability to produce more accurate and controlled angled cuts. These tools offer greater versatility and precision when it comes to creating tapered pieces in woodworking projects.
Conclusion
In conclusion, mastering taper cuts on a table saw is an essential skill for any serious woodworker.
The precision and finesse required to achieve perfect taper cuts elevate the craftsmanship of your projects to new heights.
By following the step-by-step guide and implementing the tips provided, you can confidently create stunning tapered pieces that add depth and dimension to your woodworking creations.
With practice and refinement, you will become a master of taper cutting, unlocking endless creative possibilities in your woodworking endeavors.


