
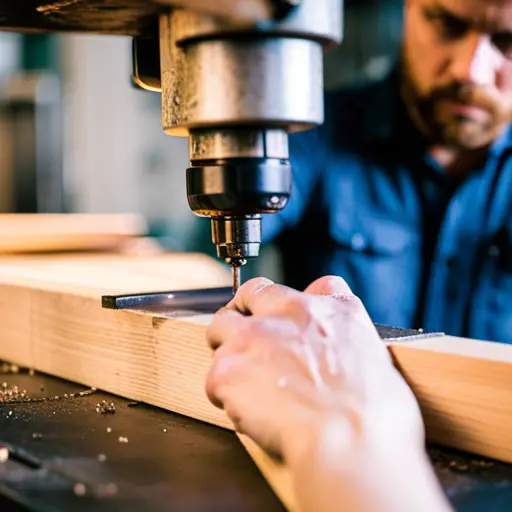
Table saws are powerful tools that allow craftsmen to create precise cuts in wood. Among the various techniques, mastering groove cuts on a table saw is an essential skill for any woodworking enthusiast.
The art of groove cuts involves creating channels or slots in the wood, providing a secure fit for other pieces and adding aesthetic value to the finished product.
In this article, we will unveil the secrets behind achieving flawless groove cuts, taking you from novice to pro. We will delve into the basics of groove cuts, exploring safety measures and precautions necessary when working with a table saw.
You will learn how to set up your table saw specifically for groove cuts and acquire techniques that ensure precision and accuracy.
As with any skill, troubleshooting common issues during groove cutting is crucial. We will address these challenges and guide you through effective solutions.
Additionally, finishing and sanding techniques will be discussed to enhance the final appearance of your work.
If you desire a comprehensive understanding of groove cut mastery on a table saw, continue reading as we reveal advanced tips and tricks that only experienced craftsmen employ.
Get ready to elevate your woodworking skills by delving into this technical yet informative journey towards becoming a pro in creating impeccable groove cuts on a table saw.
Key Takeaways
- Safety measures and precautions are necessary when using a table saw for groove cuts
- Proper setup and alignment of the table saw, including blade selection and fence alignment, are important factors for accurate groove cuts
- Utilizing specialized jigs, fixtures, and push sticks or featherboards can ensure stability and prevent accidents during groove cuts
- Minimizing tearout and splintering through sharp blades, proper sanding techniques, and managing blade speed and feed rate is essential for clean and smooth groove cuts
Understanding the Basics of Groove Cuts
The fundamental principles of groove cuts on a table saw involve comprehending the essential elements and techniques necessary for achieving clean and precise results.
When it comes to groove cut techniques, there are several types that can be employed depending on the desired outcome.
One commonly used technique is the dado cut, which involves cutting a wide groove across the grain of the wood. This type of cut is typically used when creating joints or for installing shelves in cabinetry.
Another technique is the rabbet cut, which involves removing a narrow strip of material along the edge of a workpiece. This type of groove allows for joining two pieces together or creating recesses for panels.
To achieve successful groove cuts, it is important to consider factors such as blade selection and setup. The choice of blade will depend on the type and thickness of material being worked with. A flat-top grind blade is often preferred for cleaner cuts while a negative hook angle can help reduce tear-out.
In addition to blade selection, proper fence alignment is crucial for accurate groove cuts. The fence should be set parallel to the blade to ensure consistent width throughout the cut. Furthermore, utilizing featherboards or hold-downs can help maintain consistent pressure against the fence and prevent any unwanted movement during cutting.
Overall, understanding different types of groove cuts and employing appropriate techniques are essential for achieving clean and precise results on a table saw. By considering factors such as blade selection, setup, and proper alignment, one can master the art of groove cuts and produce professional-looking woodworking projects.
Safety Measures and Precautions
To ensure a high level of safety while working with the aforementioned woodworking tool, it is essential to adhere strictly to established safety measures and precautions.
Safety gear should always be worn when operating a table saw, including safety glasses or goggles to protect the eyes from flying debris, and ear protection to reduce the risk of hearing damage caused by the loud noise generated by the machine.
In addition, proper body positioning is crucial for avoiding accidents and injuries. The operator should stand in a stable position with feet shoulder-width apart, ensuring that they have a firm and balanced stance. It is important to maintain a safe distance from the blade at all times, keeping hands and fingers away from the cutting area.
When making groove cuts on a table saw, it is recommended to use push sticks or featherboards to guide the workpiece through the cut. These tools help keep hands at a safe distance from the blade while maintaining control over the material being cut. When using push sticks, it is important to apply pressure evenly and consistently throughout the entire cut. This will prevent any kickback or sudden movement of the wood that could lead to accidents.
Furthermore, it is crucial to keep the workspace clean and free from clutter. Any loose materials or debris can interfere with safe operation of the table saw and increase the risk of accidents. Regular maintenance of the machine is also necessary to ensure its optimal performance and reduce potential hazards.
By following these safety measures and precautions, woodworkers can minimize risks when working with groove cuts on a table saw. It is important for individuals engaging in this activity to prioritize their safety by wearing appropriate protective gear and adopting proper body positioning techniques.
Setting Up Your Table Saw for Groove Cuts
Setting up the table saw for creating groove cuts involves configuring the machine to accommodate the desired depth and width of the cut. To achieve this, it is important to follow certain steps:
- Proper alignment: Ensuring your table saw blade is perfectly aligned for groove cuts is crucial. This can be achieved by adjusting the rip fence parallel to the blade and making sure it remains perpendicular to the table surface throughout the cutting process. Using a precision alignment tool can aid in achieving accurate alignment.
- Choosing the right dado set: Exploring different types of dado sets and their impact on groove cuts is essential. Dado sets consist of two outer blades and multiple chippers or blades that help create grooves of various widths. The selection should be based on factors such as desired groove width, material being cut, and power capabilities of your table saw.
- Adjusting blade height: Setting the appropriate height for the blade is necessary to achieve precise groove cuts. The height should be adjusted according to the thickness of the material being used, ensuring that it does not exceed more than half of its thickness.
- Positioning feather boards and push sticks: Feather boards are used to apply pressure against both sides of the workpiece during cutting, preventing any potential kickback or movement. Push sticks assist in guiding and pushing materials through the cut, keeping hands safe from contact with sharp blades.
By following these steps, you can effectively set up your table saw for groove cuts in a safe and efficient manner.
It is important to always prioritize safety by wearing appropriate protective gear like goggles and gloves while using a table saw for any woodworking tasks.
Techniques for Making Precise Groove Cuts
Precision is key when creating accurate groove cuts on a table saw, and employing proper techniques can greatly enhance the quality of the results. Two important factors to consider when making precise groove cuts are preventing chip out and selecting the right blade for the job.
To prevent chip out, which refers to the tearing or splintering of wood fibers at the edges of a cut, there are several techniques that can be employed. First, using a zero-clearance insert on your table saw can help provide support to reduce chip out.
Additionally, applying masking tape along the cut line can help minimize tear-out by providing extra support and stability during the cutting process. It is also important to ensure that you have a sharp blade as dull blades are more likely to cause chip out.
Selecting the right blade for groove cuts is crucial in achieving precise results. A dado set or a stacked dado set with multiple blades allows for adjustable width grooves and clean cuts. This type of blade set consists of two outer blades and multiple chippers that can be stacked together to create different groove widths. When choosing a dado set, ensure that it is compatible with your table saw’s arbor size and has appropriate safety features.
Precision in groove cuts on a table saw can be achieved by implementing proper techniques such as preventing chip out and selecting the right blade for the job. By following these guidelines, woodworkers can enhance their accuracy and produce high-quality groove cuts on their projects.
| Technique | Description |
|---|---|
| Zero-clearance insert | Provides support during cutting process to prevent tear-out |
| Masking tape | Applied along cut line for extra support and stability |
| Sharp blade | Ensures clean cuts by reducing chances of tear-out |
Note: The above table provides an overview of techniques used for preventing chip out during groove cuts on a table saw
Troubleshooting Common Issues
This discussion will focus on troubleshooting common issues that can arise when making groove cuts on a table saw.
One key point to address is the prevention of tearout and splintering, which can result in rough or damaged edges.
Another issue to consider is blade deflection, which occurs when the cutting blade bends during operation and can lead to imprecise cuts.
Lastly, we will discuss techniques for fixing uneven or inconsistent groove cuts, ensuring the desired depth and width are achieved consistently throughout the workpiece.
Preventing tearout and splintering
To achieve clean and smooth cuts on a table saw, it is crucial to employ effective techniques that minimize tearout and splintering. This can be achieved by carefully selecting appropriate wood materials, minimizing vibration during cuts, and managing blade speed and feed rate.
To prevent tearout and splintering on the table saw, consider the following:
- Selecting appropriate wood materials:
– Choose woods with straight grain patterns.
– Avoid using brittle or highly figured woods.
- Minimizing vibration during cuts:
– Ensure the table saw is properly aligned and calibrated.
– Use a zero-clearance insert to support the workpiece.
- Managing blade speed and feed rate:
– Adjust the blade height to only expose enough teeth for cutting.
– Feed the material steadily but not too quickly.
By implementing these techniques, you can significantly reduce tearout and splintering, resulting in cleaner and more professional groove cuts on your table saw.
Dealing with blade deflection
Transitioning from preventing tearout and splintering, it is important to address the issue of blade deflection when mastering the art of groove cuts on a table saw. Blade deflection refers to the bending or flexing of the saw blade during cutting, resulting in inaccurate and imprecise cuts.
This can be particularly problematic when making groove cuts that require precision and accuracy. To ensure optimal results, proper blade alignment is essential. Ensuring that the blade is parallel to the miter gauge slots and perpendicular to the table surface helps minimize deflection. Additionally, reducing blade deflection can be achieved by using a high-quality, stiff blade with carbide teeth designed specifically for groove cutting.
By addressing these aspects and applying careful adjustments, woodworkers can effectively reduce blade deflection and achieve clean, accurate groove cuts on a table saw.
| Pros | Cons |
| – Clean and accurate cuts | – Requires precise adjustments |
| – Minimizes waste due to inaccuracies | – May necessitate purchasing specialized blades |
| – Enhances overall craftsmanship | – Increased risk of accidents if not done properly |
Fixing uneven or inconsistent groove cuts
Blade alignment and selecting appropriate blades are crucial factors to consider when addressing the issue of uneven or inconsistent groove cuts on a table saw.
To fix blade alignment, it is important to ensure that the blade is parallel to the miter gauge slot and fence. This can be achieved by adjusting the trunnion bolts or using shims as necessary.
Additionally, using a dado blade can help in achieving consistent groove cuts. A dado blade consists of multiple blades stacked together, allowing for wider groove cuts compared to a standard saw blade. By adjusting the width of the dado stack, precise and uniform groove cuts can be achieved.
It is essential to follow proper safety measures when making adjustments or changing blades on a table saw to avoid accidents and ensure optimal performance.
Finishing and Sanding Groove Cuts
This discussion will focus on the process of finishing and sanding groove cuts on a table saw.
One important aspect is removing saw marks and rough edges to achieve a smooth and polished surface.
Additionally, selecting the appropriate sandpaper grit is crucial for achieving the desired level of smoothness and refinement.
Finally, applying a suitable finish can enhance the appearance and durability of the groove cuts, providing a professional touch to the final product.
Removing saw marks and rough edges
To achieve a smooth and polished finish on the wood, the rough edges and saw marks can be effectively eliminated through careful sanding techniques. When it comes to removing saw marks and rough edges, following these steps will ensure a professional finish:
- Start with coarse-grit sandpaper:
– Begin by using a coarse-grit sandpaper, such as 80 or 100 grit, to remove any noticeable saw marks and roughness on the surface of the groove cut.
– This initial step will help smooth out imperfections.
- Progress to finer-grit sandpaper:
– Gradually move on to finer-grit sandpaper, such as 120 or 150 grit, to further refine the surface of the groove cut.
– This will help eliminate any remaining roughness and prepare it for a smoother finish.
- Use a sanding block:
– To maintain an even and consistent pressure while sanding, employ a sanding block.
– This tool ensures that you apply uniform pressure across the entire groove cut, resulting in a more professional-looking finish.
- Finish with fine polishing:
– Finally, use a high-grit sandpaper (around 220 or higher) or even steel wool to give the groove cut a final polish.
– This step will remove any last traces of roughness and leave behind a smooth surface that is ready for further treatment or finishing.
By diligently following these steps, one can easily achieve flawlessly finished groove cuts on their table saw projects.
Choosing the right sandpaper grit
When it comes to achieving a smooth and polished finish on wood, the selection of sandpaper grit is crucial. Choosing the right sandpaper grit can make all the difference in achieving a refined surface and eliminating roughness.
Finer-grit options such as 120 or 150 grit are more effective in this regard compared to coarse-grit options like 80 or 100 grit. The key is to start with a coarser grit to remove any saw marks or rough edges, and then progressively move to finer-grit options for a smoother finish.
It is important to avoid sanding mistakes such as using too coarse of a grit or skipping intermediate steps, as these can result in an uneven finish. By carefully selecting the appropriate sandpaper grit and following proper sanding techniques, one can achieve professional results when refining wood surfaces.
Applying a finish to enhance the groove cuts
Enhancing the groove cuts on wood surfaces can be accomplished by applying a suitable finish that adds depth and highlights the intricate texture.
There are various methods to achieve this, including applying stain to enhance the groove cuts. Stain seeps into the grooves, emphasizing their presence and creating a visually appealing contrast with the surrounding wood. This technique brings out the details of each cut, making them more prominent and enhancing the overall aesthetic appeal of the piece.
Another option for enhancing groove cuts is using epoxy resin for a glossy finish. Epoxy resin fills in the grooves, creating a smooth surface that reflects light and gives the impression of depth. The glossy finish not only enhances the visual appeal but also provides protection against moisture and wear.
Applying a finish such as stain or epoxy resin can greatly enhance groove cuts on wood surfaces. These techniques add depth, highlight texture, and create an attractive visual effect that will impress any viewer.
Advanced Tips and Tricks for Mastering Groove Cuts
One effective method for achieving precise groove cuts on a table saw involves utilizing specialized jigs and fixtures that ensure accurate alignment and stability throughout the cutting process. These advanced techniques play a crucial role in achieving smooth results when working with groove cuts.
To begin, it is essential to select the appropriate jig or fixture for the specific type of groove cut desired. There are various types available, such as T-slot guides, dado jigs, or spline jigs. Each type has its own unique design and purpose, allowing for greater control and accuracy during the cutting process.
In addition to selecting the right jig or fixture, proper setup is vital for achieving precise groove cuts. This includes ensuring that the blade height and angle are correctly adjusted according to the desired dimensions of the groove. It is also important to secure the workpiece firmly using clamps or other suitable methods to prevent any movement during cutting.
Another tip for mastering groove cuts is to make multiple passes instead of trying to achieve the full depth in one pass. This allows for more control over the cut and reduces the risk of tear-out or splintering along the edges of the groove.
Furthermore, maintaining a steady feed rate while pushing the workpiece through the saw is crucial for achieving smooth results. Rushing or applying excessive force can lead to uneven cuts or blade deflection, resulting in less precise grooves.
Lastly, regularly checking and adjusting all components involved in making groove cuts, such as fences, miter gauges, or blade alignment, ensures consistent accuracy throughout multiple cuts.
By incorporating these advanced techniques into your workflow and paying attention to detail in setup and execution, you can greatly improve your ability to master groove cuts on a table saw while achieving smooth results consistently.
Frequently Asked Questions
How long does it usually take to master groove cuts on a table saw?
Mastering groove cuts on a table saw is no easy task. It requires patience, practice, and a deep understanding of the common challenges faced in this endeavor. One must navigate issues such as tear-out, inaccurate measurements, and maintaining consistent depth and width.
However, by employing proper techniques and tips like using a zero-clearance insert, utilizing featherboards for stability, and making test cuts for precision adjustments, one can improve both speed and accuracy in groove cuts on a table saw.
Can groove cuts be made on any type of wood?
Different techniques can be employed to make groove cuts on different types of wood. The suitability of a table saw for other types of cuts besides groove cuts depends on its design and specifications. However, it is important to note that certain factors such as the hardness and thickness of the wood may influence the effectiveness of using a table saw for these alternative cuts. Understanding these variations in technique and equipment is crucial for achieving precise and accurate results.
What are the best safety goggles to wear while making groove cuts?
When it comes to making groove cuts on a table saw, wearing the right safety goggles is crucial. The best brands for safety goggles include 3M, Uvex, and DeWalt.
These goggles provide optimal protection by shielding the eyes from flying debris, wood chips, and potential eye injuries. Wearing safety goggles while making groove cuts is of utmost importance as it ensures the safety and well-being of the user, preventing any possible accidents or harm to their eyesight.
Are there any specific table saw accessories that can enhance the precision of groove cuts?
Table saw accessories can greatly enhance the precision of groove cuts.
One such accessory is a dado blade, which allows for wider and deeper grooves compared to a standard saw blade.
Additionally, using featherboards helps to maintain consistent pressure against the workpiece, preventing it from moving during the cut.
Zero-clearance inserts can also be used to minimize tear-out and provide more support for the workpiece.
These techniques ensure accurate and clean groove cuts on a table saw.
What are some common mistakes to avoid when making groove cuts on a table saw?
When it comes to making groove cuts on a table saw, there are several common mistakes that should be avoided at all costs.
Improper blade height and feed speed are two critical errors that can lead to inaccurate and unsafe cuts. It is essential to ensure the blade is set at the correct height for the desired groove depth and to maintain a consistent feed speed throughout the cut.
Additionally, neglecting to provide proper support for the workpiece can result in uneven and unstable cuts. These mistakes can compromise both the precision and safety of groove cuts on a table saw.
Conclusion
In conclusion, mastering the art of groove cuts on a table saw requires a thorough understanding of the basics, meticulous attention to safety measures, and precise techniques.
By setting up your table saw correctly and troubleshooting common issues that may arise, you can achieve impeccable results.
Remember to finish and sand your groove cuts for a polished outcome.
For those seeking to elevate their skills further, advanced tips and tricks will help you become a true pro in this craft.
Embrace the artistry of groove cuts and excel in every project!


