
The artistry and finesse of table saw miter cuts can transform woodworking projects from ordinary to extraordinary.
This article, ‘From Novice to Pro: Unleashing the Potential of Table Saw Miter Cuts,’ delves into the intricacies of this technique, guiding readers on a journey towards mastery.
By exploring the fundamentals, such as understanding angles and bevels, selecting the right equipment, and troubleshooting common issues, novices will gain a solid foundation for their woodworking endeavors.
With an academic approach that is objective and technical in nature, this article provides precise instructions to empower readers in their quest for precision miter cuts.
Moreover, advanced tips and tricks offer insights into achieving unparalleled accuracy.
Finally, creative project ideas inspire readers to showcase their newfound skills and explore the full potential of table saw miter cuts.
Join us on this enlightening journey as we unlock the true potential of this remarkable technique.
Key Takeaways
- Miter cuts can transform woodworking projects from ordinary to extraordinary.
- Understanding angles and bevels, selecting the right equipment, and troubleshooting common issues are important fundamentals.
- Safety protocols and understanding the table saw’s features are crucial for miter cuts.
- Accurate measurement, marking guidelines, and using support devices enhance the accuracy of miter cuts.
Understanding the Basics of Miter Cuts
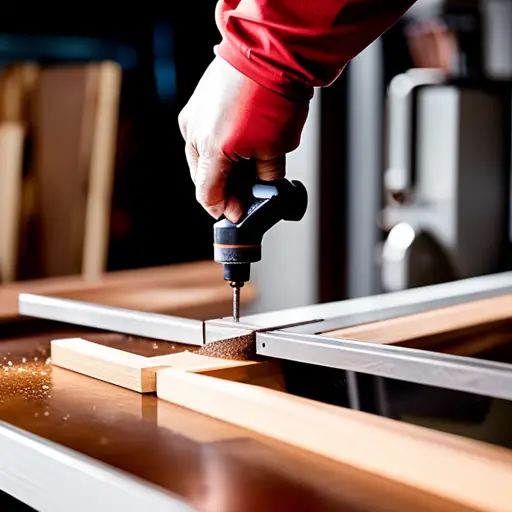
The understanding of the basics of miter cuts is essential for developing proficiency in using a table saw. Mastering miter cut safety and avoiding common mistakes are crucial aspects that should be considered when working with a table saw.
Miter cuts involve cutting wood at an angle, typically 45 degrees, to create precise joints or angled edges. This technique is commonly used in woodworking projects such as picture frames, door frames, or furniture.
To ensure safety while performing miter cuts, it is important to follow proper safety protocols. This includes wearing personal protective equipment such as safety glasses and hearing protection, securing the workpiece firmly with clamps or a jig, and keeping hands at a safe distance from the blade throughout the cutting process.
Additionally, it is crucial to have a thorough understanding of the table saw’s features and functions before attempting miter cuts.
Common mistakes in miter cuts can lead to inaccurate angles and compromised joint integrity. One common error is not properly aligning the workpiece with the miter gauge or fence, resulting in skewed cuts. It is essential to ensure that the workpiece remains flush against these guides throughout the cutting process to achieve accurate results.
Another mistake often made by novices is rushing through the cutting process without properly adjusting blade height or angle settings. This can lead to uneven and imprecise cuts. Taking time to adjust these settings accurately will result in cleaner and more professional-looking miter cuts.
Understanding the basics of miter cuts is vital for those seeking proficiency in using a table saw effectively. By mastering miter cut safety practices and avoiding common mistakes like misalignment or improper adjustments, one can unleash their potential for creating precise and professional-looking woodworking projects with ease.
Choosing the Right Table Saw for Miter Cuts
When selecting a suitable woodworking tool for creating precision angled cuts, it is crucial to carefully consider the characteristics of different table saw models. Table saws are widely used for miter cuts due to their versatility and ability to make accurate angled cuts. However, not all table saws are created equal, and choosing the right one can greatly impact both safety and the quality of the final product.
Table saw safety should be a top priority when selecting a model for miter cuts. Look for features such as blade guards, anti-kickback pawls, and riving knives that help prevent accidents and keep your fingers safe. Additionally, consider the stability and sturdiness of the table saw to minimize the risk of tipping or wobbling during operation.
Common mistakes when using table saws include improper alignment, inaccurate measurements, and lack of proper technique. To avoid these mistakes, choose a table saw with precise adjustment mechanisms that allow for easy alignment of angles and measurements. Look for models with clear markings on both the fence and miter gauge to ensure accuracy in cutting angles.
In order to evoke an emotional response in the audience regarding the importance of choosing the right table saw for miter cuts, below is a comparison table showcasing two popular models:
| Model | Safety Features | Stability | Precision |
|---|---|---|---|
| Model A | Blade guard, anti-kickback pawls, riving knife | Sturdy construction | Precise adjustment mechanisms |
| Model B | No blade guard or anti-kickback pawls | Wobbly base | Vague markings on fence |
By considering factors such as safety features, stability, precision adjustment mechanisms, and clear markings on both fence and miter gauge when selecting a table saw for miter cuts, woodworkers can ensure not only their own safety but also achieve high-quality results in their projects.
Mastering the Technique of Setting Angles and Bevels
Mastering the technique of setting angles and bevels requires a thorough understanding of the woodworking tool’s adjustment mechanisms and precise measurements.
When it comes to table saw miter cuts, improper angle and bevel settings can lead to inaccurate cuts and wasted materials. Therefore, it is crucial to familiarize oneself with the correct procedure for setting angles and bevels on a table saw.
One common mistake to avoid when setting angles and bevels is neglecting to check the accuracy of the tool’s built-in measuring devices. These devices, such as protractors or angle gauges, should be regularly calibrated and verified against an accurate reference tool to ensure their reliability.
Another mistake is failing to secure the workpiece tightly against the miter gauge or fence before making adjustments. The slightest movement during adjustment can result in imprecise cuts.
To achieve precise miter cuts, it may also be beneficial to explore alternative tools in addition to a table saw. For instance, a dedicated miter saw provides more mobility and flexibility when working with angled cuts. Miter sleds or jigs can also help enhance accuracy by providing additional support for the workpiece during cutting operations.
Mastering the technique of setting angles and bevels is essential for achieving precise table saw miter cuts. It involves understanding the adjustment mechanisms of the woodworking tool, using accurate measuring devices, avoiding common mistakes such as neglecting calibration or failing to secure the workpiece properly, and exploring alternative tools like dedicated miter saws or sleds.
By following these guidelines, woodworkers can unlock their full potential in creating flawless miter joints with their table saws.
Selecting the Right Blade for Perfect Miter Cuts
Using the appropriate blade is akin to selecting a finely-tuned instrument that harmonizes with the wood, allowing for flawlessly executed miter cuts. Blade selection plays a crucial role in achieving clean cuts and ensuring the desired results when working with a table saw. The type of blade chosen depends on various factors, including the material being cut and the desired outcome.
Here are two sub-lists to consider when selecting the right blade for perfect miter cuts:
- Blade Type:
- Crosscut Blades: These blades have many fine teeth designed to cut across the grain of wood fibers cleanly and accurately. They are ideal for making precise miter cuts on hardwoods or softwoods.
- Combination Blades: These versatile blades feature a mix of both crosscutting and ripping teeth, making them suitable for general-purpose woodworking tasks. While they may not provide as clean of a cut as specialized crosscut blades, they offer more flexibility.
- Tooth Configuration:
- Flat-Top Grind (FTG) Teeth: These teeth have squared-off tops and are commonly found on rip-cutting blades. They excel at removing material quickly but tend to leave rougher edges.
- Alternate Top Bevel (ATB) Teeth: These teeth alternate between beveled left and right, creating a shearing action that produces cleaner cuts across the grain. They are often used in combination blades.
When choosing a blade, it is essential to ensure that it is compatible with your table saw’s arbor size and RPM rating. Additionally, maintaining sharpness through regular sharpening or replacement is vital for achieving consistently clean miter cuts.
By carefully considering blade type and tooth configuration based on your specific cutting needs, you can optimize your table saw setup for precise miter cuts every time.
Advanced Tips and Tricks for Precision Miter Cuts
To achieve impeccable precision in miter cuts, incorporating advanced techniques and strategies can elevate the quality of your woodworking projects. When it comes to creating seamless joints, there are a few key tips and tricks that can make all the difference.
Firstly, ensuring accurate measurement is crucial. Using a reliable measuring tool such as a digital caliper or a high-quality tape measure will help you achieve precise angles and lengths for your miter cuts. Additionally, marking your measurements with a sharp pencil or a marking knife will provide clear guidelines for cutting.
Next, using a miter sled can greatly enhance the accuracy of your cuts. A miter sled is essentially an auxiliary fence that attaches to your table saw’s miter gauge. It provides additional support and stability when cutting small or delicate workpieces, resulting in cleaner and more consistent cuts.
Another advanced technique involves using double-sided tape or clamps to secure your workpiece firmly in place before making the cut. This prevents any movement during the cutting process, ensuring that each cut is made at the desired angle without any deviations.
Additionally, practicing good blade maintenance is essential for achieving precision in miter cuts. Keeping your blade clean and sharp will not only improve the quality of your cuts but also reduce the risk of tear-out or splintering on delicate materials.
By implementing these advanced techniques and strategies into your woodworking practice, you can achieve seamless joints and impeccable precision in your miter cuts. Remember to prioritize accurate measurement, utilize a miter sled for added stability, secure workpieces effectively before cutting, and maintain your blades regularly for optimal performance.
With these methods at hand, you’ll be well on your way to becoming an expert in table saw miter cuts.
Troubleshooting Common Issues with Miter Cuts
One common issue that woodworkers may encounter when attempting precision miter cuts is the occurrence of tear-out or splintering on their workpieces. This can be frustrating as it can ruin the overall finish and aesthetic appeal of the project. To achieve clean cuts and minimize tear-out, there are several factors to consider.
Firstly, one of the most common mistakes that lead to tear-out is using a dull blade. A sharp blade will ensure a clean cut by cleanly slicing through the wood fibers without tearing them apart. Regular maintenance and sharpening of the blade are essential to prevent tear-out.
Another factor to consider is the direction of the wood grain. Tear-out is more likely to occur when cutting against the grain rather than with it. It is crucial to identify the direction of the grain before making any cuts and adjust your technique accordingly.
Furthermore, controlling feed rate plays a significant role in achieving clean miter cuts. Feeding the material too quickly can increase tear-out due to excessive force being applied, while feeding it too slowly may cause burn marks or irregularities in the cut.
Additionally, using appropriate support devices such as backer boards or sacrificial fences can help reduce tear-out by providing additional support for delicate areas during cutting.
Lastly, selecting an appropriate blade with fine teeth specifically designed for crosscutting can greatly minimize tear-out. These blades have smaller gullets between teeth, which reduces chip removal but provides cleaner cuts.
Achieving clean miter cuts requires attention to detail and consideration of various factors such as using a sharp blade, considering wood grain direction, controlling feed rate, utilizing support devices, and selecting suitable blades. By avoiding common mistakes and implementing these techniques, woodworkers can overcome issues with tear-out and achieve precise miter cuts that enhance both functionality and aesthetics in their projects.
Showcasing Your Skills: Creative Projects with Miter Cuts
An effective approach to showcasing woodworking skills involves incorporating intricate miter cuts into creative projects. Miter cuts, which are angled cuts made on the ends of wood pieces, can add a unique touch to various woodworking designs. By customizing designs with decorative miter cuts, woodworkers can create visually appealing and complex projects that highlight their craftsmanship.
One way to showcase woodworking skills is by creating intricate picture frames using miter cuts. By carefully measuring and cutting the corners of the frame at precise angles, woodworkers can create seamless joints that enhance the overall aesthetic of the piece. Additionally, incorporating decorative elements such as inlays or contrasting wood species can further elevate the design.
Another creative project idea is building geometric patterns using mitered segments. This technique involves cutting identical angles on multiple wooden pieces and fitting them together to form intricate shapes or patterns. Woodworkers can experiment with different angles and orientations to create visually stunning designs that serve as focal points in furniture or wall panels.
Furthermore, decorative boxes with mitered corners can be an excellent way to showcase woodworking skills while also serving a functional purpose. By utilizing precision cutting techniques and selecting high-quality materials, woodworkers can create elegant boxes that are perfect for storing jewelry or other small items.
Customizing designs with decorative miter cuts provides an opportunity for woodworkers to showcase their skills and creativity. Whether it’s through crafting picture frames, building geometric patterns, or constructing decorative boxes, incorporating intricate miter cuts adds complexity and visual interest to woodworking projects.
By paying attention to detail and combining different techniques, woodworkers can unleash the full potential of table saw miter cuts in their creative endeavors.
| Creative Project Idea | Description | Materials Needed |
| Intricate Picture Frames | Create seamless joints by cutting precise angles on frame corners; incorporate decorative elements such as inlays or contrasting wood species for added visual appeal | Wood boards (various species), miter saw, measuring tools, sandpaper, glue, clamps |
| Geometric Patterns | Cut identical angles on wooden pieces and fit them together to form intricate shapes or patterns; experiment with different angles and orientations for unique designs | Wood boards (various species), miter saw, measuring tools, sandpaper, glue |
| Decorative Boxes | Construct elegant boxes with mitered corners for storing jewelry or small items; utilize precision cutting techniques and select high-quality materials for a professional finish | Wood boards (various species), miter saw, measuring tools, sandpaper, glue, clamps |
Frequently Asked Questions
Can I use a miter saw instead of a table saw for miter cuts?
Using a miter saw for table saw miter cuts has certain advantages and disadvantages.
The main advantage is that a miter saw allows for quick and accurate angled cuts without the need for extensive setup. Additionally, it provides better control over the workpiece due to its design.
However, there are limitations to using a miter saw, such as limited cutting capacity and difficulty in handling larger or thicker materials.
Overall, using a miter saw for miter cuts can be efficient but may not be suitable for all projects.
What safety precautions should I take when using a table saw for miter cuts?
Safety precautions and best practices are essential when operating a table saw for miter cuts. To ensure a safe working environment, it is crucial to wear appropriate personal protective equipment such as safety goggles, ear protection, and gloves.
Additionally, keeping the work area clean and free from clutter can help prevent accidents. Properly adjusting the blade height and using push sticks or featherboards can also enhance safety.
Following these precautions diligently will minimize the risk of injury while using a table saw for miter cuts.
How do I determine the correct angle and bevel settings for different types of miter cuts?
Determining the correct angle and bevel settings is essential for achieving precision miter cuts on a table saw.
To begin, carefully measure the desired angle using a protractor or bevel gauge.
Next, adjust the miter gauge on the table saw to match this angle.
Additionally, adjusting the bevel setting allows for compound miter cuts.
Referencing a guide or online resources can provide specific angles for different types of cuts.
Precise adjustments and accurate measurements will ensure successful miter cuts with optimal results.
Can I achieve perfect miter cuts with a standard blade, or do I need a specialized blade?
Achieving perfect miter cuts with a standard blade is challenging due to its limitations. However, using a specialized blade offers distinct advantages. These blades are specifically designed for miter cuts and feature alternate top bevel teeth that provide cleaner and smoother cuts.
Additionally, using a sled can further enhance the precision of miter cuts by providing stability and support for the workpiece. This combination of a specialized blade and a sled improves accuracy and ensures flawless miter cuts.
What are some common mistakes to avoid when attempting precision miter cuts?
Achieving precision in miter cuts requires careful attention to detail and avoidance of common mistakes. One interesting statistic is that up to 80% of woodworking errors can be attributed to improper technique during miter cuts.
Some common mistakes include:
- Inaccurate measurements
- Incorrect blade angles
- Improper use of the miter gauge
To ensure precision, it is crucial to:
- Accurately measure and mark the workpiece
- Set the blade angle correctly
- Securely guide the workpiece using a reliable miter gauge.
Conclusion
In conclusion, mastering the art of table saw miter cuts requires a solid understanding of the basics, choosing the right equipment, and honing your technique.
By selecting the appropriate table saw and blade, setting accurate angles and bevels, and implementing advanced tips and tricks, you can achieve precision in your miter cuts.
Additionally, troubleshooting common issues will ensure optimal results.
With these skills in hand, you can embark on creative projects that showcase your expertise.
So why settle for average when you can unleash the full potential of table saw miter cuts?


