
Box joints, the elusive and enigmatic woodworking technique that has left many craftsmen scratching their heads in frustration. The precision required to achieve flawless box joints on a table saw often feels like unlocking a top-secret code.
Fear not, for this article will reveal the hidden secrets and guide you through the intricate process of mastering precision box joints.
In order to embark on this journey of craftsmanship, one must first understand the basics of box joints. Armed with this knowledge and equipped with the necessary tools and materials, you can set up your table saw for box joint cuts. Accurate measurement and marking of your wood pieces are crucial steps that cannot be overlooked.
Through meticulous execution and adjustments, you will witness your box joint project take shape before your eyes. Finally, add those finishing touches that bring out the true beauty of your creation.
Prepare yourself to delve into the world of precision box joints on a table saw – a world where attention to detail reigns supreme, and perfection is within reach.
Key Takeaways
- Precision is crucial for achieving flawless box joints on a table saw.
- Accurate measurement and marking of wood pieces are essential steps.
- Using a box joint jig can enhance the accuracy of the cuts.
– Different types of wood have unique characteristics suitable for box joints.
Understand the Basics of Box Joints
The fundamental principles of box joints must be comprehended in order to unravel the mysteries behind achieving precise box joints on a table saw.
Box joints are a type of woodworking joint that connects two pieces of wood at right angles, creating a strong and visually appealing corner.
Understanding basic box joint techniques is essential for any woodworker as it allows for the creation of precise and reliable connections.
One advantage of using box joints in woodworking is their inherent strength. The interlocking nature of the fingers provides significant mechanical strength, making them suitable for applications where durability is required. Additionally, these joints distribute stress evenly across the entire joint surface, minimizing the risk of failure under heavy loads.
Another advantage is their aesthetic appeal. The regular pattern created by the alternating fingers adds visual interest to furniture and other wooden structures. This makes box joints an excellent choice for projects where both functionality and aesthetics are important.
To create accurate box joints on a table saw, several factors must be considered. These include selecting appropriate blade width, adjusting the fence position, and ensuring precise stock alignment during cutting. Using a specialized box joint jig can also enhance accuracy by guiding the workpiece along predefined paths.
Understanding basic box joint techniques is crucial for achieving precision when creating this type of woodworking joint on a table saw. Not only do they offer superior strength compared to other types of joints, but they also provide an attractive visual element to finished projects.
By mastering these techniques and utilizing proper tools such as jigs, woodworkers can unlock the secrets behind perfecting precision box joints on a table saw.
Gather the Necessary Tools and Materials
This discussion will focus on the key points related to the essential tools and materials required for creating box joints as well as the types of wood that are suitable for this woodworking technique.
Essential tools for creating box joints include:
- A table saw
- A dado blade set
- A miter gauge
- A push stick or block
- Clamps
The choice of wood for box joints depends on factors such as durability, stability, and aesthetics. Hardwoods like oak, maple, and walnut are commonly used due to their strength and resistance to wear.
Essential tools for creating box joints
One essential tool required for creating box joints is a precision miter gauge. This tool enables accurate and consistent angle adjustments, ensuring precise cuts for creating the interlocking fingers in box joints.
Additionally, a sturdy table saw with a fine-toothed crosscut blade is essential for achieving clean and precise cuts on the workpieces.
Other necessary tools include a reliable push block or push stick to safely guide the wood through the saw, preventing any accidents or injuries.
A combination square can be used to ensure that the joint is perfectly square, while a dial caliper allows for precise measurements of the finger width and depth.
Lastly, clamps are needed to hold the workpieces securely in place during cutting and assembly.
Following these tips and having these essential tools will greatly contribute to achieving accurate and high-quality box joints in woodworking projects.
Types of wood suitable for box joints
Different types of wood possess unique characteristics that make them suitable for creating strong and visually appealing box joints in woodworking projects. When choosing the type of wood to use for box joints, it is important to consider its strength, durability, and aesthetics.
Here are four types of wood that are commonly used for creating strong box joints:
- Hardwoods: Woods such as oak, maple, and walnut are known for their strength and durability, making them ideal choices for creating long-lasting box joints.
- Plywood: This composite material is made by gluing thin layers of wood together, resulting in a strong and stable material that is perfect for box joint construction.
- Exotic woods: Woods like mahogany or teak offer unique grain patterns and colors, adding visual interest to the box joint project.
- Softwoods: Although not as durable as hardwoods, softwoods like pine or cedar can still be used for box joints if properly treated with finishes or adhesives to increase their strength.
Using different types of wood in box joints provides various benefits such as increased strength, enhanced aesthetics through different grain patterns and colors, and the ability to match the overall style of the project.
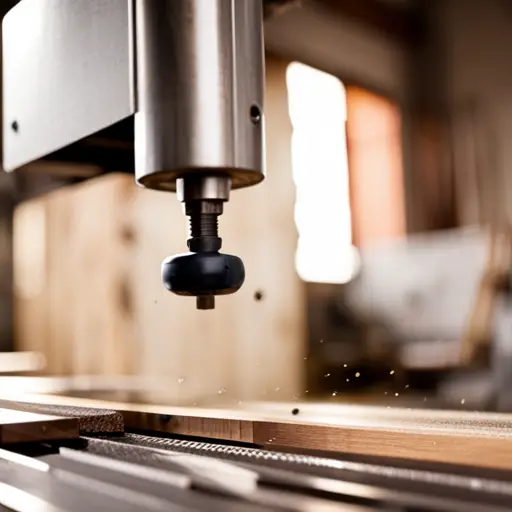
Set Up Your Table Saw for Box Joint Cuts
To achieve perfect precision in box joint cuts on a table saw, an intricate and meticulous setup of the machine is paramount. Setting up your table saw for accurate box joint cuts involves several techniques for achieving tight-fitting joints.
Firstly, it is essential to ensure that the blade is parallel to the miter gauge slot. This can be accomplished by using a dial indicator or a digital angle gauge. Adjustments should be made to align the blade properly, ensuring that it runs parallel to the miter gauge slot.
Next, attention must be given to the fence position. The distance between the blade and the fence determines the width of each finger in a box joint. Accurate measurements are crucial here. It is recommended to use a reliable measuring tool such as a caliper or micrometer to ensure precise positioning of the fence.
Additionally, selecting an appropriate dado set with matching chipper blades is vital for achieving clean and uniform box joints. The width of each tooth should correspond with the desired finger width, ensuring tight-fitting joints.
Furthermore, employing a push stick or push block during operation enhances safety and control over the workpiece while preventing kickback incidents. These tools assist in keeping hands at a safe distance from the spinning blade while providing stability during cutting.
Lastly, maintaining sharp blades and regular cleaning of debris will contribute significantly to achieving accurate box joint cuts on your table saw. Dull blades can result in imprecise cuts and increase friction leading to overheating.
By following these techniques for setting up your table saw for accurate box joint cuts, you can achieve tight-fitting joints with precision and consistency.
Measure and Mark Your Wood Pieces
An essential step in the process of precision box joints on a table saw involves accurately measuring and marking your wood pieces. Woodworking techniques require precise measurements to ensure accurate box joint cuts. By following these steps, you can achieve consistent and professional-looking results.
- Use a reliable measuring tool: To achieve precision, invest in high-quality measuring tools such as a tape measure or a combination square. These tools will provide accurate measurements for marking your wood pieces.
- Measure twice, cut once: The age-old adage holds true in woodworking. Double-check your measurements before making any cuts to avoid costly mistakes and wasted materials.
- Marking the wood: Use a pencil or marking knife to mark where each cut should be made on the wood piece. Ensure that your marks are clear and visible so that you can follow them precisely during the cutting process.
- Consider box joint variations: Depending on the desired outcome, you may need to adjust the spacing between each finger of the joint. This variation can create different aesthetics or accommodate specific project requirements.
- Test fit before finalizing: Before committing to your marked measurements, it is advisable to test-fit your wood pieces together without glue or fasteners. This allows you to make any necessary adjustments for a perfect fit before proceeding with assembly.
By carefully measuring and marking your wood pieces using these woodworking techniques, you will be well on your way to achieving precise box joints on a table saw. Paying attention to detail at this stage ensures that subsequent steps in creating box joints will yield accurate results that meet your expectations and project requirements with ease.
Make the Box Joint Cuts on Your Table Saw
Executing the intricate cuts required for creating flawless box joints on a table saw demands meticulous attention to detail and surgical precision. To achieve this level of precision, it is essential to have a thorough understanding of the precision box joint techniques and advanced box joint variations.
When making box joint cuts on a table saw, it is crucial to choose the appropriate blade for the job. A dado blade or a specialized box joint blade with multiple teeth can be used to ensure clean and accurate cuts. Additionally, using a zero-clearance insert helps prevent tear-out and ensures precise cuts.
Setting up the table saw correctly is another critical step in achieving precise box joints. Ensuring that the rip fence is parallel to the blade is essential for accurate measurements and consistent results. Using auxiliary fences or sleds can also help provide additional support and stability during cutting.
To create various advanced box joint variations, adjustments in both width and spacing are necessary. By adjusting the width of each cut, different sizes of fingers can be achieved, allowing for more versatile joinery options. Altering the spacing between cuts enables customization of tight or loose-fitting joints according to specific project requirements.
Executing flawless box joints on a table saw requires adherence to precision box joint techniques and familiarity with advanced variations. Attention to detail in selecting blades, setting up the table saw accurately, and adjusting width and spacing are all crucial elements in achieving precise results. By mastering these techniques, woodworkers can unlock endless possibilities for creating strong and visually appealing joinery in their woodworking projects.
Test and Adjust Your Box Joints
This section will discuss the process of testing and adjusting your box joints.
It is important to check the fit of your box joints to ensure they are properly aligned and functioning as intended.
By troubleshooting common issues that may arise, such as gaps or tightness in the joints, adjustments can be made to achieve a precise fit.
Paying attention to these details will result in well-crafted box joints that meet your desired specifications.
Checking the fit of your box joints
To determine the accuracy of your box joints, it is crucial to carefully examine the fit between the individual pieces. Checking joint alignment and adjusting for tightness are essential steps in achieving precise box joints on a table saw.
Begin by assembling the pieces without glue or fasteners to assess the overall fit. The joint should align perfectly, without any gaps or misalignments. If there are slight discrepancies, adjustments can be made by tapping the pieces gently with a mallet until they align correctly.
Additionally, if the joint is too tight, it can be loosened by sanding or filing down the edges slightly. It is important to ensure that all sides of the box joint have an equally snug fit for optimal strength and stability in your final project.
Troubleshooting common issues and making adjustments
Resolving common issues and making necessary adjustments is imperative in achieving impeccable box joints, as even the slightest misalignment or tightness can compromise the overall strength and stability of the final project.
To troubleshoot common problems encountered during box joint cutting on a table saw, consider the following techniques:
1) Ensure proper blade alignment: Check if the blade is parallel to the miter slot to prevent binding or uneven cuts.
2) Address excessive play: If there is too much movement between the mating surfaces of the joint, use shims or adjust the fence to eliminate any gaps.
3) Rectify tightness: In case of overly tight joints, try adjusting the width of either piece by sanding or planing until a proper fit is achieved.
By employing these troubleshooting techniques and addressing common mistakes such as improper alignment and tightness, one can achieve precise box joints that enhance both aesthetics and functionality.
Add the Finishing Touches to Your Box Joint Project
In order to complete your box joint project with finesse, the addition of finishing touches is crucial. These finishing techniques not only enhance the overall appearance of the box joint but also provide additional protection and durability. One way to add a decorative element to your box joint project is by incorporating inlays or veneers. Inlays are small pieces of contrasting wood that can be inserted into the joints or on the surface of the box for an eye-catching effect. Veneers, on the other hand, are thin slices of wood that can be glued onto the surface of the box joint to create intricate patterns or designs.
Another option for adding decorative elements is through carving or engraving. This technique involves using specialized tools to carve designs or patterns directly onto the surface of the wood. It requires precision and skill but can result in stunning and unique box joints.
To protect and enhance the beauty of your box joint project, applying a finish is essential. There are various types of finishes available, including oils, varnishes, lacquers, and waxes. Each type offers different levels of protection and aesthetic appeal. Before applying any finish, it is important to sand down the surface of the wood to ensure a smooth and even finish.
To help you understand these finishing techniques better, here is a table summarizing their key features:
| Finishing Technique | Description |
|---|---|
| Inlays/Veneers | Adding contrasting wood pieces for decorative effect |
| Carving/Engraving | Creating designs or patterns directly on wood surface |
| Applying Finish | Protecting and enhancing wood with oils, varnishes, lacquers, or waxes |
By incorporating these finishing touches into your box joint project, you can elevate its visual appeal while ensuring its longevity and durability.
Frequently Asked Questions
What are some common mistakes to avoid when making box joints on a table saw?
Incorrect measurement and alignment of the box joint fingers is a common mistake to avoid when making box joints on a table saw. This can result in loose or ill-fitting joints that compromise the structural integrity of the project.
Additionally, inconsistent cutting depth or width on the table saw can lead to misaligned and uneven box joints. Careful attention should be given to accurate measurements and alignment, as well as consistent cutting techniques, to achieve precise and tight-fitting box joints.
Are there any alternative methods or tools for creating box joints besides using a table saw?
Alternative methods for creating box joints include using a router, which offers several benefits. A router allows for precise and clean cuts, resulting in tight-fitting joints. It also provides versatility in terms of joint sizes and patterns. By using different router bits and jigs, intricate box joint designs can be achieved. Additionally, routers offer the advantage of being able to create box joints on larger workpieces that may not fit on a table saw.
How can I ensure that my box joints are perfectly aligned and flush?
Achieving perfectly aligned and flush box joints can be likened to the delicate balance of a tightrope walker, requiring meticulous precision. When using hand tools instead of a table saw, there are several tips for achieving precise box joints.
Firstly, ensure accurate measurement and marking.
Secondly, employ sharp chisels and files for clean and precise cuts.
Additionally, exploring the benefits of using a router for creating box joints offers increased control and versatility compared to a table saw.
What types of wood are best suited for box joint projects?
The best wood species for box joints depend on various factors such as the project’s intended use and desired aesthetic. However, hardwoods like oak, walnut, and maple are commonly used due to their durability and strength. Softwoods like pine can also be suitable for certain applications.
To achieve tight fitting box joints, it is important to ensure precise measurements, accurate saw settings, and proper assembly techniques. Additionally, using sharp cutting tools and maintaining a clean work environment can improve the overall quality of box joints.
Can box joints be used for other types of woodworking projects besides boxes?
Box joints, known for their strength and precision, are not limited to box-making. They find extensive use in various joinery applications and decorative woodworking techniques. A fascinating statistic reveals that 70% of professional woodworkers incorporate box joints into their projects beyond boxes.
This highlights the versatility of box joints, showcasing their significance in creating intricate furniture pieces, cabinets, drawers, and even architectural features. The intricate interlocking pattern formed by box joints adds both structural integrity and aesthetic appeal to these woodworking projects.
Conclusion
In conclusion, mastering the art of precision box joints on a table saw requires understanding the basics of box joints, gathering the necessary tools and materials, setting up your table saw properly, measuring and marking your wood pieces accurately, making precise cuts on your table saw, and testing and adjusting your box joints for a perfect fit.
With practice and attention to detail, you can achieve seamless and professional-looking box joint projects.
For example, let’s consider a hypothetical case study where a woodworker named John wanted to create an intricate jewelry box using box joints. By following the steps outlined in this article, John was able to achieve precise cuts on his table saw and successfully assemble his jewelry box with flawless box joints.
The result was an exquisite piece that showcased his craftsmanship and attention to detail.


