
In the realm of woodworking, inlay designs are a sophisticated technique that elevates the visual appeal and artistic value of a piece. By seamlessly embedding contrasting materials into wood surfaces, these designs create intricate patterns and captivating textures. However, achieving mastery in this craft requires precision and expertise.
To take inlay designs to the next level, one must harness the power of a table saw—a versatile tool that enables accurate cuts and intricate detailing. This article explores the fundamental aspects of inlay work while emphasizing the role of a table saw in enhancing its intricacy.
By understanding the basics of inlay designs, selecting an appropriate table saw for this specialized task, and employing precise cutting techniques, woodworkers can achieve flawless results. Moreover, attention to detail during fitting and gluing processes ensures seamless integration between materials.
Finally, meticulous finishing and sanding techniques bring out the full potential of these magnificent inlays.
With comprehensive knowledge about taking inlay designs to new heights using a table saw, enthusiasts can delve into this art form with confidence while producing awe-inspiring creations that captivate viewers’ imagination.
Key Takeaways
- Inlay designs add visual appeal and artistic value to woodworking pieces.
- Table saws are essential for enhancing the intricacy of inlay designs.
- Understanding the basics of inlay designs is crucial for using a table saw effectively.
– Precision and expertise are required to master inlay work.
Understanding the Basics of Inlay Designs
The understanding of the fundamentals of inlay designs is crucial for taking them to a higher level using a table saw. Inlay design techniques involve the process of embedding small pieces of material into another surface to create decorative patterns or images. This technique has been used for centuries in various forms, from woodwork to jewelry making.
To create unique inlay patterns, it is important to have a clear understanding of the different types of inlay techniques and materials. The most common types include stringing, banding, and pictorial inlays. Stringing involves adding thin strips of contrasting material into grooves or channels carved into the surface. Banding refers to creating decorative bands by gluing together thin strips or veneers with different colors or patterns. Pictorial inlays are more complex and involve cutting out intricate shapes from different materials and fitting them together like puzzle pieces.
When working on an inlay design with a table saw, precision is key. It is essential to accurately measure and mark the areas where the inlay will be inserted. A table saw allows for straight cuts and precise angles, ensuring that the pieces fit seamlessly together. Additionally, using appropriate safety precautions when operating a table saw is essential to prevent accidents.
Understanding the basics of inlay designs is fundamental for taking them to a higher level using a table saw. By familiarizing oneself with various inlay design techniques and materials, one can create unique patterns that enhance their woodworking projects or other crafts. The precision offered by a table saw enables accurate cuts and seamless fittings, resulting in visually appealing finished products.
Choosing the Right Table Saw for Inlay Work
To achieve precise and intricate inlay work, it is essential to carefully select a table saw that offers the necessary features and capabilities. When it comes to choosing a table saw for inlay work, one can opt for either a portable or stationary option.
A portable table saw provides convenience and ease of transportability. These saws are lightweight and compact, making them ideal for jobsites or small workshops where space is limited. Additionally, they often come with folding stands or wheels for easy maneuverability. However, while portable table saws may offer portability, they may lack some of the advanced features required for complex inlay designs.
On the other hand, a stationary table saw offers numerous benefits for inlay work. These robust machines provide stability and precision needed to create intricate designs accurately. Stationary table saws typically have larger surface areas and more powerful motors compared to their portable counterparts. They also often come equipped with advanced fence systems that ensure accurate cuts every time.
Moreover, stationary table saws usually have better dust collection systems than portable ones. This is crucial when working on detailed inlay designs as dust particles can affect the overall quality of the workpiece.
When choosing a table saw for inlay work, it is important to consider both the benefits of a portable option such as convenience and ease of transportability as well as those of a stationary option including stability, precision, advanced features, and improved dust collection systems.
Selecting the right table saw will significantly enhance one’s ability to take inlay designs to the next level by enabling precise cuts and intricate detailing.
Preparing Your Workpiece for Inlay
Preparing the workpiece for inlay involves meticulous attention to detail and careful craftsmanship, ensuring that the surface is smooth and free from imperfections to achieve optimal results.
Workpiece preparation is a crucial step in the process of creating intricate and beautiful inlay designs using a table saw. To begin with, it is important to select a high-quality workpiece material that can withstand the cutting and shaping required for inlay work. Hardwoods such as maple, walnut, or cherry are often preferred due to their durability and ability to hold fine details. Additionally, the workpiece should be properly dried and stabilized to prevent warping or cracking during the cutting process.
Once the appropriate material has been selected, it is essential to prepare the surface by removing any roughness or unevenness. This can be achieved through sanding with progressively finer grits of sandpaper until a smooth finish is achieved. It is also advisable to use a scraper or chisel to remove any remaining imperfections that cannot be eliminated through sanding alone.
In addition to achieving a smooth surface, precise measurements and markings are crucial for successful inlay design techniques. Careful planning and marking of both the workpiece and the desired inlay pattern will help ensure accurate placement during cutting.
Overall, proper workpiece preparation sets the foundation for successful inlay work using a table saw. The attention given to selecting suitable materials, preparing surfaces, and making precise measurements significantly contributes to achieving optimal results when creating intricate and detailed inlay designs.
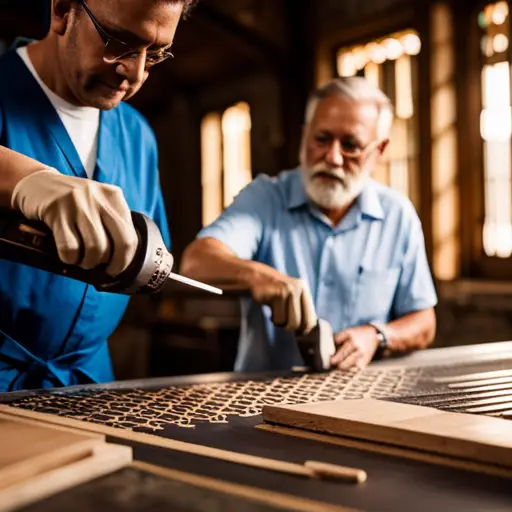
Cutting the Inlay Pieces with Precision
Achieving precise cuts when creating inlay pieces requires a steady hand, sharp tools, and a keen eye for detail, as even the slightest deviation can compromise the overall accuracy and aesthetics of the final design. To ensure accurate cutting techniques, it is crucial to use a table saw with a fine-toothed blade that allows for clean and precise cuts. Additionally, employing proper safety measures such as wearing goggles and using push sticks can help prevent accidents while cutting.
When cutting inlay pieces with precision, it is important to mark the desired dimensions on the workpiece using a pencil or marking knife. This step helps guide the saw blade accurately along the intended lines. Using a square or ruler can further enhance accuracy by ensuring straight cuts.
To create intricate shapes or patterns, advanced cutting techniques such as beveling or angling the saw blade may be necessary. These techniques require careful planning and practice to achieve desired results. It is recommended to make test cuts on scrap wood before attempting intricate designs on valuable materials.
Incorporating various inlay design tips during the cutting process can elevate the final result. For instance, considering grain direction when selecting and orienting wood pieces ensures a seamless integration between inlay and base material. Utilizing contrasting colors or materials adds visual interest to the design.
Overall, achieving precise cuts in inlay pieces involves employing appropriate cutting techniques and incorporating design tips specific to inlays. By following these guidelines meticulously, woodworkers can elevate their craftsmanship and produce visually stunning inlay designs.
| Cutting Techniques | Inlay Design Tips |
|---|---|
| Use fine-toothed blades for clean cuts | Consider grain direction |
| Mark dimensions accurately on workpiece | Incorporate contrasting colors/materials |
| Practice advanced techniques like beveling | Test intricate designs on scrap wood first |
| Ensure safety measures are followed |
Fitting and Gluing the Inlay Pieces
This discussion will focus on two key points related to fitting and gluing the inlay pieces:
- Sanding and shaping the inlay pieces for a perfect fit:nnSanding and shaping the inlay pieces is crucial to ensure a seamless and tight fit between the inlay and the surrounding material. This process requires precision and attention to detail, as any imperfections can compromise the overall quality of the finished product.
2. Choosing the right adhesive for inlay work:nnSelecting the appropriate adhesive is essential for achieving a strong bond between the inlay pieces and the base material. Factors such as durability, compatibility with different materials, and ease of application should be considered when choosing the adhesive.
Sanding and Shaping the Inlay Pieces for a Perfect Fit
Sanding and shaping the inlay pieces is essential for achieving a precise fit. Properly sanding the edges of the inlay pieces ensures that they will seamlessly blend into the surrounding material, creating a smooth and professional finish.
Various sanding techniques can be employed to achieve this desired outcome. One commonly used technique involves using progressively finer grits of sandpaper to gradually smooth out any rough edges or imperfections.
Additionally, shaping tools such as rasps or files can be employed to carefully shape the inlay pieces to match the contours of the surrounding material. These tools allow for precise adjustments and fine-tuning, ensuring an accurate fit that enhances the overall aesthetic appeal of the final product.
By employing these sanding techniques and shaping tools, craftsmen can take their inlay designs to new levels of perfection.
Choosing the Right Adhesive for Inlay Work
One important aspect in the process of creating inlay designs is selecting the appropriate adhesive, which can be likened to finding the perfect puzzle piece that seamlessly fits into place.
Choosing the right adhesive for seamless inlay designs is crucial for achieving a flawless end result. The importance of proper adhesive selection in inlay work cannot be overstated.
Different adhesives have different properties, and understanding these properties is essential for ensuring successful bonding between the inlay pieces and the base material. Factors such as compatibility with different materials, drying time, strength, and ease of use all need to be taken into consideration when choosing an adhesive.
Additionally, factors like temperature and humidity conditions during application should also be considered. By carefully considering these factors and selecting the appropriate adhesive, craftsmen can achieve precise and durable inlay designs that enhance their woodworking projects.
Finishing and Sanding the Inlay Design
To achieve a smooth and polished finish on the inlay design, it is essential to carefully sand the surface using progressively finer grits of sandpaper. This process helps to remove any rough edges or imperfections and create a flawless look.
Here are some key finishing techniques and polishing methods to consider when working with inlay designs:
- Start by using a coarser grit sandpaper, such as 80 or 120, to remove any excess adhesive or material from the surface of the inlay design. This will help create an even base for further sanding.
- Gradually work your way up to finer grits, such as 220, 320, and finally 400 or higher. Each successive grit will help refine the surface and eliminate any visible scratches left behind by the previous grit.
- When sanding, it is important to use light pressure and make sure you cover all areas evenly. This will prevent uneven surfaces or over-sanding in certain spots.
- After reaching your desired level of smoothness with the finest grit, you can opt for additional polishing methods like buffing compounds or abrasive pastes. These products can be applied with a soft cloth or felt pad to enhance the shine of the inlay design.
- Finally, wipe down the surface with a clean cloth dampened with mineral spirits to remove any dust particles before applying a protective finish like varnish or polyurethane.
By following these finishing techniques and polishing methods, you can take your inlay designs to the next level by achieving a professional-looking smooth and polished finish on your projects.
Taking Inlay Designs to the Next Level
In the pursuit of achieving a flawless and refined aesthetic, the meticulous care taken in the final stages of enhancing an inlay design can be likened to an artist’s delicate brush strokes bringing life to a canvas.
Advanced inlay techniques are employed to take these designs to the next level, ensuring that they stand out as true works of art.
One such technique involves using a table saw to create intricate and precise cuts for the inlay pieces. This allows for greater control and accuracy, resulting in seamless integration between the main surface and the inlay design. The table saw’s adjustable fence enables craftsmen to make consistent and uniform cuts, ensuring that each piece fits perfectly into its designated space.
To further enhance the visual appeal of an inlay design, woodworkers can experiment with different types of wood species. By choosing contrasting colors or grains, they can create visually striking patterns that add depth and dimension to the overall composition. Additionally, incorporating exotic woods with unique characteristics can elevate an ordinary design into something truly extraordinary.
Another way to enhance an inlay design is through creative placement and orientation of the pieces. By strategically positioning the inlays within the overall pattern or by angling them at different angles, craftsmen can create optical illusions or dynamic visual effects that captivate viewers’ attention.
Adding additional decorative elements such as metal accents or gemstones can elevate an already impressive inlay design even further. These embellishments provide added texture and shine, making the piece truly luxurious and eye-catching.
In conclusion, advanced inlay techniques offer endless possibilities for enhancing designs on a whole new level. Through precision cutting on a table saw, careful selection of wood species, strategic placement and orientation of pieces, as well as incorporating various decorative elements, craftsmen can transform simple designs into extraordinary masterpieces that will leave audiences amazed.
Frequently Asked Questions
How long does it typically take to complete an inlay design using a table saw?
The time required to complete an inlay design using a table saw can vary depending on several factors. One advantage of using a table saw for inlay designs is the precision it offers, allowing for accurate cuts and intricate detailing. However, this method may take longer compared to other techniques due to the need for multiple passes and careful adjustments.
Other factors that can affect completion time include:
- The complexity of the design
- Skill level of the operator
– Preparation time required.
Can I use any type of wood for inlay designs, or are there specific types that work best?
Different types of wood can be used for inlay designs, but there are specific types that work best. Hardwoods such as ebony, rosewood, and maple are commonly used due to their durability and attractive appearance. Softwoods like pine can also be used, but they are more prone to damage and may require additional protection.
When using a table saw for inlay work, it offers precision and accuracy in cutting the wood pieces, allowing for intricate designs. However, caution must be taken to ensure safety while operating the table saw.
What kind of safety precautions should I take when using a table saw for inlay work?
Table saw safety precautions are crucial to prevent accidents and ensure a successful inlay work.
Firstly, always wear appropriate safety gear such as goggles, ear protection, and gloves.
Before operating the table saw, make sure the blade is sharp and properly aligned.
Maintain a safe distance from the blade and use push sticks or feather boards to guide the wood through.
Avoid wearing loose clothing or jewelry that could get caught in the machinery.
Lastly, never remove safety features or guards for convenience purposes.
Common mistakes to avoid when using a table saw include rushing through cuts, not using proper techniques for different types of cuts, and neglecting regular maintenance of the equipment.
Are there any specific techniques or tips for achieving intricate designs with a table saw?
Advanced inlay design techniques using a table saw require mastering precision and accuracy. Achieving intricate designs necessitates a systematic approach that emphasizes attention to detail.
To begin, select the appropriate blade for your desired cuts, ensuring it is sharp and properly aligned. Implementing jigs and fixtures can aid in controlling workpieces and achieving consistent results.
Additionally, employing a slow feed rate while cutting will enhance control and minimize errors. Diligently practicing these techniques will enable craftsmen to produce exquisite inlay designs with remarkable finesse and artistry.
Are there alternative methods to cutting inlay pieces with a table saw, or is it the most effective tool for the job?
Alternative methods for cutting inlay pieces include using a scroll saw, a handheld router, or a laser cutter. Each method has its pros and cons.
The scroll saw allows for intricate designs but may require more time and skill.
The handheld router offers precision and versatility but can be challenging to control.
Laser cutters provide speed and accuracy but may be limited in terms of design complexity.
Ultimately, the choice of method depends on the specific requirements of the project and the skills of the craftsman.
Conclusion
In conclusion, mastering the art of inlay designs requires precision and attention to detail. By utilizing a table saw specifically chosen for this purpose, one can achieve accurate and clean cuts.
Proper preparation of the workpiece ensures a seamless fit for the inlay pieces, which can then be securely glued into place.
The finishing touches of sanding and polishing enhance the overall look of the design.
With these techniques mastered, one can truly take their inlay designs to the next level.
So why not elevate your woodworking skills and create stunning inlay designs that will impress all who see them?


