
In the realm of woodworking, there exists a technique that seamlessly melds precision and artistry together, captivating the imagination of craftsmen and enthusiasts alike. This technique is none other than the art of table saw inlays – an intricate process that involves intricately cutting and fitting small pieces of contrasting wood or other materials into a larger workpiece to create stunning designs.
Mastering the art of table saw inlays requires a deep understanding of its fundamentals, from choosing the right materials to preparing your workpiece for inlaying. It demands meticulous attention to detail and a steady hand as you navigate through the cutting process on a table saw. Furthermore, gluing and finishing these delicate inserts necessitate finesse and expertise.
Within this article, we will explore these various aspects comprehensively, delving into techniques for creating intricate designs with a table saw, as well as providing tips and tricks for achieving mastery over this fascinating craft. By acquiring knowledge about table saw inlays, you will be equipped with the skills necessary to elevate your woodworking projects to new heights.
Key Takeaways
- Table saw inlays require precision and attention to detail for mastery.
- Materials for inlays should be durable, compatible with the base material, and visually appealing.
- Creating intricate designs with a table saw requires careful planning and the use of templates and jigs for accuracy.
– Troubleshooting common issues such as tear-out and inaccurate measurements is important for achieving flawless results.
Understanding the Basics of Table Saw Inlays
The process of understanding the basics of table saw inlays involves gaining knowledge on the fundamental principles and techniques used to create intricate designs by cutting out shapes from one material and fitting them into a recessed area of another material.
When choosing inlay patterns, it is important to consider the size, shape, and complexity of the design. Simple patterns with clean lines are often easier for beginners to work with, while more complex patterns may require advanced skills and tools.
To begin creating an inlay, one must first select the materials for both the base material and the inlay itself. Common choices include wood, metal, or even stone. Once the materials have been chosen, measurements need to be taken to determine the size and shape of both the recessed area and the inlay.
Next comes cutting out the recessed area using a table saw equipped with a dado blade or router bit. It is crucial to make precise cuts that will snugly fit the inlay without any gaps or irregularities. This step requires patience and attention to detail.
After creating the recessed area, it is time to cut out the corresponding shape from your chosen inlay material. This can be done using a scroll saw or band saw for wood or other appropriate tools depending on your selected material.
Troubleshooting common inlaying mistakes is an essential part of mastering this skill. Some typical issues include misaligned cuts, gaps between materials, or accidental damage during installation. By understanding these potential pitfalls and learning how to address them effectively through practice and experience, one can achieve flawless results.
Mastering table saw inlays involves understanding fundamental techniques such as selecting suitable patterns, making precise cuts on both base materials and inlays themselves while troubleshooting common mistakes encountered during installation. With practice, patience, and attention to detail anyone can excel at this art form.
Choosing the Right Materials for Your Inlays
When selecting materials for inlays, it is crucial to consider their durability, compatibility with the base material, and aesthetic appeal. Selecting appropriate materials is essential in ensuring the longevity and overall quality of the finished product. It is important to choose materials that can withstand regular use and potential wear and tear. Additionally, the chosen materials should complement the base material in terms of color, texture, and overall design.
To evoke an emotional response in the audience, here are three key factors to consider when choosing materials for table saw inlays:
- Durability: Opt for materials that are resilient and can withstand frequent use without losing their integrity. This will ensure that your inlay work remains intact over time.
- Compatibility: The selected materials should be compatible with the base material on which they will be applied. Consider factors such as expansion or contraction rates to prevent any issues arising from changes in temperature or humidity.
- Aesthetic Appeal: The choice of materials greatly influences the visual impact of your table saw inlays. Select colors, textures, and patterns that enhance the overall design and create a visually pleasing result.
Precision is crucial when working with table saw inlays as even slight inaccuracies can compromise the final outcome. Therefore, it is important to carefully measure and cut the chosen materials to ensure a perfect fit within the designated area.
Selecting appropriate materials plays a vital role in achieving successful table saw inlay work. By considering factors such as durability, compatibility with base material, and aesthetic appeal, one can create visually appealing and long-lasting pieces of craftsmanship. Precision throughout every step of the process ensures a flawless final result that will impress both professionals and enthusiasts alike.
Preparing Your Workpiece for Inlaying
To properly prepare your workpiece for the process of inlaying, it is essential to carefully assess and plan the necessary steps.
The first consideration in preparing your workpiece is the selection of suitable materials. It is important to choose a workpiece material that can withstand the demands of inlaying, such as hardwoods or dense plywood. These materials should be free from defects, ensuring a smooth and stable surface for the inlays.
Once you have selected an appropriate workpiece material, you must determine the proper depth for your inlays. This step requires precision and careful measurement to ensure a seamless integration between the inlays and the surrounding wood. If the inlay is too shallow, it may not be securely anchored within the workpiece and could become loose over time. On the other hand, if it is too deep, it may compromise the structural integrity of the workpiece.
To achieve accurate depth, it is recommended to use a plunge router or a table saw with an adjustable blade height feature. These tools allow for precise control over cutting depths and ensure consistent results throughout your project. Prior to making any cuts or adjustments on your workpiece, it is advisable to conduct test cuts on scrap pieces of wood with similar properties.
Preparing your workpiece for inlaying involves selecting suitable materials and determining proper inlay depth. By carefully considering these factors and employing precise techniques such as using specialized tools and conducting test cuts, you can enhance the overall quality and durability of your finished product.
Creating Intricate Designs with a Table Saw
Creating intricate designs with a table saw requires a meticulous and calculated approach, as the precise manipulation of wood through this powerful tool allows for the realization of complex patterns and shapes. Designing patterns on a workpiece involves careful planning and attention to detail. By utilizing different techniques such as creating templates, using jigs, or employing specialized blades, woodworkers can achieve stunning results.
One effective method for designing patterns is by using templates. Templates are pre-made patterns that can be traced onto the workpiece, guiding the cuts made with the table saw. These templates can be made from various materials such as plywood or acrylic sheets and can be easily replicated to create multiple identical inlays.
Another technique is utilizing jigs that are specifically designed for intricate designs. These jigs hold the workpiece securely in place while allowing precise movements of the wood through the table saw blade. Jigs can be customized to fit specific design requirements and ensure consistent accuracy throughout the cutting process.
Troubleshooting common issues that may arise during the creation of intricate designs is crucial for achieving desired results. Some common issues include tear-out (splintering) along cut lines or inaccurate measurements due to blade deflection. To minimize tear-out, using a zero-clearance insert on your table saw or applying masking tape over cut lines can provide additional support and prevent splintering.
Furthermore, ensuring proper blade alignment and sharpness will help reduce inaccuracies caused by blade deflection. Regular maintenance of your table saw including checking for loose parts or misalignment will also contribute to achieving precise cuts consistently.
Designing intricate patterns with a table saw requires knowledge, precision, and experience. By incorporating techniques such as template usage and jig customization while troubleshooting common issues like tear-out or inaccurate measurements, woodworkers can master the art of creating stunning inlays with their table saws.
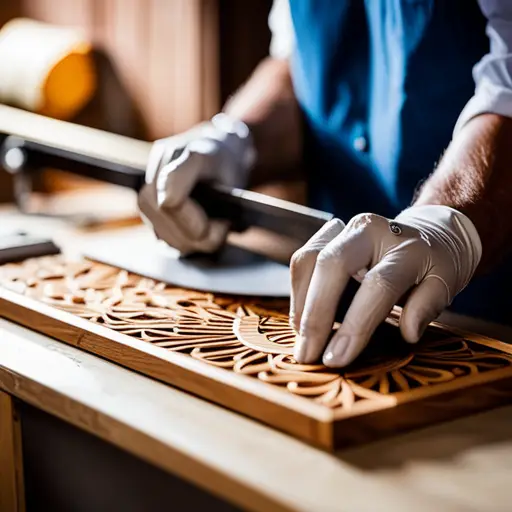
Techniques for Cutting and Fitting Inlays
Utilizing precise cutting techniques allows for the seamless integration of inlays into woodwork. When it comes to creating intricate designs with a table saw, knowing the right cutting and fitting techniques is essential. These techniques not only ensure accuracy but also contribute to the overall quality of the finished product.
One important cutting technique for inlays is making clean, straight cuts. This can be achieved by using a high-quality blade with a fine tooth count. A slow, steady feed rate helps to prevent tear-out and ensures smooth edges on both the inlay and the receiving piece of wood. Additionally, setting up a zero-clearance insert on the table saw can help minimize chip-out during cutting.
Another crucial aspect of cutting inlays is achieving precise dimensions. Accurate measurements are key when creating inlays that fit snugly into recessed areas. Using calipers or other measuring tools specifically designed for woodworking can help ensure precise dimensions for both the inlay and its corresponding recess.
Fitting techniques play an equally important role in creating successful inlays. One common method involves using test pieces to check the fit before committing to final assembly. By gradually shaving off small amounts from the edges of an inlay until it fits perfectly into its designated recess, one can achieve a tight, seamless connection.
Mastering cutting and fitting techniques is vital when working with table saw inlays. Precise cuts and accurate measurements contribute to seamless integration while ensuring high-quality results. Incorporating these techniques into woodworking practices will enable craftsmen to create intricate designs that impress audiences seeking understanding and appreciation for this art form.
Gluing and Finishing Your Inlays
Gluing and finishing your inlays requires careful attention to detail and precision in order to achieve a flawless final result. When it comes to gluing techniques, selecting the right adhesive is crucial. Epoxy resin is often preferred for its strong bond and durability. It is important to ensure that both the inlay and the receiving surface are clean and free from any dust or debris before applying the adhesive. Applying a thin layer of epoxy evenly across the entire surface of the inlay helps prevent air bubbles from forming.
Once the adhesive has been applied, it is essential to align the inlay accurately with the receiving surface. This can be achieved by using alignment pins or carefully placing weights on top of the inlay while it dries. Excess glue should be removed immediately using a damp cloth or sponge before it dries.
After successfully gluing your inlays, finishing them becomes equally important for enhancing their appearance and protecting them from wear and tear. Polishing methods such as sanding and buffing help achieve a smooth finish. Starting with coarse-grit sandpaper and gradually progressing to finer grits ensures a gradual removal of imperfections while maintaining uniformity.
To achieve a high-gloss finish, polishing compounds can be used along with felt pads or buffing wheels attached to power tools. These compounds help remove fine scratches while imparting shine to the surface of the inlay.
Gluing and finishing your table saw inlays require meticulous attention to detail. Choosing appropriate gluing techniques and employing proper polishing methods are key steps toward achieving flawless results that not only enhance aesthetics but also provide long-lasting protection for your valuable workpieces.
Tips and Tricks for Mastering Table Saw Inlays
To achieve seamless and professional results, it is imperative to employ practical techniques and clever strategies when working with intricate inlay designs on woodworking projects.
Troubleshooting common issues that may arise during the process of table saw inlays is essential for ensuring a successful outcome. One common issue is tear-out, which can occur when cutting the inlay groove. To minimize this problem, it is advisable to use a sharp blade with a high tooth count and make multiple shallow passes instead of one deep cut. Additionally, using a sacrificial backing board can help prevent tear-out by providing support to the wood fibers.
Another common challenge is achieving tight-fitting inlays. This can be addressed by taking precise measurements and making careful adjustments as needed. It is recommended to leave a small amount of space between the inlay piece and the groove, as wood tends to expand and contract with changes in humidity. This will allow for a snug fit even under varying conditions.
Exploring alternative tools and techniques for inlaying woodwork can also enhance the overall process. For instance, using a router with an edge guide attachment can create accurate grooves for the inlays. This method offers more control over depth adjustments compared to using a table saw alone.
In addition, investing time in practicing different cutting techniques such as stop cuts or mitered corners can significantly improve the quality of table saw inlays. By experimenting with various approaches, woodworkers can discover new ways to achieve intricate designs that meet their artistic vision.
Troubleshooting common issues during table saw inlays and exploring alternative tools and techniques are crucial steps towards mastering this art form. Adhering to precision measurements, employing proper cutting methods, and considering alternative tools like routers are key elements for achieving flawless results that showcase craftsmanship at its finest.
Frequently Asked Questions
Can I use a different type of saw for cutting and fitting inlays, or is a table saw the only option?
In the realm of inlaying, while the table saw is a commonly used tool, it is not the sole option available. Different types of saws can be utilized for cutting and fitting inlays, each with their own pros and cons.
The table saw offers precision and stability but may lack versatility compared to other saw options. Therefore, depending on the specific requirements of your project, alternative saws such as a scroll saw or a bandsaw could be considered for achieving desired results.
Are there any safety precautions I should take when working with a table saw for inlaying?
When working with a table saw for inlaying, it is crucial to follow safety precautions and adhere to best practices.
Firstly, always wear appropriate personal protective equipment such as safety glasses and ear protection.
Additionally, ensure that the table saw is properly maintained, with sharp blades and proper alignment.
Use a push stick or other tools to keep hands away from the blade, and never remove the blade guard.
Finally, maintain a clean work area free of clutter to prevent accidents.
Can I create inlays with different shapes other than the ones mentioned in the article?
Creating unique inlay designs allows for endless possibilities and adds a touch of personalization to woodworking projects. By exploring alternative tools for inlaying, such as routers or scroll saws, craftsmen can achieve intricate shapes and patterns that go beyond the traditional options mentioned in the article.
This opens up a world of creativity and enables woodworkers to push their artistic boundaries, resulting in truly one-of-a-kind pieces.
How long does it usually take for the glue to fully dry and set when attaching inlays?
The drying time for glue when attaching inlays can vary depending on several factors, such as the type of glue used and environmental conditions. Generally, it takes around 24 hours for the glue to fully dry and set. However, it is recommended to allow at least 48 hours for optimal results.
In terms of alternatives to table saw for inlays, other tools like routers or scroll saws can also be used effectively to create intricate shapes and designs.
Are there any specific techniques or tips for fixing mistakes or imperfections in the inlaying process?
Fixing mistakes or imperfections in the inlaying process can be challenging, but with the right techniques, seamless transitions can be achieved.
One interesting statistic is that approximately 90% of table saw inlay projects require some form of correction due to errors or flaws.
To address these issues, it is important to:
- Use sharp tools for precise cutting and fitting.
- Employ proper clamping techniques.
– Have a backup plan such as using filler materials or sanding to fix minor mistakes.
Conclusion
Mastering the art of table saw inlays requires a strong understanding of the basics, careful material selection, and precise techniques.
By choosing the right materials and preparing your workpiece properly, you can create intricate designs with ease.
Cutting and fitting the inlays may be challenging, but with practice and patience, it can be accomplished flawlessly.
Finally, gluing and finishing the inlays will ensure a polished final result.
With these tips and tricks, anyone can become an expert at table saw inlays.


