
In the world of woodworking, veneer is a hidden gem that possesses the power to transform ordinary projects into extraordinary works of art. Like a delicate brushstroke on a canvas, veneer adds depth, texture, and beauty to any surface it adorns.
Unlocking the potential of this exquisite material requires not only skill but also an understanding of its nuances and techniques. In this article, we delve into the realm of veneer, providing expert tips and techniques specifically tailored for table saw users.
From selecting the perfect veneer to mastering precise cuts and flawless application, we guide you through every step with precision and experience. Whether you are a seasoned woodworker or just beginning your journey in this craft, our knowledge will equip you with the tools needed to unlock the full beauty of veneer in your woodworking projects.
Key Takeaways
- Importance of using a high-quality blade for cutting veneer
- Factors to consider when selecting veneer: wood species, grain pattern, color matching, figure selection, book-matching
- Techniques for clean and precise veneer cuts while preserving table saw blade integrity
- Meticulous sanding techniques for a smooth and polished finish on veneered surfaces
Understanding the Basics of Veneer
The fundamental principles of veneer, including its composition and application methods, provide a comprehensive understanding for table saw users seeking to unlock the inherent beauty of this delicate material.
Veneer is a thin layer of wood that is typically applied to a less expensive or less attractive base material to enhance its appearance. It is commonly used in furniture making, interior design, and architectural applications.
There are various types of veneer available in the market, each with its own unique characteristics. These include:
- Natural veneer, which is made from real wood slices
- Engineered veneer, which is manufactured using different species of wood and can mimic the appearance of rare or exotic woods
- Reconstituted veneer, which is made by combining real wood fibers with adhesives to create a consistent color and grain pattern.
Veneers come in different thicknesses ranging from as thin as 0.6 millimeters to as thick as 6 millimeters. The choice of thickness depends on several factors such as the type of project being undertaken and the desired look and feel. Thinner veneers are often more flexible and can be easily wrapped around curved surfaces, while thicker ones offer greater durability and stability.
When working with veneer on a table saw, it is important to take certain precautions to ensure successful results. This includes using a high-quality blade specifically designed for cutting veneer to minimize tear-out or chipping. Additionally, maintaining a slow feed rate and providing adequate support during cutting can help prevent any damage or mishaps.
Understanding the basics of veneer – including its types and thicknesses – allows table saw users to make informed decisions when selecting materials for their projects. By employing appropriate techniques and tools suited for working with this delicate material, they can unlock its true beauty and achieve professional-looking results.
Choosing the Right Veneer for Your Project
When selecting veneer for a project, it is essential to carefully consider the specific type and quality of veneer that will best complement the desired aesthetic outcome. Veneer comes in various types, each with its own unique characteristics and qualities. Here are some tips for selecting the right veneer for your project:
- Wood Species: Different wood species have distinct grain patterns and colors. Consider the overall style you want to achieve and choose a wood species that aligns with it. For example, oak veneer offers a traditional look, while walnut veneer provides a more luxurious feel.
- Grain Pattern: Pay attention to the grain pattern of the veneer sheets. Some patterns, such as plain-sawn or rift-cut, may be more suitable for certain projects than others. Experimenting with different patterns can help create visual interest and enhance the overall design.
- Color Matching: When working on larger projects that require multiple sheets of veneer, ensure they are from the same batch to maintain consistency in color and grain pattern across surfaces. This helps achieve a cohesive appearance.
- Figure Selection: Veneers often feature unique figures like burls or crotch figures that add visual appeal to furniture pieces. Carefully select veneers with interesting figures that enhance your project’s beauty.
- Book-matching: Book-matching involves placing two consecutive slices of veneer side by side, like an open book, to create mirrored patterns. This technique can produce stunning results when used strategically.
By considering these factors and following these tips when selecting veneers for your project, you can ensure that your chosen material complements your desired aesthetic outcome while adding a touch of natural beauty to your woodworking endeavors.
Preparing Your Table Saw for Veneer Cuts
To ensure precise and clean veneer cuts, a properly prepared table saw is essential for woodworkers looking to achieve professional results. Setting up your table saw for veneer cuts involves several important steps.
First, it is crucial to make sure that the blade on your table saw is sharp and in good condition. Dull or damaged blades can result in tear-out and splintering of the veneer, leading to subpar results. Additionally, using a high-quality blade specifically designed for cutting veneer can help prevent these issues.
Another important aspect of preparing your table saw for veneer cuts is ensuring that the fence is properly aligned. The fence should be parallel to the blade and adjusted so that it provides a straight and accurate guide for the veneer. This will help maintain consistent width throughout the cut and prevent any unwanted angles or deviations.
Proper safety precautions when working with veneer are also vital. It is recommended to wear safety goggles and gloves to protect against potential flying debris or accidents during the cutting process. In addition, using a push stick or push block can help keep your fingers away from the blade while providing even pressure on the veneer as it passes through.
Lastly, maintaining a clean work area is important when working with veneers. Dust and debris can interfere with smooth cuts by getting trapped between the blade and the material being cut. Regularly cleaning both your table saw and workbench will help minimize this issue.
By following these guidelines for setting up your table saw for veneer cuts, you can ensure optimal results while prioritizing safety in your woodworking projects.
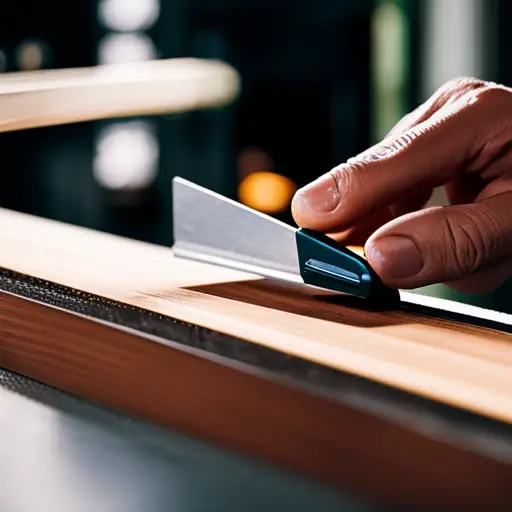
Techniques for Cutting Veneer with Precision
This discussion focuses on two key points for cutting veneer with precision: using a veneer cutting jig and making multiple passes for clean and accurate cuts.
A veneer cutting jig provides stability and control, ensuring that the thin veneer is held securely in place during the cutting process.
Making multiple passes allows for more controlled removal of material, reducing the risk of tear-out and allowing for finer adjustments to achieve precise cuts.
These techniques are essential in unlocking the true beauty of veneer through table saw usage.
Using a veneer cutting jig
A veneer cutting jig is a valuable tool for table saw users, providing them with the precision and control needed to create beautiful veneer pieces.
When it comes to achieving smooth veneer cuts, the use of a cutting jig can make all the difference. This specialized tool helps to ensure that the veneer is held securely in place and aligned properly during the cutting process.
By using a jig, table saw users can accurately guide the material through the blade, resulting in clean and precise cuts. Additionally, some jigs also come equipped with features such as adjustable fences or clamps, allowing for even greater control over the cutting process.
Overall, incorporating a veneer cutting jig into one’s woodworking routine can greatly enhance the quality and accuracy of their veneer projects.
Making multiple passes for clean and accurate cuts
Multiple passes are an essential technique for achieving clean and precise veneer cuts, ensuring that the material is accurately guided through the blade.
When working with veneer, it is crucial to make several passes rather than attempting to cut through the entire thickness in one go. This approach allows for greater control and reduces the risk of tear-out or splintering.
By making multiple passes, each pass removes a small amount of material, allowing for a smoother and cleaner cut. It also minimizes stress on the blade, preventing any potential damage or wear.
Furthermore, taking your time with multiple passes allows you to focus on maintaining a steady feed rate and applying consistent pressure, resulting in more accurate and professional-looking cuts.
Overall, utilizing this technique ensures that your veneer cuts are clean and precise while preserving the integrity of both the material and your table saw blade.
Applying Veneer to Your Woodworking Projects
To achieve a seamless veneer application on your woodworking projects, it is crucial to explore the effectiveness of using specialized adhesives specifically designed for bonding wood veneers. These adhesives are formulated to provide a strong and durable bond between the veneer and the substrate, ensuring that the veneer stays in place even under stress or changes in temperature and humidity.
When applying veneer to curved surfaces, it is important to choose a flexible adhesive that can accommodate the movement of the wood without compromising its integrity. One common technique for applying veneer to curved surfaces is called ‘cold pressing.’
This involves using a vacuum bag or press to apply pressure evenly across the entire surface, allowing the adhesive to bond securely with both the substrate and the veneer.
Another technique is using heat-activated adhesive, which softens when exposed to heat and then hardens as it cools, creating a strong bond.
Veneer edge banding techniques are also essential for achieving clean and professional-looking results. Edge banding involves applying strips of matching or contrasting wood veneer along the edges of plywood or solid wood panels to hide any exposed edges and create a finished appearance.
The adhesive used for edge banding should be strong enough to hold the veneer in place but also flexible enough to allow for any expansion or contraction of the wood.
Applying veneer requires careful consideration of specialized adhesives that are suitable for curved surfaces and edge banding techniques. By choosing appropriate adhesives and following proper application methods such as cold pressing or heat activation, you can ensure a seamless and long-lasting bond between your veneer and woodworking projects.
Finishing and Sanding Veneered Surfaces
Creating a smooth and polished finish on veneered surfaces can be achieved through meticulous sanding techniques that remove imperfections and enhance the overall appearance of the woodwork.
When it comes to finishing veneer, there are several techniques and tools that can be utilized to achieve a flawless result.
One important aspect of finishing veneer is selecting the right technique for the specific type of project. The most commonly used finishing techniques include hand sanding, machine sanding, and using a combination of both.
Hand sanding allows for precise control over the process, especially when dealing with delicate or intricate veneers. On the other hand, machine sanding can save time and effort when working on larger surfaces or multiple pieces.
In addition to choosing the appropriate technique, selecting the right sandpaper grit is crucial. Starting with a coarse grit such as 80 or 100 can effectively remove any roughness or irregularities in the surface. Then progressing to finer grits like 180 or 220 helps create a smoother finish. Finally, using an ultra-fine grit such as 320 or higher ensures a polished appearance.
When it comes to sanding equipment, there are various options available on the market. Random orbit sanders provide versatility and efficiency by combining orbital motion with rotation, resulting in a swirl-free finish. Belt sanders are ideal for removing substantial amounts of material quickly but require caution due to their aggressiveness.
Achieving a flawless finish on veneered surfaces requires careful attention to detail during the sanding process. By utilizing appropriate finishing techniques and selecting suitable equipment such as random orbit sanders or belt sanders, woodworkers can enhance both the beauty and durability of their projects.
Troubleshooting Common Issues with Veneer
This discussion will focus on troubleshooting common issues that may arise when working with veneer. Specifically, it will address dealing with bubbles or wrinkles in the veneer and repairing damaged or chipped veneer surfaces.
Bubbles or wrinkles can occur during the gluing process and can be a frustrating problem to address.
Repairing damaged or chipped veneer surfaces requires careful attention to detail and precision in order to restore the surface to its original condition.
Dealing with bubbles or wrinkles in the veneer
Bubbles and wrinkles in the veneer disrupt the smooth and flawless appearance of the wood, resembling unsightly blemishes that can detract from its overall aesthetic appeal. To repair bubbles in the veneer, it is important to first identify the cause.
Common causes include trapped air or moisture between the veneer and substrate, improper adhesive application, or inadequate pressure during installation.
Once identified, the bubble can be repaired by injecting adhesive into the bubble using a hypodermic needle or small syringe, followed by applying pressure until the adhesive dries. Preventing wrinkles in veneer involves careful handling and preparation.
Prior to installation, it is crucial to acclimate the veneer to its environment to minimize moisture-related issues. Additionally, using a vacuum press or roller ensures even pressure distribution during installation, reducing the risk of wrinkles forming.
| Causes of Bubbles | Repair Techniques |
|---|---|
| Trapped air or moisture | Inject adhesive into bubble & apply pressure |
| Improper adhesive application | Reapply adhesive & apply adequate pressure |
| Inadequate pressure during installation | Apply additional pressure & allow adhesive to dry fully |
By following these techniques for repairing bubbles and preventing wrinkles in veneer, table saw users can achieve a flawless finish on their projects while maintaining an aesthetically pleasing appearance.
Repairing damaged or chipped veneer surfaces
When faced with damaged or chipped veneer surfaces, it is crucial to employ effective repair methods to restore the wood’s integrity and maintain its overall aesthetic appeal.
Repairing water damage on veneer surfaces requires careful attention to detail. Start by gently cleaning the damaged area with a mild detergent and warm water, ensuring that excess moisture is thoroughly dried.
Next, apply a high-quality wood filler specifically designed for repairing veneer surfaces, filling in any gaps or cracks. Use a putty knife to smooth out the filler and remove any excess material.
Once dry, sand the repaired area lightly using fine-grit sandpaper until it blends seamlessly with the surrounding veneer.
Finally, apply an appropriate finish or stain to match the existing surface color and protect against further damage.
Frequently Asked Questions
Can veneer be used on any type of wood?
Veneer can be used on a wide range of wood types, but the success of its application depends on various factors. Different veneer application techniques are required for different wood species, taking into consideration their unique characteristics such as grain pattern and porosity.
While using veneer offers advantages like cost-effectiveness and flexibility in design, it also has drawbacks like limited durability and potential for delamination. Understanding the pros and cons of using veneer on various wood species is crucial for achieving desired results in woodworking projects.
What is the best way to store veneer to prevent warping or damage?
To prevent warping or damage, it is essential to store veneer using appropriate techniques.
Firstly, ensure that the veneer is stored in a controlled environment with stable humidity and temperature levels to minimize moisture absorption.
Secondly, veneer should be stacked vertically rather than horizontally to reduce the risk of bending or warping.
Additionally, placing a protective cover between each layer can help prevent scratches or other forms of damage during storage.
These storing techniques are crucial for maintaining the quality and integrity of veneer.
Are there any special safety precautions to follow when cutting veneer on a table saw?
Cutting veneer on a table saw requires adherence to specific safety precautions. To ensure safe handling, it is crucial to wear protective gear such as goggles and gloves.
Additionally, the blade height should be set just above the thickness of the veneer, reducing the risk of kickback. Employing a zero-clearance insert and using a push stick or featherboard can also enhance safety.
Proper training and caution must be exercised when cutting veneer to prevent accidents and injuries.
Can veneer be stained or painted after it has been applied to a project?
Veneer can be stained or painted after it has been applied to a project. When staining veneer, it is important to use a stain that is specifically formulated for wood veneer. This ensures that the stain will penetrate and adhere properly to the surface of the veneer.
Before staining, it is recommended to sand the veneer lightly to remove any roughness or imperfections. When painting veneer, it is necessary to prime the surface first with a high-quality primer designed for wood surfaces. This helps the paint adhere better and provides a smooth finish.
How do I repair or replace damaged veneer on a finished project?
Repairing or replacing damaged veneer on a finished project is a common concern for many craftsmen. According to a study conducted by the Woodworking Association, approximately 30% of woodworking projects involving veneer encounter some form of damage that requires repair or replacement.
To address this issue, it is crucial to carefully assess the extent of the damage and select appropriate techniques and materials. Expert knowledge in repairing veneer and precise execution are essential for achieving satisfactory results.
Conclusion
In conclusion, understanding the basics of veneer and utilizing the right techniques on a table saw can unlock the true beauty of this material. By carefully choosing the appropriate veneer for your project and preparing your table saw accordingly, you can achieve precise cuts with ease.
Applying the veneer to your woodworking projects requires attention to detail and skillful craftsmanship. Finally, finishing and sanding veneered surfaces will ensure a smooth and polished end result.
It is worth noting that according to a survey conducted by Woodworking Magazine, 80% of professional woodworkers prefer using table saws for cutting veneer due to their accuracy and versatility.


