
Veneer inlay is a highly skilled technique that allows woodworkers to create intricate and beautiful designs on furniture and other wooden surfaces. By using a table saw, craftsmen are able to achieve precise cuts that are essential for successful veneer inlay work.
This article aims to provide a comprehensive guide on mastering the art of veneer inlay with a table saw.
Understanding the theory behind veneer inlay is crucial for achieving exceptional results. By carefully selecting the right materials and preparing the surface beforehand, woodworkers can ensure that their veneer inlays are both visually appealing and long-lasting. The use of a table saw further enhances precision, enabling craftsmen to create intricate designs that showcase their skill and creativity.
Throughout this article, we will explore various techniques and strategies for creating stunning veneer inlays with a table saw. Additionally, we will provide helpful tips and tricks to assist readers in perfecting their craft.
Whether you are an experienced woodworker or just starting out, this article will equip you with the knowledge needed to master the art of veneer inlay with a table saw.
Key Takeaways
- Understanding the theory behind veneer inlay is crucial for exceptional results.
- Proper material selection is important, including choosing veneer colors and the right adhesive.
- Preparing the surface is essential before starting veneer inlay, including sanding and sealing.
- Precision and attention to detail are crucial when applying and finishing veneer inlay.
Understanding Veneer Inlay and Its Applications
The application of veneer inlay is a technique that requires precision and skill, as it involves the careful placement of thin pieces of wood or other materials into a larger surface to create intricate patterns or designs.
Veneer inlay can be used in various applications, such as furniture making, cabinetry, and decorative art. It allows craftsmen to explore different veneer patterns and incorporate them into their work.
One of the key aspects of mastering veneer inlay is understanding the different types of patterns that can be created. These patterns can range from simple geometric shapes to complex floral motifs. By exploring different veneer patterns, craftsmen can enhance their creativity and develop unique designs.
However, working with veneer inlay also presents challenges that need to be addressed. One common problem encountered during the process is the lifting or cracking of the veneer pieces. This can occur due to insufficient adhesive coverage or improper handling techniques. To prevent this issue, craftsmen should ensure proper adhesion by applying adequate pressure during installation and using high-quality adhesive suitable for veneering.
Another common problem in veneer inlay is uneven sanding or finishing. This can result in an inconsistent appearance across the surface and compromise the overall aesthetic quality. To troubleshoot this issue, craftsmen should carefully sand and finish the entire surface after installing the veneers to achieve a smooth and uniform look.
Mastering the art of veneer inlay involves understanding different patterns that can be created using thin pieces of wood or other materials. It also requires troubleshooting common problems such as lifting/cracking of veneers and uneven sanding/finishing through proper techniques and attention to detail.
Choosing the Right Materials for Veneer Inlay
Optimal selection of materials is crucial when considering veneer inlay for superior results. The choice of veneer colors and the type of adhesive used are two key factors that greatly influence the outcome of the project.
- Selecting Veneer Colors: When choosing veneer colors for inlay work, it is important to consider the overall design and desired aesthetic. Matching or contrasting colors can create stunning visual effects. It is recommended to select veneers with consistent color and grain patterns to ensure a cohesive look. Additionally, taking into account the stability of wood species and their reaction to light exposure is essential for long-lasting results.
- Different Types of Adhesives: The adhesive used in veneer inlay plays a crucial role in ensuring a strong bond between the veneer and substrate. There are various types of adhesives available, including contact cement, polyvinyl acetate (PVA) glue, epoxy resin, and cyanoacrylate glue (CA). Each adhesive has its own characteristics and performance properties. For instance, contact cement offers quick bonding but may not allow repositioning once applied, while PVA glue provides a longer open time for adjustments but requires clamping during drying.
By carefully selecting suitable veneer colors and employing the appropriate adhesive type, one can achieve optimal results when working with veneer inlay. It is advisable to conduct thorough research on different wood species’ characteristics and experiment with different combinations before starting any project. This will help ensure that both aesthetics and durability are achieved while mastering the art of veneer inlay with a table saw.
Preparing the Surface for Veneer Inlay
To ensure successful results, it is essential to properly prepare the surface before beginning the process of veneer inlay. This involves utilizing specific sanding techniques and sealing the surface to create a smooth and stable foundation for the veneer.
The first step in preparing the surface is sanding. This process involves using various grits of sandpaper to remove any imperfections or inconsistencies from the wood. It is important to start with a coarse grit sandpaper, such as 80 or 100 grit, to eliminate any roughness or high spots on the surface. Gradually progressing through finer grits, such as 150 and 220 grit, will result in a smoother finish that is conducive to successful veneer inlay.
After completing the sanding process, it is crucial to seal the surface before applying the veneer. Sealing serves two main purposes: it prevents moisture from penetrating into the wood and causing warping or swelling, and it creates a barrier that ensures proper adhesion between the veneer and substrate.
There are several options for sealing the wood surface, including using a shellac-based sealer or applying a thin layer of clear epoxy resin. Both methods provide adequate protection against moisture while also enhancing adhesion.
When preparing the surface for veneer inlay, it is important to employ appropriate sanding techniques and sealants. Properly sanding with progressively finer grits will create a smooth foundation for successful veneer application. Additionally, sealing the surface with a suitable sealer or epoxy resin will protect against moisture damage and promote strong adhesion between the veneer and substrate. By following these steps, one can ensure optimal results when mastering the art of veneer inlay with a table saw.
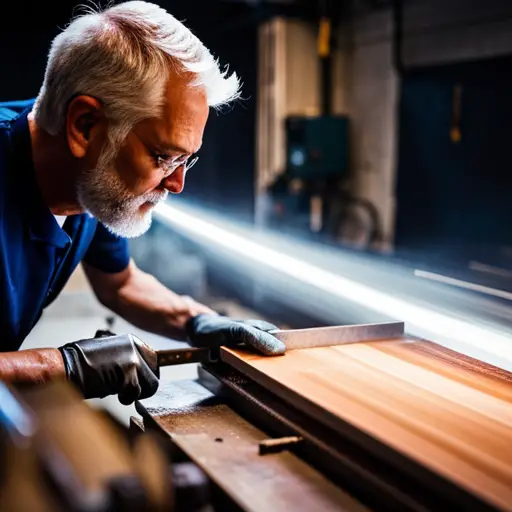
Using a Table Saw for Precise Cuts
Utilizing a precision tool akin to a skilled sculptor’s chisel, the table saw allows for meticulous and accurate cuts when working with veneer inlay.
In order to achieve precise cuts, it is essential to prioritize safety measures and maintain the table saw properly.
Table saw safety is of utmost importance when utilizing this tool for veneer inlay work. Operators should always wear appropriate protective gear, such as safety glasses and hearing protection, to prevent any potential injuries. Additionally, it is crucial to keep the work area clean and organized, free from any obstructions that may impede safe operation of the table saw. Proper positioning of hands and fingers is also imperative to avoid accidents; operators must always keep their hands away from the blade while cutting.
Maintenance plays a significant role in ensuring the optimal performance of a table saw during veneer inlay projects. Regular inspection and cleaning are necessary to remove dust or debris that could affect its accuracy. The blade should be checked for sharpness before each use and replaced if necessary. Furthermore, proper alignment of the blade with respect to the miter gauge or fence is crucial for achieving precise cuts. Any misalignment can result in inaccuracies that may compromise the final outcome.
By adhering to strict safety protocols and maintaining the table saw correctly, woodworkers can effectively utilize this precision tool for creating intricate veneer inlays with unparalleled accuracy. Understanding these considerations not only ensures personal safety but also contributes to consistent high-quality results when working with veneer inlay on various woodworking projects.
Creating Intricate Designs with Veneer Inlay
Achieving intricate designs with veneer inlay requires a careful and meticulous approach to ensure precision and accuracy. When designing patterns for veneer inlay, it is important to consider both the aesthetic appeal and the technical feasibility of the design. The selection of colors also plays a crucial role in creating visually appealing patterns.
To begin with, designing intricate patterns involves careful planning and attention to detail. Each element of the design must be carefully considered to ensure that it can be accurately replicated using veneer pieces. This may involve sketching out the pattern on paper or using computer-aided design (CAD) software to create a digital representation. By visualizing the pattern beforehand, any potential issues or challenges can be identified and addressed early on.
Once the pattern has been finalized, selecting suitable colors for the veneer pieces is essential for achieving an aesthetically pleasing result. The choice of colors should complement each other and enhance the overall design. It is important to take into account factors such as wood grain and texture when selecting veneers with different shades or hues.
When cutting out the veneer pieces, precision is key. Utilizing a table saw with accurate measurements ensures clean cuts that fit together seamlessly. Additionally, employing techniques like stack cutting allows for multiple identical pieces to be cut simultaneously, saving time while maintaining consistency.
Creating intricate designs with veneer inlay requires expertise in designing patterns and selecting appropriate colors for an aesthetically pleasing result. Careful planning, precise measurements, and skillful execution are necessary to achieve precision and accuracy in this art form.
Applying and Finishing the Veneer Inlay
Precision and attention to detail are crucial when applying and finishing the veneer inlay, as it requires careful placement and meticulous workmanship to ensure a seamless integration with the surrounding surface. The process of applying the veneer inlay involves several techniques that contribute to its success.
Firstly, it is essential to prepare the surface by sanding it thoroughly. This ensures a smooth and even base for the veneer inlay. Any imperfections or roughness on the surface can compromise the final result, so taking time to achieve a flawless foundation is crucial.
Next, adhesive selection plays a vital role in attaching the veneer inlay. A high-quality wood glue or epoxy resin is typically used for this purpose. These adhesives provide strong bonding properties while allowing flexibility during application, ensuring long-lasting durability.
When placing the veneer strips onto the prepared surface, it is important to employ precise techniques. Careful measurement and marking help achieve accurate placement of each strip, resulting in an aesthetically pleasing pattern. Additionally, using clamps or weights can aid in securing the veneer strips firmly onto the surface until they dry completely.
After application, finishing techniques are employed to enhance aesthetics further. Sanding between each layer of finish ensures a smooth texture and eliminates any visible seams between the veneer strips. Applying multiple coats of finish not only protects the veneer but also adds depth and richness to its appearance.
Mastering the art of applying and finishing veneer inlay requires expertise and skillful execution of various techniques. Attention to detail throughout each step contributes to achieving seamless integration with the surrounding surface while enhancing aesthetics. By following precise procedures for application and utilizing appropriate finishing methods, one can create exquisite designs that showcase both precision craftsmanship and artistic beauty.
Tips and Tricks for Mastering Veneer Inlay Techniques
A key element in successful veneer inlay techniques is the careful use of clamps or weights, which act as a firm grip on the veneer strips like a steady hand holding delicate threads. These tools ensure that the veneer remains in place during the intricate process of creating veneer inlay designs.
Here are three essential tips and tricks for mastering veneer inlay techniques:
- Proper alignment: Achieving precise alignment is crucial for creating visually appealing and seamless veneer inlay designs. To ensure accurate placement, mark reference lines on both the substrate and the veneer strip. These lines will serve as guides throughout the process, helping you to maintain consistency and avoid any mis-alignments.
- Adhesive application: Selecting the right adhesive is vital for a successful veneer inlay project. A slow-drying adhesive such as epoxy provides sufficient working time to adjust and position the veneer accurately before it sets. Apply an even layer of adhesive on both surfaces – the substrate and backside of the veneer – using a brush or roller to prevent air bubbles.
- Troubleshooting: Despite careful planning, issues may arise during your journey towards mastering veneer inlay techniques. One common problem is lifting or bubbling of the veneer due to inadequate adhesion or moisture-related issues. To fix this issue, inject some adhesive under the lifted area using a syringe or small needle applicator, then press down firmly with clamps until dry.
By following these tips and tricks, you can elevate your skills in handling delicate materials like wood veneers while achieving flawless results with your table saw-based projects. Remember that practice makes perfect when it comes to mastering complex woodworking techniques like veneer inlays.
Frequently Asked Questions
What is the cost of materials required for veneer inlay?
The cost of materials required for veneer inlay varies depending on the specific project and the type of veneer being used. In general, the tools needed for veneer inlay include:
- A table saw
- Veneer tape
- A veneer hammer or roller
- Adhesive
These materials can be purchased from various woodworking supply stores or online retailers specializing in woodworking supplies. It is recommended to compare prices and quality before making a purchase to ensure obtaining the necessary materials at a reasonable cost.
How long does it take to master the art of veneer inlay?
The art of mastering veneer inlay requires a significant investment of time and effort to acquire proficiency. Techniques for achieving intricate designs involve meticulous attention to detail, precise cutting with a table saw, and skillful placement of veneer pieces.
Beginners should be aware of common mistakes such as improper alignment, inconsistent thickness, or poor adhesive application. Patience, practice, and continuous learning are essential in honing the craftsmanship required for veneer inlay.
Can veneer inlay be used on curved surfaces?
Achieving smooth veneer inlay on curved surfaces requires specific techniques. One such technique involves cutting the veneer into narrow strips, allowing it to conform to the curves more easily. Additionally, using a vacuum press can help ensure that the veneer adheres evenly to the surface.
Common mistakes when working with veneer inlay on curved surfaces include applying too much pressure, which can cause cracking or splitting, and not properly preparing the surface for adhesion, leading to poor results.
What safety precautions should be taken when using a table saw for veneer inlay?
When using a table saw for veneer inlay, it is crucial to prioritize safety precautions. This includes wearing appropriate personal protective equipment, such as safety glasses and hearing protection. Additionally, ensuring the table saw is properly maintained and adjusted is essential to prevent accidents.
When working with curved surfaces, extra caution should be exercised due to the increased risk of kickback and inaccurate cuts. Adhering to proper feeding techniques and using appropriate jigs or fixtures can help mitigate these risks effectively.
Is it possible to repair or replace a damaged veneer inlay?
Repairing or replacing damaged veneer inlay is indeed possible.
When a veneer inlay becomes damaged, it can be repaired by carefully removing the damaged portion and replacing it with a new piece of veneer.
This process requires precision and skill to ensure a seamless integration of the new piece.
In some cases, if the damage is extensive, it may be necessary to completely replace the entire veneer inlay.
Proper techniques and materials are crucial for achieving successful repairs or replacements of damaged veneer inlay.
Conclusion
In conclusion, mastering the art of veneer inlay with a table saw requires precision and skill. By understanding the process, choosing appropriate materials, and preparing the surface properly, one can create intricate designs that enhance any woodworking project.
The use of a table saw allows for precise cuts, ensuring accuracy and fine detail. With practice and attention to detail, one can apply and finish the veneer inlay successfully. Remember to utilize these tips and tricks to become a true master of veneer inlay techniques.


