
Woodworking is a craft that has been honed and perfected over centuries, with artisans constantly seeking ways to elevate their skills.
One technique that stands out for its precision and versatility is the dado cut. Derived from the Italian word ‘dado’ meaning ‘dice,’ this woodworking technique involves creating precise grooves or slots in wood, allowing for seamless joinery and increased structural integrity.
Dado cuts offer a wide range of benefits, from providing additional support for shelves and panels to creating intricate designs and patterns.
In order to master this technique, it is important to understand the step-by-step process involved in making dado cuts, as well as choosing the right blade for optimal results.
This article will provide a comprehensive guide on making dado cuts, including tips and techniques for perfecting your craftsmanship.
Additionally, we will explore creative applications of dado cuts that will take your woodworking skills to the next level.
Whether you are an experienced woodworker or just starting out, mastering dado cuts will undoubtedly enhance your repertoire of woodworking techniques.
Key Takeaways
- Dado cuts offer increased joint strength and stability
- Accurate measurement and calibration of the blade’s width is essential for precise dado cuts
- Making multiple passes when cutting results in cleaner and smoother cuts
– Using a sacrificial fence can prevent tear-out and ensure clean results when making dado cuts
Understanding Dado Cuts
Dado cuts are a woodworking technique that involves cutting a groove or channel across the grain of a workpiece, typically used for joining pieces together or creating space for shelves in cabinetry. This method provides several advantages in woodworking projects.
Firstly, dado cuts offer increased joint strength compared to other methods such as butt joints or dowel joints. The interlocking nature of the dado cut creates a more secure connection between the pieces, ensuring greater stability and durability.
Additionally, dado cuts allow for precise alignment and positioning of pieces during assembly. By providing a designated space for components to fit into, dado cuts ensure accurate and consistent placement, resulting in a seamless final product. This is particularly beneficial when constructing cabinets or shelving units where uniformity is key.
Furthermore, dado cuts enable efficient use of materials by eliminating the need for additional hardware such as nails or screws to join pieces together. This not only reduces costs but also enhances the aesthetic appeal of woodworking projects by minimizing visible fasteners.
However, it is important to consider some potential disadvantages associated with using dado cuts. One challenge lies in accurately measuring and setting up the cutting tools to achieve precise dimensions required for proper fitment. Additionally, dado cuts may weaken the structural integrity of certain types of wood if they are not executed properly or if excessive material is removed.
Understanding and utilizing dado cuts can significantly elevate one’s woodworking skills by enhancing joint strength, facilitating precise assembly, and optimizing material usage. Although some challenges exist with this technique, careful attention to detail and proper execution can overcome these limitations and result in exceptional craftsmanship.
Benefits of Dado Cuts
Utilizing dado cuts can greatly enhance the precision and efficiency of woodworking, allowing for seamless joints and increased stability in finished projects. Dado cuts, also known as housing or trenching, are horizontal grooves cut into a piece of wood to create a channel that another piece of wood can fit into. These cuts provide several advantages that make them a valuable technique for woodworkers.
One key benefit of dado cuts is their ability to create strong and secure joints. By removing material from both pieces of wood, dado cuts increase the surface area for bonding, resulting in a more stable connection compared to other joint types such as butt joints or miters. This added strength is particularly advantageous when constructing furniture or cabinetry that may experience significant weight or pressure.
Furthermore, dado cuts offer versatility in terms of their applications. They can be used for various purposes such as creating shelves, dividers, or drawers within furniture pieces. Additionally, dado cuts allow for efficient assembly by providing precise locations for inserting components during construction. This ensures accurate alignment and saves time by eliminating the need for measurements and adjustments.
Another advantage of using dado cuts is their ability to hide joint lines. Unlike certain joinery methods that leave visible seams or gaps between connected pieces, dado cuts create flush connections where one piece fits snugly into the groove of another. This seamless integration adds an aesthetic appeal to woodworking projects while also improving overall structural integrity.
Incorporating dado cuts into woodworking practices offers numerous advantages and uses. The strength and stability they provide make them ideal for creating durable furniture pieces, while their versatility allows for diverse applications within different projects. Moreover, the ability to conceal joint lines enhances both the visual appeal and structural soundness of finished works. Overall, utilizing dado cuts is an effective way to elevate woodworking craftsmanship by achieving precise joinery with increased efficiency.
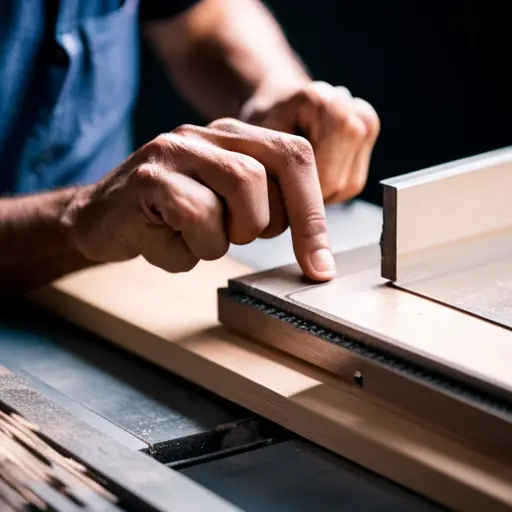
Step-by-Step Guide to Making Dado Cuts
Implementing the precise technique of creating dado cuts involves following a step-by-step guide that ensures accurate and seamless joints in woodworking projects.
The step by step dado cutting process is as follows:
- Measure and mark:
– Begin by measuring and marking the location where the dado cut will be made on both pieces of wood.
– Use a marking gauge or a square to ensure accuracy.
- Set up the saw:
– Adjust the height of the table saw blade to match the desired depth of the dado cut.
– Also, set up a dado blade stack or a router bit with an appropriate width for the cut.
- Make multiple passes:
– To achieve a clean and precise dado cut, it is recommended to make multiple passes instead of trying to remove all material in one go.
– Start with a shallow pass, gradually increasing the depth with each subsequent pass until reaching the desired width.
It is important to keep in mind some common mistakes to avoid when making dado cuts:
- Incorrect measurements:
– Accurate measurements are crucial for successful dado cuts.
– Even small errors can lead to ill-fitting joints or gaps between pieces.
- Rushing through cuts:
– Taking your time during each pass ensures precision and reduces the risk of errors or kickbacks from improper feeding.
- Neglecting safety precautions:
– Always wear appropriate safety gear such as goggles and gloves when working with power tools like table saws or routers.
By following this step-by-step process and avoiding common mistakes, woodworkers can enhance their craftsmanship and achieve professional-looking results when making dado cuts in their woodworking projects.
Choosing the Right Dado Blade
The selection of an appropriate dado blade is crucial for achieving precise and seamless joints in woodworking projects, evoking a sense of confidence and satisfaction in the woodworker. When choosing a dado blade, it is important to consider several key features that will greatly impact the quality of the cuts and overall performance.
One essential feature to look for in a dado blade is its adjustability. This allows the woodworker to fine-tune the width of the cut, ensuring a perfect fit for the corresponding material being used.
Additionally, a dado blade with multiple chippers and shims provides flexibility in creating different width cuts without having to purchase separate blades.
Another important aspect to consider is the material from which the dado blade is made. Carbide-tipped blades tend to offer superior durability and longevity compared to high-speed steel blades. The carbide tips are more resistant to wear and can maintain their sharpness over extended periods of use.
Safety precautions should always be taken when using dado blades due to their cutting capabilities. It is imperative to carefully read and follow all manufacturer instructions regarding installation, operation, and maintenance. Proper eye protection should be worn at all times during usage, as well as utilizing push sticks or feather boards when feeding material through a table saw.
Selecting the right dado blade is essential for achieving accurate and professional-looking joints in woodworking projects. By considering features such as adjustability and material composition, woodworkers can ensure they have chosen a reliable tool that will enhance their craftsmanship. Furthermore, adhering strictly to safety precautions guarantees both efficient work practices and personal protection while operating with these powerful cutting tools.
Tips and Techniques for Perfect Dado Cuts
One key technique to achieve flawless dado cuts involves precise measurement and calibration of the blade’s width. By ensuring that the blade is set to the correct width, woodworkers can create dado cuts that fit perfectly, resulting in stronger joints and a more professional finish.
There are several tips and techniques that can help woodworkers achieve perfect dado cuts.
- Use a dial caliper or digital gauge: Measuring the width of the dado cut with precision is crucial for achieving accurate results. A dial caliper or digital gauge allows woodworkers to measure the width of the blade accurately.
- Test cuts on scrap wood: Before making a dado cut on your workpiece, it is recommended to make test cuts on scrap wood first. This allows you to fine-tune your setup and ensure that everything is aligned properly before cutting into your final piece.
- Make multiple passes: When making a deep or wide dado cut, it is often better to make multiple passes instead of trying to remove all the material in one go. This reduces strain on both the blade and the motor, resulting in cleaner and more controlled cuts.
- Use a sacrificial fence: To prevent tear-out along the edges of your dado cut, consider using a sacrificial fence. This additional layer of protection helps maintain clean edges by supporting the fibers as they are being cut.
- Maintain proper feed rate: Controlling your feed rate while making a dado cut is essential for achieving clean results. Pushing too hard can cause tear-out or uneven cutting depth, while going too slow may result in burning or overheating of the wood.
By implementing these advanced woodworking techniques and troubleshooting any issues that may arise during dado cuts, woodworkers can take their craftsmanship to new heights. With precise measurements and careful execution, flawless dados become attainable, enabling beautiful joinery work in woodworking projects.
Creative Applications of Dado Cuts
In our previous discussion, we explored various tips and techniques to achieve perfect dado cuts in woodworking. Now, let us delve into the exciting realm of creative applications of dado cuts. This subtopic aims to inspire woodworkers with design ideas and alternatives that can take their craftsmanship to new heights.
One fascinating aspect of dado cut design ideas is the versatility they offer in creating unique and visually appealing furniture pieces. By incorporating dado cuts into your woodworking projects, you can add intricate patterns and decorative elements that elevate the overall aesthetic appeal. For instance, by carefully planning the depth and spacing of your dado cuts, you can create eye-catching geometric designs or incorporate interlocking joinery techniques.
Furthermore, dado cuts open up a world of possibilities when it comes to functional design elements in furniture making. You can use them to create built-in shelves, compartments, or even hidden storage spaces within your pieces. By strategically placing dado cuts at specific locations on a piece of furniture, you can maximize its utility without compromising on aesthetics.
However, it is essential to note that while dado cuts are undoubtedly versatile and visually striking, there are also alternatives worth considering depending on your project requirements. For instance, biscuit joints or mortise and tenon joints can provide similar structural support as dados while offering different aesthetic options.
Exploring creative applications for dado cuts allows woodworkers to infuse their projects with distinctive visual appeal and functionality. However, it is vital to consider alternative joinery methods based on project specifications. Ultimately, mastering these techniques will enable woodworkers to push their skills further and unlock endless possibilities in their woodworking endeavors.
Taking Your Woodworking Skills to the Next Level
Mastering advanced techniques and expanding proficiency in the realm of woodworking allows craftsmen to enhance their skills, enabling them to achieve remarkable craftsmanship and unlock new creative possibilities.
By delving into advanced woodworking techniques, craftsmen can take their woodworking skills to the next level and improve their precision in creating intricate designs. Here are five key ways that woodworkers can elevate their craft:
- Incorporating complex joinery: Advanced woodworkers often use intricate joinery techniques like dovetail joints or mortise and tenon joints. These methods not only provide structural integrity but also add an aesthetic appeal to the finished piece.
- Utilizing veneering: Veneering is a technique where thin slices of high-quality wood are applied to a lower-grade base material, creating a beautiful surface finish. This method allows craftsmen to work with rare or expensive woods while maximizing their resources.
- Experimenting with different finishes: A professional woodworker knows how crucial it is to choose the right finish for each project. By exploring various finishing techniques such as staining, oiling, or lacquering, craftsmen can enhance the appearance and durability of their creations.
- Creating intricate inlays: Inlay work involves embedding small pieces of contrasting materials into the main wooden surface, adding visual interest and complexity to the design. Woodworkers can experiment with various types of inlay materials like metal, shell, or even other types of wood.
- Mastering precision cutting: Achieving precise cuts is essential for creating seamless joinery and flawless edges on woodworking projects. Advanced woodworkers invest time in honing their skills using tools like table saws, miter saws, or routers equipped with dado blades.
By implementing these advanced woodworking techniques and improving precision in their craft, artisans can elevate their woodworking skills to produce stunning pieces that showcase both technical mastery and artistic vision.
Frequently Asked Questions
What are some common mistakes to avoid when making dado cuts?
Improper measurement and alignment, as well as using the wrong type of saw blade, are common mistakes to avoid when making dado cuts. These errors can lead to inaccurate and uneven cuts, compromising the structural integrity of the woodworking project.
By ensuring precise measurements and proper alignment, craftsmen can achieve clean and professional-looking dado cuts.
Additionally, selecting the appropriate saw blade for dado cutting is crucial to ensure smooth and efficient operation while preventing damage to both the material and the tool itself.
Can dado cuts be made with hand tools or do I need power tools?
Dado cuts can be made using either hand tools or power tools. Both methods have their own pros and cons.
Power tools, such as a table saw or router, offer speed and precision, making them ideal for large-scale projects.
On the other hand, hand tools like chisels and mallets provide more control and allow for finer adjustments.
Additionally, there are various techniques available for making dado cuts without power tools, such as using a coping saw or a plow plane.
How do I determine the appropriate size of the dado cut for my project?
Determining the appropriate size of a dado cut for a woodworking project involves employing various techniques.
Firstly, considering the thickness of the material and the purpose of the joint is crucial.
Additionally, understanding the dimensions of the mating parts and how they will fit together aids in determining the appropriate width and depth of the dado cut.
By utilizing accurate measurements and taking into account structural requirements, one can ensure a tight and secure fit for their project.
Are there any safety precautions I should take when making dado cuts?
Safety measures for dado cuts are crucial to ensure the protection of woodworkers.
Prior to beginning the process, it is essential to wear appropriate personal protective equipment (PPE), such as safety goggles and gloves.
Furthermore, securing the workpiece firmly using clamps or a vice is necessary to prevent any movement.
Additionally, using a push stick or featherboard will keep hands at a safe distance from the blade, reducing the risk of injury.
Adhering to these precautions significantly minimizes potential accidents during dado cuts.
Can dado cuts be made on different types of wood or are there specific types that work best?
Different types of wood can be used for dado cuts, each with its own pros and cons.
Softwoods like pine are commonly used due to their affordability and ease of cutting.
Hardwoods such as oak provide better durability and a more polished finish but can be more challenging to work with.
Exotic woods offer unique aesthetics but may require special tools and techniques.
Ultimately, the choice of wood depends on the desired outcome, budget, and level of experience of the woodworker.
Conclusion
In conclusion, dado cuts are a valuable technique that can elevate your woodworking skills to new heights. By understanding and utilizing dado cuts, you can create stronger joints, enhance the overall stability of your projects, and achieve a more professional finish.
With the right dado blade and proper techniques, you can easily make precise dado cuts in various materials. As an interesting statistic, studies have shown that using dado cuts can increase the strength of joints by up to 30%, ensuring the durability of your woodworking creations.


