
Woodworking is an art that requires precision, skill, and the right tools.
One technique that can greatly enhance your woodworking skills is rip-cutting on a table saw. Like a master sculptor chiseling away at marble, the woodworker uses the table saw to carefully shape and transform raw lumber into beautiful pieces of furniture or intricate designs.
Rip-cutting involves cutting wood along its length, creating long, straight cuts that are essential for various woodworking projects.
To embark on this journey of enhancing your woodworking skills through rip-cutting techniques, it is important to understand the basics of rip-cutting and choose the right table saw and accessories for your needs. Additionally, setting up your table saw correctly plays a crucial role in achieving accurate cuts. Mastering the techniques involved in rip-cutting will allow you to create clean and precise cuts consistently.
In this article, we will delve into these topics in detail while also exploring advanced rip-cutting techniques. Whether you are a beginner or a seasoned woodworker looking to expand your repertoire of skills, this guide will provide you with valuable insights and tips to improve your woodworking craftsmanship through effective rip-cutting techniques on a table saw.
Key Takeaways
- Rip-cutting on a table saw requires precision, skill, and the right tools.
- Safety precautions, such as wearing PPE and securing the workpiece, are essential during rip-cutting.
- Choosing the right table saw and accessories is important for optimal performance and safety.
– Proper maintenance and care of the table saw, including blade alignment and height adjustments, are crucial for accurate and clean cuts.
Understanding Rip-Cutting Basics
Rip-cutting on a table saw involves the process of cutting wood parallel to its grain, requiring an understanding of basic techniques for achieving accurate and efficient cuts. To ensure safety in woodworking, it is crucial to follow certain precautions when performing rip cuts on a table saw.
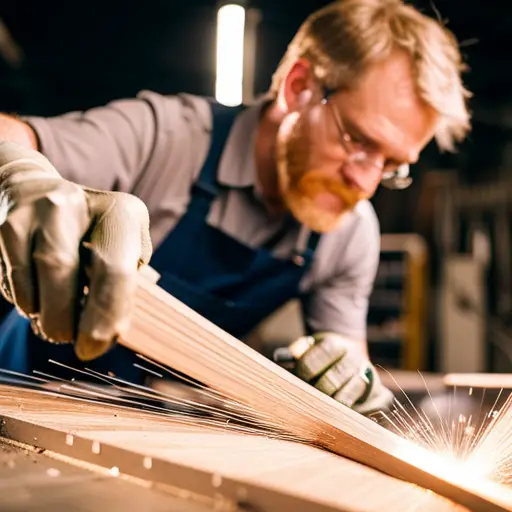
First and foremost, it is important to wear appropriate personal protective equipment (PPE), including safety glasses and hearing protection. Additionally, securing the workpiece firmly using clamps or a rip fence helps maintain stability during the cutting process.
When troubleshooting common rip cutting mistakes, several factors should be considered. One common mistake is experiencing burning marks along the cut edge. This issue can be resolved by adjusting the blade height or increasing feed rate while maintaining proper alignment with the blade.
Another frequent mistake is encountering tear-out at the end of the cut. This can be mitigated by utilizing a zero-clearance insert or placing sacrificial pieces at both ends of the workpiece.
By implementing these woodworking safety precautions and troubleshooting techniques, individuals can enhance their rip-cutting skills on a table saw and achieve precise and clean cuts consistently.
Choosing the Right Table Saw and Accessories
When selecting a table saw and its corresponding accessories, it is essential to consider their compatibility and overall functionality in order to maximize efficiency and precision.
Choosing the right table saw is crucial as it directly affects the quality of your rip cuts. There are various types of table saws available on the market, such as contractor saws, cabinet saws, and hybrid saws. Each type has its own unique features and capabilities that cater to different woodworking needs. It is important to evaluate factors such as motor power, cutting capacity, stability, and safety features when making a decision.
In addition to choosing the right table saw, proper maintenance and care are vital for optimal performance. Regularly cleaning the table surface ensures smooth sliding of materials during rip cuts and prevents debris buildup. Keeping the blade clean and sharp not only improves cutting accuracy but also reduces strain on the motor. Lubricating moving parts such as gears and bearings helps minimize friction for smoother operation. Furthermore, regularly inspecting safety features like blade guards, anti-kickback pawls, and riving knives ensures they are functioning properly.
By carefully considering these factors when choosing a table saw and practicing proper maintenance techniques, woodworkers can enhance their rip-cutting skills with improved efficiency and precision in their woodworking projects.
Setting Up Your Table Saw for Rip-Cutting
Setting up a table saw for efficient and precise rip cuts requires careful consideration of various factors, including the alignment of the blade, fence, and miter gauge. Proper setup ensures not only accurate cuts but also enhances safety during rip cutting operations.
To ensure table saw safety during rip cutting, it is crucial to follow certain precautions:
- Blade Alignment:
- Verify that the blade is parallel to the miter slot by using a dial indicator or a specialized alignment tool.
- Check for any wobbling or deflection that could affect the accuracy of the cut.
- Ensure that the blade is at an appropriate height to prevent kickback and reduce strain on the motor.
- Fence Alignment:
- Align the fence parallel to the blade using a precision square.
- Make sure there are no gaps between the fence and blade that could cause wood binding or inaccurate cuts.
- Miter Gauge Alignment:
- Adjust the miter gauge so it slides smoothly through its entire range of motion without any play or resistance.
- Confirm that angles indicated on both sides of zero align accurately with their respective detents.
By meticulously setting up these components on your table saw, you can create a safe working environment and achieve precise rip cuts with efficiency.
Following these guidelines will help mitigate potential risks associated with improper alignment and ensure optimal performance from your table saw.
Mastering Rip-Cutting Techniques
This discussion will focus on mastering various rip-cutting techniques on a table saw.
Straight-line rip-cutting is the foundation of all rip-cutting operations and involves cutting a board parallel to its edges.
Tapered rip-cutting, on the other hand, allows for creating angled cuts along the length of a board by adjusting the fence angle.
Lastly, ripping wide boards refers to cutting boards that are wider than the capacity of your table saw by making multiple passes or using specialized jigs and sleds.
Straight-Line Rip-Cutting
Straight-line rip-cutting on a table saw requires precise measurements and steady hand-eye coordination to ensure accurate and parallel cuts. When ripping plywood, it is essential to use a straight edge guide or fence to maintain consistency in the cut.
The straight edge guide is positioned parallel to the desired cut line, ensuring that the wood moves along a straight path during the cutting process. This technique is especially useful when multiple pieces need to be cut with identical dimensions for projects such as cabinet making or furniture construction.
Additionally, cross cutting techniques can be applied in conjunction with straight-line rip-cutting to further enhance woodworking skills. Cross cutting involves cutting boards across their width instead of lengthwise, creating smaller sections suitable for specific project needs.
Overall, mastering these techniques enhances precision and efficiency in woodworking practices.
Tapered Rip-Cutting
Tapered rip-cutting, a technique used in woodworking, involves gradually reducing the width of a piece of wood along its length, resulting in a tapered shape that can be used for various applications such as creating decorative edges or fitting pieces together.
To achieve this technique, several tapered rip cutting techniques can be utilized. One method is to use a tapering jig, which holds the workpiece at an angle while it is guided through the table saw blade. Another approach involves adjusting the fence on the table saw to create angled rip cuts. This allows for precise and controlled tapering of the wood.
It is important to note that when performing tapered rip-cutting, safety precautions should be followed such as wearing protective gear and ensuring proper blade alignment and stability.
Ripping Wide Boards
When it comes to woodworking, mastering the art of rip-cutting is essential for achieving precise and accurate results.
In our previous discussion on tapered rip-cutting, we explored techniques for creating angled cuts with finesse.
Now, let’s turn our attention to another important aspect of rip-cutting: ripping wide boards.
Ripping thick boards can present challenges due to their size and weight.
To ensure optimal safety and accuracy, it is crucial to employ the correct techniques.
One key consideration when ripping wide boards is preventing kickback – a potentially dangerous situation where the wood is forcefully thrown back towards the operator.
This can be avoided by using a riving knife or splitter, ensuring proper blade alignment and height, maintaining a steady feed rate, and using appropriate push sticks or featherboards.
By understanding these principles and implementing them effectively, woodworkers can enhance their skills in rip-cutting wide boards while prioritizing safety and achieving outstanding results.
Tips and Tricks for Clean and Accurate Cuts
This discussion will focus on three key points for achieving clean and accurate cuts in woodworking:
- Using push sticks and featherboards: These essential tools ensure safety by keeping hands away from the blade while providing stability and control during the cutting process.
- Maintaining proper blade height and alignment: This is crucial to achieve precise cuts as it directly affects the accuracy of the saw’s performance.
- Preventing tear-out and splintering: Techniques such as using a zero-clearance insert or applying masking tape to the workpiece before cutting can help prevent tear-out and splintering.
Adjusting the paragraph structure in this way allows for each concept to be clearly and logically grouped on its own line.
Using Push Sticks and Featherboards
To enhance woodworking skills on a table saw, incorporating the use of push sticks and featherboards is essential. Push sticks are an important safety tool that allows woodworkers to keep their hands at a safe distance from the blade while guiding the material through the cut. Featherboards, on the other hand, are devices that apply pressure against the workpiece to prevent it from moving or vibrating during rip cuts. This helps ensure clean and accurate cuts, reducing the risk of kickback and improving overall safety. When using push sticks and featherboards, it is crucial to follow proper safety precautions such as wearing appropriate protective gear, maintaining a firm grip on the tools, and keeping fingers away from the blade’s path. By utilizing these tools effectively, woodworkers can significantly enhance their rip-cutting skills while prioritizing safety in their woodworking projects.
| Push Sticks | Featherboards |
|---|---|
| Provides safe distance for hands | Prevents workpiece movement |
| Guides material through cuts | Reduces risk of kickback |
| Improves overall safety | Allows for clean and accurate cuts |
Maintaining Proper Blade Height and Alignment
Maintaining proper blade height and alignment is crucial for achieving precise and accurate cuts on a table saw. Blade maintenance plays a significant role in ensuring optimal performance. Regularly inspecting the blade for any signs of wear or damage, such as dullness or chipped teeth, is essential.
If the blade is not cutting smoothly or producing burning marks on the workpiece, it may indicate that it needs to be sharpened or replaced.
Alignment issues can also affect the quality of cuts. To troubleshoot alignment problems, start by checking if the blade is parallel to the miter gauge slots and fence. Adjustments can be made using the appropriate tools provided with your table saw. It is important to follow manufacturer’s instructions when making adjustments to avoid compromising safety.
By properly maintaining blade height and alignment, woodworkers can ensure their table saws perform optimally and achieve accurate results in their woodworking projects.
Preventing Tear-Out and Splintering
Preventing tear-out and splintering can be achieved by carefully selecting the appropriate blade for the material being cut, ensuring it has a high tooth count and sharp edges.
When dealing with curved cuts, it is essential to reduce tear out. This can be accomplished by using a crosscutting blade specifically designed for intricate and curvaceous cuts. These blades typically have a higher tooth count, allowing for cleaner and smoother cuts without tearing the wood fibers.
Additionally, when working with end grain cuts, preventing chip out is crucial. To achieve this, a combination blade or a specialized rip-cutting blade with alternate top bevel (ATB) teeth can be used. These blades are specifically designed to minimize chip out on end grains by cutting through the fibers cleanly and smoothly.
By employing these techniques and selecting the right blade type for each task, woodworkers can significantly reduce tear-out and splintering in their woodworking projects.
Advanced Rip-Cutting Techniques
Utilizing the table saw with finesse, one can delve into advanced rip-cutting techniques that elevate woodworking skills to a level of artistry, casting aside mundane notions of simplicity and embracing the intricacies of craftsmanship. These advanced rip-cutting techniques on a table saw open up new possibilities for woodworkers seeking to enhance their projects.
Here are three key elements to consider when exploring these techniques:
- Precision: Advanced rip-cutting techniques require precise measurements and careful planning. Woodworkers must ensure that the fence is set accurately and securely before making any cuts. Additionally, using a zero-clearance insert can help minimize tear-out and splintering.
- Blade Selection: The choice of blade plays a crucial role in achieving clean and smooth cuts during advanced rip-cutting. A fine-toothed blade with carbide tips is recommended for hardwoods, while a blade with more teeth provides better results for softwoods.
- Push Sticks and Featherboards: To maintain safety while performing advanced rip-cuts, it is essential to use push sticks or push blocks to guide the workpiece through the cut safely. Featherboards also come in handy by applying pressure against the workpiece, preventing it from drifting away from the fence.
By mastering these advanced table saw techniques, woodworkers can take their projects to new heights, creating intricate designs with utmost precision and finesse.
Frequently Asked Questions
How do I choose the right blade for rip-cutting on a table saw?
When selecting a blade for rip-cutting on a table saw, several factors should be considered.
Firstly, the type of wood being cut plays a crucial role in blade selection. Hardwoods require blades with more teeth to produce cleaner cuts, while softer woods can be adequately cut with fewer teeth.
Additionally, the blade’s tooth configuration and hook angle should align with the desired cutting speed and finish quality.
Lastly, considering the width and thickness of the material being cut is essential for choosing an appropriate blade size.
What safety precautions should I take when rip-cutting on a table saw?
Safety precautions are of utmost importance when rip-cutting on a table saw. To ensure personal well-being, it is crucial to adhere to safety measures such as wearing appropriate protective gear, maintaining a clean and organized workspace, and keeping hands clear of the blade’s path.
Proper technique involves using a push stick or push block to guide the wood through the cut, avoiding kickback by using a splitter or riving knife, and ensuring that the fence is properly aligned for accurate cuts.
Can I use a miter gauge for rip-cutting on a table saw?
When considering the use of a miter gauge for rip-cutting on a table saw, there are both pros and cons to consider.
The main advantage is that it allows for accurate and precise cuts, particularly when cutting smaller pieces.
However, there are limitations to the width and length of material that can be cut using a miter gauge.
Alternative methods for rip-cutting without a table saw include using a circular saw with a guide or using a track saw.
These methods offer more flexibility in terms of material size but may require additional tools or setup.
How do I prevent kickback when rip-cutting on a table saw?
Kickback, the unruly beast that lurks in the shadows of every table saw, can be tamed with proper techniques for safe rip cutting.
To prevent this dangerous phenomenon, woodworkers should adhere to essential guidelines. Firstly, maintaining a firm grip on the workpiece and using push sticks or featherboards offers stability during cuts.
Secondly, ensuring that the blade height is properly adjusted and aligned with the fence helps maintain control over the material.
Lastly, employing a riving knife or splitter prevents wood from pinching against the blade and causing kickback.
Are there any alternative tools or techniques for rip-cutting if I don’t have access to a table saw?
Alternative tools for rip cutting include a circular saw, a band saw, and a track saw. These tools can efficiently cut through wood without the need for a table saw.
Techniques for rip cutting without a table saw involve using guides or fences to ensure straight cuts, marking and measuring accurately, and using proper safety precautions.
Understanding the capabilities and limitations of these alternative tools is crucial in achieving precise and safe rip cuts in woodworking projects.
Conclusion
In conclusion, mastering rip-cutting techniques on a table saw is essential for enhancing woodworking skills. Understanding the basics of rip-cutting, selecting the appropriate table saw and accessories, and properly setting up the equipment are crucial steps in achieving clean and accurate cuts.
By implementing advanced rip-cutting techniques and following helpful tips and tricks, woodworkers can elevate their craftsmanship to new heights. The precision achieved through these practices not only ensures efficient material utilization but also enhances the overall quality of finished woodworking projects.


