
In the realm of woodworking, box joints stand as a testament to the precision and craftsmanship that can be achieved through meticulous joinery techniques. Like interlocking puzzle pieces, these joints not only provide structural integrity but also add aesthetic appeal to furniture and other wooden creations.
Mastering the art of box joints requires a deep understanding of the underlying principles, coupled with the use of appropriate tools and materials. This article delves into the world of box joint joinery, offering invaluable insights and step-by-step instructions on how to achieve flawless results using a table saw.
By unraveling the secrets behind setting up a table saw, making accurate cuts, ensuring tightness and flushness, as well as finishing touches and expansion of skills, aspiring woodworkers will be equipped with comprehensive knowledge that empowers them to create intricate and visually stunning box joint projects.
Key Takeaways
- Box joints provide strength and a large surface area for glue bonding.
- Choosing the right tools and materials is crucial for precise box joints.
- Accurate measurements and alignment of the workpiece are crucial.
- Box joints add structural integrity and artistic craftsmanship to woodworking projects.
Understanding Box Joints
Box joints, also known as finger joints, are a type of joinery technique that involves interlocking rectangular cuts to create strong and aesthetically pleasing corners in woodworking projects.
There are different box joint designs available, such as the basic box joint and the comb or hinged box joint. The basic box joint consists of equally spaced and sized fingers that interlock with corresponding fingers on another piece of wood. On the other hand, the comb or hinged box joint is characterized by alternating long and short fingers that fit into matching slots on the mating piece of wood.
One of the main benefits of using box joints in woodworking projects is their exceptional strength. When properly constructed, box joints provide a large surface area for glue to bond together, resulting in a strong and durable joint. This makes them ideal for constructing boxes, drawers, and other items that require solid corner joints.
Another advantage of box joints is their aesthetic appeal. The interlocking pattern created by this joinery technique adds visual interest to furniture pieces or any project where visible joinery is desired. This can elevate the overall appearance of a woodworking project while also showcasing the craftsmanship involved.
Moreover, using box joints allows for precise alignment during assembly due to their snug fit. The tight connection between each finger ensures accuracy when joining multiple pieces together. This precision guarantees that all corners will be flush and square, contributing to the overall quality and professionalism of the finished product.
Understanding different box joint designs and recognizing the benefits they offer in woodworking projects is crucial for achieving precise joinery results. Box joints provide strength, aesthetic appeal, and facilitate accurate alignment during assembly – making them an excellent choice for creating sturdy and visually appealing corners in various woodworking applications.
Choosing the Right Tools and Materials
When selecting the appropriate tools and materials, one must carefully consider their characteristics in order to achieve optimal results in creating seamless connections. Tools selection is a crucial aspect of box joint construction as it directly affects the accuracy and precision of the joinery. The table saw is commonly used for box joints due to its ability to make precise cuts at specific angles. It is important to choose a table saw that has a stable base and a reliable fence system to ensure straight and consistent cuts.
In addition to the table saw, other tools such as dado blades or router bits can be employed for creating box joints with varying dimensions. Dado blades allow for quick and efficient removal of material, while router bits offer versatility in terms of joint design options. It is essential to select tools that are compatible with the chosen wood species and desired joint dimensions.
Material preparation also plays a vital role in achieving precise box joints. The choice of wood should be based on its hardness, stability, and grain pattern. Hardwood species like oak or maple are often preferred for their durability and resistance to wear over time. Softwoods like pine or cedar may be suitable for less demanding applications.
To evoke emotion in the audience, we can use a table comparing different tool options and their pros/cons:
| Tool | Pros | Cons |
|---|---|---|
| Table Saw | Accurate cuts at specific angles | Requires skillful operation |
| Dado Blades | Quick removal of material | Limited joint design options |
| Router Bits | Versatile joint design options | Time-consuming setup process |
Choosing the right tools and materials is crucial when mastering box joints. Careful consideration of tool characteristics like stability and precision along with material properties such as hardness and grain pattern will ultimately lead to seamless connections in woodworking projects.
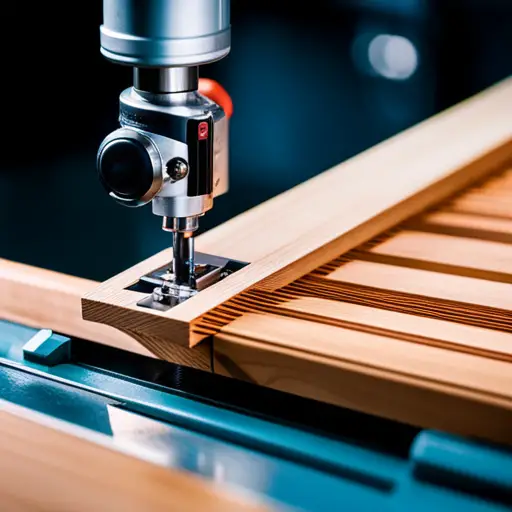
Setting Up Your Table Saw
To achieve accurate and precise cuts for creating seamless connections, the initial step is to properly set up the table saw. This crucial step ensures that the tool is in optimal condition and ready to deliver the desired results. Here are four key considerations when setting up your table saw:
- Table Saw Safety: Before starting any work, it is imperative to prioritize safety. Ensure that all safety features, such as blade guards and riving knives, are properly installed and functioning correctly. Familiarize yourself with the manufacturer’s safety guidelines and adhere to them strictly.
- Blade Selection: Choosing the right blade for your project is essential for achieving clean cuts. Different blade types have varying tooth configurations suitable for specific tasks. For box joints, a dado or flat-top rip blade may be most appropriate due to their ability to create precise groove cuts.
- Blade Height Adjustment: Once you have selected the appropriate blade, adjust its height according to your desired cut depth. The general rule of thumb is to set the blade height slightly higher than the thickness of your material but not exceeding 1/8 inch above it. This adjustment ensures efficient cutting while minimizing tear-out.
- Fence Alignment: Proper alignment of the fence guarantees accuracy throughout your cuts. Ensure that it runs parallel to both the miter gauge slot and blade using a reliable measuring tool like a combination square or dial caliper. Make necessary adjustments until perfect alignment is achieved.
By following these steps, you can confidently set up your table saw for precise joinery work while prioritizing safety precautions. Remember always to wear appropriate personal protective equipment such as goggles and hearing protection when operating power tools like table saws.
Making Accurate Box Joint Cuts
Achieving impeccable precision in your woodworking projects requires a meticulous approach to creating seamless connections through accurate box joint cuts. To ensure that your box joints fit together perfectly, it is essential to employ precise measuring techniques and be aware of common mistakes that may arise during the process. By following these guidelines, you can create flawless box joints that will enhance the overall quality of your woodworking projects.
When making box joint cuts, accurate measurements are crucial. This involves measuring both the width of the workpiece and the thickness of the blade. It is important to remember that the width of each finger should be equal to the thickness of the blade. To achieve this, using a reliable measuring tool such as a digital caliper or an accurate tape measure is recommended.
Troubleshooting common mistakes is another vital aspect of making accurate box joint cuts. One common mistake is not properly aligning the workpiece with the table saw fence. This can result in uneven finger widths and misaligned joints. To avoid this issue, ensure that the workpiece is securely held against both the fence and table surface before making any cuts.
Another mistake to watch out for is using excessive force when pushing the workpiece through the blade. This can lead to rough edges and inaccurate cuts. Instead, apply steady pressure while maintaining control over both speed and direction.
Lastly, keeping your table saw well-maintained by regularly cleaning it and ensuring that all components are properly aligned will contribute to achieving precise box joint cuts consistently.
Mastering box joint cuts involves employing meticulous measuring techniques and troubleshooting common mistakes such as misalignment or excessive force during cutting. By adhering to these guidelines, woodworkers can achieve exceptional precision in their projects while creating seamless connections through accurately cut box joints.
Ensuring Tight and Flush Joints
In order to ensure tight and flush joints, meticulous attention to detail is required in measuring and aligning the workpiece, as well as applying controlled pressure during the cutting process. Achieving proper alignment is crucial for creating box joints that fit together seamlessly. Any deviation from precise alignment can result in loose or misaligned joints.
To achieve proper alignment, it is important to accurately measure and mark the workpiece before making any cuts. This can be done using a reliable measuring tool such as a ruler or caliper. Once the measurements are marked, aligning the workpiece with the saw blade becomes essential. This can be achieved by using guides or clamps to hold the workpiece securely in place.
Troubleshooting common joint issues is another aspect of ensuring tight and flush box joints. One common issue that may arise is gaps between the jointed pieces. To address this problem, adjusting the table saw fence may be necessary to ensure a snug fit between the pieces. Additionally, using a mallet or hammer with a block of wood can help close any small gaps that may still exist.
Another potential issue is unevenness or misalignment between each individual joint within a project. Careful measurement and marking of each cut can help minimize this problem. If misalignment occurs despite these precautions, adjusting the fence or re-cutting certain sections may be necessary.
Achieving tight and flush box joints requires meticulous attention to detail in measuring and aligning the workpiece, as well as troubleshooting common joint issues such as gaps or misalignment. By following these techniques, woodworkers can create precise joinery that enhances both functionality and aesthetics in their projects.
Finishing and Sanding
The final step in creating flawless box joints involves carefully applying a smooth and even finish to the completed project, ensuring a polished and professional look.
To achieve this, various refinishing techniques can be employed, with sanding playing a crucial role in achieving the desired outcome.
Before beginning the finishing process, it is important to ensure that any glue residue or excess wood fibers are removed from the surface of the joints. This can be done using a scraper or sandpaper.
Once the surface is clean and smooth, sanding equipment such as sanding blocks or orbital sanders can be utilized to further refine the joints.
When selecting sandpaper grits for box joint projects, it is essential to start with coarser grits and gradually progress to finer ones. Coarse grits help remove any imperfections or rough surfaces left by previous steps in the woodworking process, while finer grits are responsible for achieving a polished finish.
It is advisable to begin with 80 or 100-grit paper and then move on to 150 or 180-grit paper for intermediate smoothing. Finally, finishing touches can be made using 220-grit paper for a silky-smooth result.
In addition to regular hand-held sanding tools, powered tools like random orbital sanders can also be employed for more efficient and consistent results. These machines utilize circular motion combined with random orbital action, which helps prevent swirl marks on the wood surface.
While performing these refinishing techniques, it is important to maintain an even pressure across all sections of the joint. Uneven pressure may result in uneven removal of material or create visible depressions on the surface.
By employing appropriate refinishing techniques and utilizing suitable sanding equipment throughout this final step of box joint creation, one can achieve flawlessly finished joints that enhance both aesthetic appeal and overall professionalism of their woodworking projects.
Expanding Your Joinery Skills
This subtopic focuses on expanding your joinery skills by exploring variations of box joints, such as angled or curved joints. By mastering these variations, woodworkers can create unique and intricate designs that add visual interest to their projects.
Additionally, this discussion will cover how to incorporate box joints into different woodworking projects, showcasing the versatility and adaptability of this joinery technique.
Exploring variations of box joints, such as angled or curved joints
Angle and curvature can be introduced into box joints, allowing for a wider range of joinery options. By incorporating angled or curved joints, woodworkers can achieve unique and visually appealing designs. Here are four techniques for creating these variations:
- Angled Box Joints: Instead of the traditional straight box joint, angled box joints introduce a sloping angle to the joint edges. This technique adds visual interest and can be used to create strong corner connections.
- Curved Box Joints: Creating curved box joints involves shaping the fingers and slots in a way that follows a curved pattern. This technique is often used in projects where softness or fluidity is desired.
- Adjustable Angle Jig: An adjustable angle jig allows woodworkers to cut precise angled box joints by tilting the workpiece on the table saw. This versatile tool enables the creation of various angles with ease.
- Router Techniques: Using a router with specialized bits, woodworkers can create intricate curves within box joints by following templates or patterns.
By exploring these variations, craftsmen can elevate their joinery skills and add an extra dimension to their woodworking projects.
Incorporating box joints into different woodworking projects
Incorporating box joints into various woodworking projects allows for a seamless integration of structural integrity and artistic craftsmanship, creating a harmonious blend of form and function.
Creative box joint designs can be utilized to add a unique touch to woodworking projects, enabling woodworkers to showcase their creativity and skill. By varying the size and spacing of the fingers in the joint, intricate patterns can be achieved, enhancing the aesthetic appeal of the finished piece.
Additionally, incorporating box joints into furniture construction provides added strength and durability. The interlocking nature of box joints creates a strong bond between pieces of wood, ensuring that the furniture will withstand everyday use and remain sturdy over time.
Whether it is a decorative item or functional furniture piece, integrating box joints enhances both the visual appeal and longevity of woodworking projects.
Frequently Asked Questions
Can box joints be used for creating strong and durable furniture joints?
Box joints can indeed be used to create strong and durable furniture joints. They are commonly employed in decorative woodworking projects due to their aesthetic appeal. To achieve a tight fitting box joint without gaps, precise measurements and accurate cutting techniques are crucial.
It is important to ensure that the width of the fingers matches the thickness of the material being joined. Additionally, using a high-quality table saw with a dado blade can help achieve clean and precise cuts for a seamless fit.
What are the advantages of using box joints over other joinery techniques?
Box joints offer several advantages over other joinery techniques when it comes to creating strong and durable furniture joints.
Firstly, box joints provide a large surface area for gluing, resulting in a stronger bond between the pieces of wood.
Secondly, the interlocking fingers of box joints create mechanical strength, preventing the joint from easily coming apart.
Additionally, box joints are visually appealing and can add an aesthetic element to furniture projects.
Overall, box joints are a reliable technique for achieving sturdy and long-lasting furniture joints.
Can box joints be used with different types of wood, or are there specific wood species that work best?
Different wood species can be used for box joints, although some may work better than others. It is important to choose woods that have similar hardness and density to ensure a tight fit. For achieving tight fitting box joints, it is recommended to use hardwoods such as oak, maple, or walnut. These woods provide stability and strength necessary for precise joinery.
Additionally, using high-quality tools and accurate measurements will greatly contribute to the success of creating tight fitting box joints.
How do you prevent tear-out and splintering when making box joint cuts?
Preventing tear-out and splintering when making box joint cuts is crucial for achieving clean and precise joinery. Box joint techniques play a vital role in ensuring this outcome.
By taking certain precautions, such as using a zero-clearance insert, employing a slow feed rate, and utilizing a backing board, tear-out and splintering can be minimized. These measures create cleaner cuts by supporting the wood fibers during the cutting process and reducing the likelihood of tear-out or splintering.
Are there any special safety precautions or techniques to keep in mind when working with box joints on a table saw?
Safety precautions and best practices are crucial when working with box joints on a table saw.
It is important to wear appropriate personal protective equipment, such as safety goggles and ear protection, to protect against potential hazards.
Additionally, ensuring that the blade is properly aligned and adjusted can help minimize the risk of accidents.
Using a push stick or push block to guide the workpiece through the cut can also enhance safety by keeping hands away from the blade.
Conclusion
In conclusion, mastering box joints requires a meticulous approach and an understanding of the techniques involved.
By carefully selecting the appropriate tools and materials, setting up your table saw correctly, and making accurate cuts, you can achieve precise joinery.
Ensuring tight and flush joints is crucial for a seamless finish, before proceeding with finishing and sanding.
As you expand your joinery skills, remember that practice makes perfect.
With patience and dedication, you can unlock the artistry of box joints and elevate your woodworking craft to new heights.


