
Dovetail joints, a classic woodworking technique known for its strength and beauty, have long captivated the minds of craftsmen. These intricate interlocking joints not only provide structural integrity but also showcase the artistry and skill of the woodworker.
Unlocking the secrets of dovetail joinery can be a challenging endeavor, requiring precision and finesse. However, with the right tools and techniques, it becomes an achievable feat.
In this article, we delve into the art of dovetail joints with a table saw as our primary tool. By understanding the mechanics behind this joint and mastering its execution, you will gain the ability to create stunning pieces that stand the test of time.
From selecting suitable materials to preparing your wood and setting up your table saw correctly, we guide you through each step in meticulous detail. With our expert guidance, cutting perfect dovetail joints becomes an attainable goal.
Join us on this journey as we unravel the mysteries of dovetail joinery and empower you to take your woodworking skills to new heights.
Key Takeaways
- Dovetail joints are known for their strength and beauty in woodworking.
- Precision and finesse are required to achieve successful dovetail joints.
- Tools such as a table saw, miter gauge, dado blade set, and dovetail jig are necessary for creating dovetail joints with a table saw.
- Wood selection, accurate measurements, and proper marking out of the dovetail layout are crucial steps in creating flawless dovetail joints.
Tools and Materials You’ll Need
In order to successfully unlock the art of dovetail joints using a table saw, it is necessary to gather the appropriate tools and materials.
The tools required for this endeavor include:
- A quality table saw
- A miter gauge
- A dado blade set
- A dovetail jig
- Clamps
- Safety equipment such as goggles and gloves
Each of these tools plays a crucial role in achieving precise and clean dovetail joints.
A reliable table saw serves as the foundation for cutting the wood pieces with precision. It is important to choose one that offers stability, accuracy, and adjustable features to ensure smooth operation.
The miter gauge allows for accurate angle cuts while maintaining consistent measurements throughout the process. Additionally, a dado blade set provides optimal results when creating grooves or dados required for fitting together the dovetails.
The use of a dovetail jig greatly simplifies the process by guiding the cuts and ensuring uniformity in spacing between each tail and pin. This tool eliminates much of the guesswork involved in hand-cutting dovetails while maintaining their traditional aesthetic appeal.
To hold everything securely in place during cutting operations, clamps are essential.
Techniques employed when working with these tools are equally important as having them on hand. Proper alignment of both workpiece and blade is key to achieving accurate cuts that result in snug-fitting joints. Taking into consideration factors such as grain direction helps prevent tear-out or splintering of wood during cutting operations.
By utilizing these necessary tools along with appropriate techniques, one can embark on unlocking the art of dovetail joints using a table saw effectively. With attention to detail and patience, individuals can achieve visually appealing and structurally sound connections that epitomize craftsmanship at its finest.
Understanding Dovetail Joints
This discussion will explore the subtopic of understanding dovetail joints, focusing on three key points: the anatomy of a dovetail joint, the types of dovetail joints, and their strength and durability.
The anatomy of a dovetail joint involves the interlocking shape of its components, with one piece having trapezoidal pins that fit into corresponding tails on the other piece.
There are several types of dovetail joints, including through dovetails, half-blind dovetails, and sliding dovetails.
Dovetail joints are known for their exceptional strength and durability due to their interlocking design and large gluing surface area.
Anatomy of a Dovetail Joint
The anatomy of a dovetail joint can be understood by examining the interlocking pattern of trapezoidal pins and tails, which create a strong and durable connection. Can you envision how these precisely cut angles fit together seamlessly?
The history and evolution of the dovetail joint dates back to ancient Egypt, where it was used in furniture construction. Over time, it has evolved into a popular woodworking technique known for its strength and aesthetics.
To create a proper dovetail joint, there are common mistakes that should be avoided. One such mistake is not cutting the pins and tails at precise angles, resulting in loose or ill-fitting joints. Another mistake is not properly spacing out the pins and tails, which can weaken the overall structure.
By understanding the anatomy of a dovetail joint and avoiding these common mistakes, one can unlock the art of creating strong and visually appealing connections using a table saw.
Types of Dovetail Joints
Different types of dovetail joints offer varying levels of strength and complexity, allowing woodworkers to choose the most appropriate option for their specific project.
There are several types of dovetail joints commonly used in woodworking, each with its own distinct characteristics and applications.
The most common type is the through dovetail joint, where the tails and pins extend completely through the thickness of both pieces of wood being joined. This type of joint is known for its strength and durability.
Another popular option is the half-blind dovetail joint, which conceals the end grain on one side to create a more aesthetically pleasing appearance.
Other variations include sliding dovetails, finger or box joints, and secret mitred dovetails.
Each type requires different techniques for creating dovetail joints, including precise measurements, careful marking out, and skillful cutting using a table saw or other suitable tools.
Strength and Durability
One can appreciate the strength and durability of well-crafted dovetail joints by considering how they resemble the interlocking branches of a mighty oak tree, providing stability and resilience to a wooden structure.
These joints are known for their exceptional strength due to their unique design. The interlocking shape creates a mechanical bond that prevents the joint from separating under stress. This makes dovetail joints ideal for applications where strength is crucial, such as in furniture construction or cabinetry.
Additionally, the angled sides of the dovetail provide increased resistance against lateral forces, further enhancing their durability.
Woodworkers employ various techniques to ensure the precision and accuracy required for creating strong dovetail joints, including using specialized jigs and cutting tools.
By mastering these woodworking techniques, craftsmen can create dovetail joints that not only exhibit exceptional strength but also stand the test of time.
Preparing Your Wood
This discussion will focus on the key points of choosing the right wood, cutting and preparing the pieces, and marking out the dovetail layout in order to effectively prepare your wood for dovetail joints.
Selecting the appropriate type of wood is crucial as it affects both the aesthetics and strength of the joint.
Cutting and preparing the pieces involves ensuring accurate measurements, straight edges, and smooth surfaces to achieve a precise fit.
Lastly, marking out the dovetail layout requires careful planning and attention to detail in order to create symmetrical and well-aligned joints.
Choosing the Right Wood
A crucial factor in the process of unlocking the art of dovetail joints with a table saw is selecting the appropriate type of wood, which significantly impacts the final outcome. Wood selection is important because different types of wood have varying densities and hardness, affecting their suitability for dovetail joints.
Additionally, considering the grain direction is crucial as it determines the joint’s strength and durability.
Here are four key factors to consider when choosing wood for dovetail joints:
- Wood species: Different wood species have distinct characteristics that affect their workability and appearance.
- Density: The density of the wood affects its strength and ability to hold together under pressure.
- Stability: Some woods are more prone to warping or shrinking, which can impact the integrity of your joint over time.
- Grain pattern: The direction and pattern of the wood grain influence how easily it can be cut and shaped.
Considering these factors ensures that you choose a suitable wood for your dovetail joints, resulting in strong, aesthetically pleasing connections between pieces of furniture or woodworking projects.
Cutting and Preparing the Pieces
In the previous subtopic, we discussed the importance of selecting the right wood for dovetail joints. Now, let’s delve into the next step in unlocking the art of dovetail joints: cutting and preparing the pieces.
This stage involves employing specific cutting techniques and joinery methods to ensure precise and accurate results. When it comes to cutting, it is crucial to use a table saw with a sharp blade that can provide clean and smooth cuts. Additionally, using appropriate measuring tools, such as a miter gauge or a crosscut sled, aids in achieving accurate dimensions for each piece.
Preparing the pieces involves carefully marking out the desired shape of each component before commencing with cutting. Taking time to create precise markings ensures proper alignment during assembly.
By mastering these cutting techniques and joinery methods, one can enhance their ability to create flawless dovetail joints that showcase both strength and beauty.
Marking Out the Dovetail Layout
Mastering the precise and meticulous process of marking out the dovetail layout is essential for achieving impeccable alignment and symmetry in the assembly of dovetail joints, akin to an artist meticulously sketching their masterpiece on a canvas.
Dovetail layout techniques involve carefully measuring and marking out the shape and size of each individual dovetail joint on both pieces of wood to ensure a precise fit. This can be done using various tools such as marking gauges, sliding bevels, or combination squares.
It is important to pay attention to detail during this process, as even slight errors can lead to misalignment and compromised joint strength. Common mistakes in dovetail layout include inaccurate measurements, inconsistent angles, or improper spacing between the tails and pins.
To avoid these errors, it is crucial to use accurate measuring tools and take time to double-check all markings before proceeding with cutting.
Setting Up Your Table Saw
This discussion will focus on the key points of adjusting the blade height and angle, installing the dovetail jig, and testing and fine-tuning when setting up a table saw for dovetail joints.
Adjusting the blade height and angle is crucial to ensure precise cuts that fit together seamlessly.
Installing the dovetail jig correctly is essential for accurate and efficient operation.
Finally, testing and fine-tuning the setup allows for adjustments to be made to achieve desired results in terms of tight-fitting joints.
Adjusting the Blade Height and Angle
To effectively unlock the art of dovetail joints with a table saw, one must first understand how to adjust both the blade height and angle. Proper adjustment of these two factors is crucial for achieving precise and clean cuts.
Before making any adjustments, it is important to ensure that the table saw is turned off and unplugged for safety reasons.
To adjust the blade height, locate the elevation crank or wheel on the front or side of the saw and turn it clockwise to raise the blade or counterclockwise to lower it. It is essential to make small adjustments and check frequently until reaching the desired height.
As for adjusting the blade angle, most table saws have a bevel adjustment mechanism located near the front or back of the saw. By loosening this mechanism, users can tilt their blades left or right according to their specific needs.
It is important to note that regular blade maintenance should also be performed to keep blades sharp and in good working condition while ensuring optimal cutting results.
Installing the Dovetail Jig
Installing the dovetail jig requires careful attention to detail and precise alignment, as even the slightest error can compromise the integrity of the joint. To ensure a successful installation, consider the following:
- Properly mounting the jig: Ensure that the jig is securely attached to the table saw’s fence or work surface. This will provide stability during operation.
- Adjusting for depth and width: Depending on your project requirements, adjust the jig to create dovetails of appropriate depth and width. This can be achieved by manipulating various knobs or screws on the jig.
- Dovetail jig maintenance: Regularly clean and inspect your dovetail jig for any signs of wear or damage. Lubricate moving parts as necessary to ensure smooth operation.
- Troubleshooting dovetail joints: If you encounter issues with your dovetail joints, such as loose fitting or misalignment, carefully review your setup and adjustments. Make any necessary corrections before proceeding.
By following these guidelines, you can enhance your understanding of installing a dovetail jig while maintaining its optimal performance for creating flawless dovetail joints.
Testing and Fine-Tuning
In order to ensure the accuracy and precision of dovetail joints, it is essential to thoroughly test and fine-tune the dovetail jig. Testing techniques play a crucial role in this process as they allow woodworkers to identify any potential flaws or inconsistencies in their joints.
One common testing technique involves creating sample joints using scrap wood before attempting the final joint on the actual workpiece. This provides an opportunity to adjust the settings on the table saw and make necessary adjustments to achieve a perfect fit.
Troubleshooting tips can also be helpful in overcoming challenges that may arise during testing. For instance, if the joints are too loose, adjusting the jig’s guide fingers can help create tighter connections. Conversely, if the joints are too tight, sanding or filing down the mating surfaces can alleviate this issue.
By employing these testing techniques and troubleshooting tips, woodworkers can ensure that their dovetail joints are of superior quality and meet their desired standards of craftsmanship.
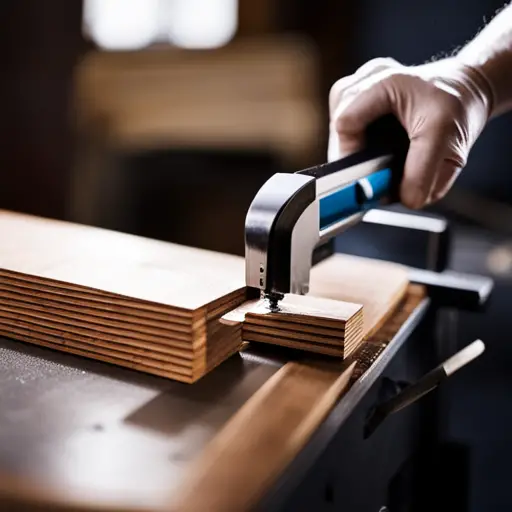
Cutting the Dovetail Joints
One effective method for cutting dovetail joints is utilizing a table saw. Cutting dovetail joints requires precision and skill, and a table saw provides the necessary accuracy to achieve clean and precise cuts. When using a table saw for cutting dovetails, there are various cutting techniques and troubleshooting tips that can enhance the quality of the joints.
To ensure accurate cuts, it is important to set up the table saw properly. This involves adjusting the blade height and angle according to the desired size and shape of the joint. Additionally, using a sharp blade with appropriate teeth configuration will help in achieving clean cuts without tear-out or splintering.
The following table presents three common cutting techniques used with a table saw for creating dovetail joints:
| Cutting Technique | Description |
|---|---|
| Through Dovetails | Both ends of the joint have visible tails and pins, resulting in an exposed joint on both sides of the workpiece. This technique is commonly used in furniture making. |
| Half-Blind Dovetails | One end of the joint has hidden pins that fit into tails cut on one side only. This technique is often used in drawer construction where one side remains unseen when assembled. |
| Sliding Dovetails |
When cutting dovetails with a table saw, troubleshooting tips can help address common issues such as tear-out or inconsistent spacing between tails and pins. These tips include adjusting feed rate, using zero-clearance inserts to reduce tear-out, and ensuring proper alignment of workpieces during cutting.
By employing these cutting techniques and troubleshooting tips while utilizing a table saw, woodworkers can unlock the art of creating precise dovetail joints with ease and accuracy.
Assembling and Finishing
Assembling and finishing the dovetail joints involves carefully fitting the tails into the corresponding pins, followed by sanding and applying a suitable finish to enhance the aesthetic appeal and durability of the joint.
The assembling techniques for dovetail joints require precision and attention to detail. Once the tails have been cut and shaped to match their respective pins, they are carefully slid together. This process can be challenging due to the tight fit of dovetail joints, requiring patience and finesse to achieve a seamless connection.
To ensure a successful assembly, woodworkers often employ various techniques such as dry fitting or using clamps to hold the pieces in place while checking for any misalignments or gaps. Adjustments may be necessary to achieve a tight fit without compromising the structural integrity of the joint.
After achieving a precise fit, sanding is crucial in refining the appearance and feel of the joint. Using progressively finer grits of sandpaper, woodworkers meticulously smooth out any rough edges or imperfections caused during cutting or assembly. This step not only enhances visual appeal but also ensures that there are no sharp edges that could cause injury.
Once sanded, applying an appropriate finish further enhances both aesthetics and durability. Common options include oil-based finishes like Danish oil or polyurethane varnish. These finishes protect against moisture damage while highlighting the natural beauty of wood grain patterns.
Assembling dovetail joints requires careful fitting of tails into pins using various techniques like dry fitting or clamping. Sanding refines its appearance while eliminating any roughness from previous steps. Finally, applying a suitable finish brings out both beauty and longevity in these intricate joints with enhanced protection against wear and tear over time.
Taking Your Skills to the Next Level
Developing a mastery of dovetail joinery opens the door to a world of limitless possibilities, where intricate patterns seamlessly intertwine and craftsmanship reaches new heights. Once you have honed your basic skills in assembling and finishing dovetail joints, it is time to take your skills to the next level by taking risks and exploring new techniques.
Taking risks is an essential part of advancing your expertise in dovetail joinery. Pushing the boundaries of what you already know allows you to discover innovative solutions and create unique designs. By challenging yourself with more complex projects, you can refine your technique and expand your repertoire.
This may involve experimenting with different wood types or attempting intricate joint designs that require precise cutting angles.
Exploring new techniques is another way to enhance your skill set in dovetail joinery. One method worth considering is using a table saw instead of traditional hand tools for cutting the joints. The table saw offers greater precision and efficiency, enabling you to achieve tighter-fitting joints with less effort. Additionally, incorporating power tools into your workflow can save time without compromising quality.
To truly excel in dovetail joinery, it is crucial to cultivate patience and perseverance as you navigate through challenges. Mistakes will inevitably happen along the way, but learning from them will help you grow as a craftsman. Dedication to continuous learning and improvement will fuel your passion for this art form.
Taking risks and exploring new techniques are vital steps towards mastering dovetail joinery. Embracing challenges, such as attempting complex projects or incorporating power tools like a table saw, will expand both your skills and creativity in this craft. Through dedication and perseverance, you can unlock the full potential of this timeless woodworking technique.
Frequently Asked Questions
How long does it take to master the skill of creating dovetail joints with a table saw?
Mastering the skill of creating dovetail joints with a table saw requires dedicated practice and patience.
Techniques for improving accuracy include ensuring precise measurements, using sharp cutting tools, and employing proper safety precautions.
Common challenges faced when learning this skill include achieving consistent spacing between the pins and tails, maintaining straight cuts, and avoiding tear-out.
Overcoming these challenges can be achieved through careful attention to detail, practicing on scrap wood, and seeking guidance from experienced woodworkers or instructional resources.
Can dovetail joints be made with hand tools instead of a table saw?
Hand tools, like masterful painters’ brushes, possess a unique charm and skill in the creation of dovetail joints.
The advantages of using hand tools for crafting these joints lie in their ability to provide a tactile connection between craftsman and material, fostering a deeper sense of control and precision.
To achieve accuracy with hand tools, one must exercise patience and employ techniques such as careful marking, precise sawing, and refined chisel work.
These methods ensure that each joint is meticulously crafted to fit snugly together, resulting in an exquisite piece of woodworking artistry.
What is the recommended type of wood for creating dovetail joints?
Recommended types of wood for creating dovetail joints include hardwoods such as oak, maple, and cherry. These woods are known for their durability, stability, and ability to hold intricate joinery.
When selecting wood for dovetail joints, it is important to choose straight-grained pieces with minimal knots or defects. This ensures a cleaner and more precise joint.
Additionally, using sharp chisels and a fine-toothed saw can help achieve precise dovetail joints by allowing for clean cuts and smooth fitting of the joint components.
Are there any safety precautions that should be taken when using a table saw for creating dovetail joints?
The careful handling of a table saw is paramount in ensuring both personal safety and the successful creation of dovetail joints.
Table saw safety precautions must be strictly adhered to, such as wearing appropriate protective gear, keeping hands away from the blade, and using push sticks or featherboards for material control.
Proper technique is of utmost importance to minimize the risk of accidents and achieve accurate and precise results when working with a table saw.
What are some common mistakes to avoid when cutting dovetail joints with a table saw?
Common mistakes to avoid when cutting dovetail joints with a table saw include:
- Improper setup of the saw for accurate cuts
- Using an incorrect blade type
- Neglecting to use a dovetail jig or guide
These errors can result in:
- Poorly fitting joints
- Inaccurate angles
- Uneven spacing between the pins and tails
To achieve precise dovetail cuts, it is essential to:
- Meticulously prepare the equipment
- Select suitable blades
- Utilize appropriate guiding tools.
Conclusion
In conclusion, mastering the art of dovetail joints requires a deep understanding of the technique and precision in execution. By following the steps outlined in this article, you can unlock the potential of your table saw to create beautifully crafted joints.
With the right tools and materials, proper wood preparation, and careful setup of your table saw, you can confidently cut dovetail joints that fit snugly together.
Assembling and finishing your project will bring satisfaction as you witness the seamless connection of each piece. Take these skills to the next level by exploring more complex designs and pushing the boundaries of your craftsmanship.


