
In the realm of woodworking, box joint dadoes are a fundamental technique that can elevate one’s craftsmanship to new heights. Like puzzle pieces fitting together seamlessly, these joints create strong and visually appealing connections between wooden components.
This step-by-step guide aims to provide a comprehensive understanding of box joint dadoes, enabling woodworkers to master this technique with precision and finesse.
By utilizing the right tools and materials, marking and measuring accurately, and setting up a router or table saw properly, woodworkers can achieve flawless box joint dado cuts.
The subsequent sections will delve into each stage in detail, covering essential techniques for cutting, assembly, and finishing. Additionally, advanced techniques and troubleshooting tips will be explored for those seeking to push their skills further.
Whether you’re a seasoned woodworker or just starting out on your craft journey, this article caters to an audience eager to grasp the intricacies of mastering box joint dadoes. Prepare to embark on a knowledge-filled adventure that will empower you to create stunning woodworking projects with confidence and expertise.
Key Takeaways
- Box joint dadoes provide additional strength and visual appeal to woodworking projects.
- Accurate measurement and proper tool setup are crucial for creating precise box joint dadoes.
- The right tools for creating box joint dadoes include a table saw with a dado blade or a router with a straight bit.
– Wood selection for box joint dadoes should consider factors such as hardness, stability, and grain pattern.
Understanding Box Joint Dadoes
Box joint dadoes are a fundamental technique in woodworking that allow for the creation of strong and precise joints, making them an essential skill for any woodworker seeking to create high-quality furniture or cabinetry. Understanding the benefits of using box joint dadoes in woodworking projects is crucial for achieving professional results.
One key benefit of using box joint dadoes is their ability to provide additional strength to the overall structure. The interlocking nature of these joints creates a larger surface area for glue application, resulting in a stronger bond between the wooden pieces. This added strength makes box joint dadoes ideal for constructing furniture or cabinetry that needs to withstand heavy loads or constant use.
Additionally, box joint dadoes offer excellent precision when it comes to aligning and joining pieces together. The square shape of the fingers and notches allows for accurate fitting, ensuring seamless connections without any unsightly gaps. This level of precision gives woodworkers the ability to create clean lines and smooth surfaces on their finished projects.
However, there are common mistakes that woodworkers should avoid when creating box joint dadoes. One common error is poor measurement accuracy during layout and cutting processes. Even a slight discrepancy can lead to ill-fitting joints that compromise the structural integrity of the piece. It is crucial to take precise measurements and make accurate cuts to achieve tight-fitting joints.
Another mistake to avoid is neglecting proper tool setup. Not setting up tools correctly can result in uneven cuts or inaccurate spacing between fingers and notches, leading to improper alignment during assembly.
Understanding box joint dadoes is vital for any woodworker aiming for superior craftsmanship. The benefits they offer in terms of strength and precision make them indispensable techniques in woodworking projects. By avoiding common mistakes such as measurement inaccuracies and improper tool setups, woodworkers can master this technique effectively and produce high-quality furniture or cabinetry with confidence.
Gathering the Right Tools and Materials
This discussion will focus on two key points: essential tools for creating box joint dadoes and choosing the right wood for your project.
To create box joint dadoes, you will need a table saw with a dado blade or a router with a straight bit, as well as clamps to hold the wood in place during cutting.
When it comes to selecting the right wood, it is important to consider factors such as hardness, stability, and grain pattern to ensure optimal results for your box joint dadoes.
Essential Tools for Creating Box Joint Dadoes
To create precise box joint dadoes, a woodworker must possess a comprehensive set of essential tools that enable meticulous measurements and accurate cuts.
The first tool required is a router, as it allows for precise cutting and shaping of the joints. When choosing the right router, one should consider its power and speed capabilities, as well as its compatibility with different bit sizes.
Additionally, alternative joinery methods such as using a table saw or hand tools can be employed if a router is not available. These methods may require more time and effort, but can still yield satisfactory results.
It is important to note that regardless of the method chosen, attention to detail and precision are crucial for achieving high-quality box joint dadoes.
Choosing the Right Wood for Your Project
Choosing the appropriate type of wood for a woodworking project involves considering various factors, but how can one determine which wood species will yield the desired aesthetic and structural qualities?
Wood selection is a crucial step in ensuring the success of any project. When choosing the right wood, it is essential to consider the specific requirements of the project. Factors such as durability, stability, and appearance should all be taken into account.
For box joint dadoes, it is important to select a wood species that is strong enough to withstand the stresses imposed on it while also providing an attractive finish. Some popular choices for box joint dadoes include hardwoods like oak or maple, as they offer both strength and visual appeal. Softwoods like pine can also be used but may require additional support due to their lower density.
Ultimately, selecting the right wood species will ensure a successful outcome for your box joint dado project.
Marking and Measuring
Marking and measuring is an essential step in the process of mastering box joint dadoes, as it ensures accurate and precise cuts for a seamless fit.
To achieve measuring accuracy, there are different marking techniques that can be employed:
- Measure twice, cut once: This age-old adage holds true in woodworking as well. Taking the time to double-check measurements before making any cuts can prevent costly mistakes and wasted materials.
- Use a combination square: A combination square is a versatile tool that can be used for both marking and measuring. Its adjustable head allows for precise angle measurements, ensuring the accuracy of your box joint dadoes.
- Create reference lines: Before making any cuts, it’s important to establish clear reference lines on your workpiece. These lines act as guides and help maintain consistency throughout the project.
- Utilize a marking knife: A marking knife has a fine point that creates crisp and accurate lines on wood surfaces. By scoring along these lines before cutting, you create an indentation that acts as a guide for your saw blade.
By employing these measuring techniques and utilizing the right tools, you can ensure precision in your box joint dadoes. Remember to take your time during this crucial step to avoid costly errors later on in the process.
With accurate measurements and markings, you’ll be well on your way to mastering box joint dadoes with ease and confidence.
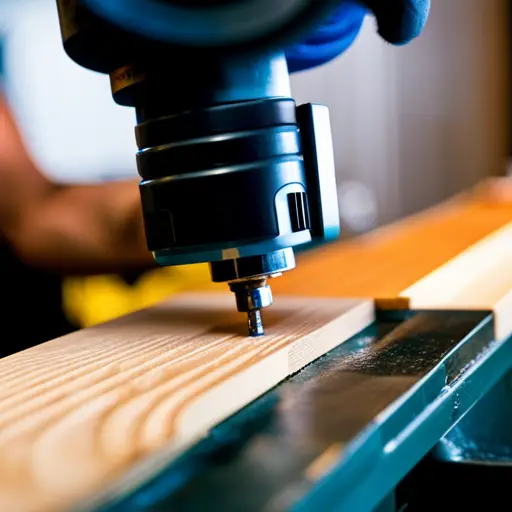
Setting Up Your Router or Table Saw
Setting up your router or table saw is a critical aspect of the process, as it lays the foundation for smooth and precise cuts that will ultimately result in a seamless fit.
Whether you choose to use a router or a table saw for creating box joint dadoes, proper setup is essential to ensure accurate and consistent results.
When setting up your router, there are several key factors to consider. First, ensure that the router bit is securely installed and properly aligned with the fence or guide. This will prevent any unwanted movement during operation and ensure that the cuts are made at the desired depth and width.
Additionally, it is crucial to set the appropriate speed for your specific material and bit type. Higher speeds are typically used for softer woods, while lower speeds are recommended for harder materials.
In terms of table saw setup, attention should be given to both the blade and the fence. The blade should be sharp and properly aligned with the miter gauge slots to avoid any binding or wobbling during cutting. It is important to adjust the height of the blade so that it matches the intended depth of cut for your box joint dadoes.
Moreover, ensuring that the fence is parallel to the blade is vital for achieving precise cuts with consistent widths.
Properly setting up your router or table saw not only guarantees accurate measurements but also enhances safety by minimizing potential accidents caused by misaligned tools or improper operating conditions.
By following these guidelines when setting up either tool, you can achieve optimal results in creating box joint dadoes with precision and efficiency.
Cutting the Box Joint Dadoes
To create the box joint dadoes, a series of precise and controlled cuts are made using either a router or table saw, resulting in perfectly interlocking grooves that form the foundation of a strong and seamless joint.
When cutting the box joint dadoes, it is important to employ proper cutting techniques and follow joinery tips to ensure accurate and clean results.
One key cutting technique is to use a specialized box joint jig for your router or table saw. This jig allows for consistent spacing between each cut, ensuring uniformity in the size of the dadoes. Additionally, using a sharp blade or bit is crucial for achieving clean cuts without tear-out or splintering.
When setting up your router or table saw for cutting the dadoes, it is essential to accurately position the fence or guide. This ensures that each cut is made at precisely the right depth and angle. Taking time to measure and mark the desired location of each cut beforehand can greatly help in achieving accuracy.
During the cutting process, it is recommended to make multiple shallow passes rather than trying to remove too much material in one go. This helps maintain control over the tool and prevents any potential damage or mistakes.
Furthermore, employing appropriate safety measures such as wearing protective goggles and securing workpieces firmly can help prevent accidents while working with power tools.
Mastering box joint dadoes requires careful attention to detail and adherence to proper cutting techniques. By utilizing a specialized jig, maintaining sharp blades/bits, accurately positioning guides/fences, making multiple shallow passes, and emphasizing safety precautions throughout the process; one can achieve precise and flawless interlocking grooves that form strong joints with ease.
Assembly and Finishing
Assembling the perfectly interlocking grooves is like fitting together the intricate pieces of a puzzle, creating a seamless and strong joint that showcases the craftsmanship and precision of the woodworker.
Once the box joint dadoes have been cut with utmost accuracy, it is time to move on to the assembly process. This step requires careful attention to detail and adherence to specific techniques in order to achieve optimal results.
To begin with, it is crucial to ensure that all the joints fit snugly without any gaps or misalignments. This can be achieved by dry-fitting the pieces together before applying any glue or fasteners. By doing so, any necessary adjustments can be made prior to permanent assembly.
There are several assembly techniques that can be employed depending on personal preference and desired aesthetic outcome. One common method involves using wood glue applied along each mating surface of the joint. Clamping pressure is then applied evenly across all sides until the glue has fully cured, ensuring a strong bond between the pieces.
In addition to glue, some woodworkers may choose to reinforce their box joint dadoes with mechanical fasteners such as nails or screws for added strength. These should be strategically placed in inconspicuous locations in order to preserve the visual appeal of the joint.
Once assembled, it is important to allow sufficient time for all adhesives and finishes to fully dry before moving onto applying a finish. The choice of finish will depend on personal preference and intended use of the piece but may include options such as varnish, lacquer, or oil-based finishes.
Applying a finish not only enhances the appearance of the completed project but also protects it from potential damage caused by moisture and normal wear and tear. It is recommended to follow manufacturer instructions when applying finishes, ensuring proper ventilation and multiple coats if necessary for optimal coverage.
By following these assembly techniques and properly applying a finish, one can truly master box joint dadoes while creating durable and visually appealing woodworking projects.
Advanced Techniques and Troubleshooting
Advanced woodworking techniques and troubleshooting methods can help woodworkers overcome challenges and achieve impeccable results when working with box joint dadoes in their projects.
One common mistake when creating box joint dadoes is not properly aligning the boards during the cutting process. This can result in uneven joints that do not fit together snugly. To avoid this, it is important to carefully measure and mark the location of each cut, ensuring that they are aligned perfectly.
Another common mistake is using dull or improperly set saw blades. Dull blades can cause tear-out or splintering along the edges of the dado cuts, resulting in a less-than-perfect fit. It is crucial to use sharp blades specifically designed for cutting dadoes and ensure they are properly set for optimal performance.
To achieve a perfect fit in box joint dadoes, there are several tips that woodworkers can follow. First, it is essential to make precise measurements and use high-quality materials to ensure accurate cuts. Additionally, using a sacrificial board underneath the workpiece can help minimize tear-out and protect the surface of the project.
Furthermore, taking extra care during assembly by applying even pressure when joining the pieces together will ensure a tight fit. Sanding or planing any rough edges before assembly can also improve the overall appearance of the joint.
Mastering advanced woodworking techniques and troubleshooting methods is vital for achieving flawless results when working with box joint dadoes. By avoiding common mistakes such as improper alignment and using dull blades, woodworkers can create tight-fitting joints that enhance both structural integrity and aesthetic appeal in their projects.
Implementing tips like precise measurements, high-quality materials, sacrificial boards, even pressure during assembly, and proper finishing techniques will further contribute to achieving impeccable box joint dadoes.
Frequently Asked Questions
How do I choose the right type of wood for box joint dadoes?
To choose the appropriate wood for box joint dadoes, several factors must be considered. The type of wood should possess sufficient hardness and stability to withstand the forces exerted during cutting and assembly.
Hardwoods such as oak or maple are commonly used due to their durability. However, softer woods like pine can also be used with caution.
Alternatively, one can explore using alternative methods for cutting box joint dadoes, such as using a router or table saw with a dado blade.
Can box joint dadoes be used for joinery in other woodworking projects?
Box joint dadoes can be used for joinery in various woodworking projects, offering both advantages and disadvantages compared to other techniques.
One advantage is their strength and durability, as the interlocking fingers provide a sturdy connection.
However, box joint dadoes require precise measurements and careful execution to achieve clean and professional results.
Tips for achieving this include using a high-quality dado blade set, ensuring accurate setup of the table saw, and practicing proper cutting techniques to maintain tight tolerances.
What safety precautions should I take when using a router or table saw for cutting box joint dadoes?
When using a router or table saw for cutting box joint dadoes, it is crucial to prioritize safety. Similar to navigating treacherous terrain, precautions must be taken to avoid potential hazards.
To ensure router safety, one should:
- Wear appropriate protective equipment
- Secure the workpiece firmly in place
- Maintain a steady hand while operating the tool
Likewise, table saw safety necessitates:
- Using a push stick or block to keep hands away from the blade
– Adjusting the blade height accordingly.
Are there any alternative methods for cutting box joint dadoes without a router or table saw?
Alternative methods for cutting box joint dadoes without a router or table saw include using hand tools. Hand tools such as chisels and hand saws can be used to create precise and detailed box joint dadoes.
Chisels can be used to remove material and create the necessary grooves, while hand saws can be used to cut the joints themselves.
These methods require patience, skill, and attention to detail, but they offer a viable option for those without access to power tools.
How can I ensure that my box joint dadoes are perfectly aligned and fit together snugly during assembly?
To achieve tight fitting box joint dadoes, follow these tips:
- Firstly, ensure precise measurements and use a sharp cutting tool.
- Secondly, maintain uniform spacing between the dadoes to avoid inconsistencies.
- Thirdly, use clamps or a jig to secure the workpieces during cutting for accuracy.
Additionally, avoid common mistakes such as rushing the process or using excessive force which can lead to misalignment.
By adhering to these guidelines, you can assemble box joint dadoes that fit snugly and align perfectly.
Conclusion
In conclusion, mastering box joint dadoes requires precision and attention to detail. By understanding the concept of box joint dadoes and gathering the necessary tools and materials, one can successfully create strong and aesthetically pleasing joints.
Marking and measuring accurately is crucial for a perfect fit, while setting up the router or table saw properly ensures clean cuts. Assembly and finishing techniques complete the process, resulting in a professional-looking project.
With practice and patience, you can achieve box joint dadoes that fit together like a well-tuned orchestra, creating a harmonious masterpiece.


